
Desserts
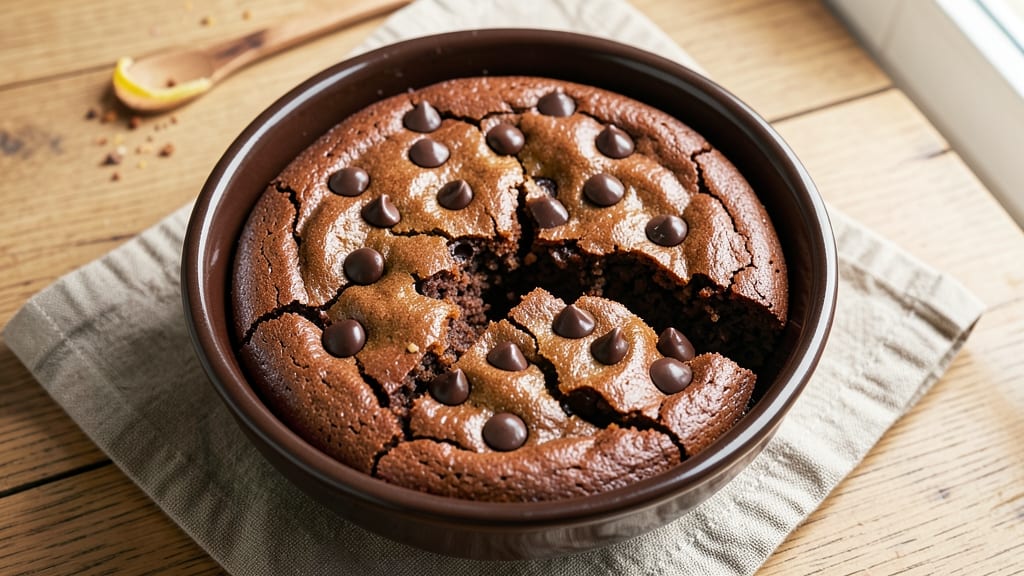
This chewy brownie recipe with chocolate chips delivers the perfect balance of fudgy cracks and melty chocolate rivers—no cakey texture in sight. The secret lies in using melted butter instead of creamed, plus a precise mix of cocoa powder and chocolate chips that creates that signature chew.
I’ve baked these hundreds of times, and this method never fails to impress, even with picky eaters.
What sets these brownies apart is the technique: a single bowl, minimal mixing, and a high-heat bake that develops deep, caramelized flavor. The chocolate chips stay gooey while the edges form those coveted cracks, and the texture remains moist for days.
This recipe is foolproof for beginners but delivers restaurant-quality results every time.
By the time they emerge from the oven, you’ll have a pan of rich, glossy brownies with crisp edges and a fudgy interior that practically melts in your mouth.
The aroma alone will have everyone gathering around the kitchen. Serve warm with a scoop of vanilla ice cream or dusted with powdered sugar for that bakery-fresh finish.
Optional upgrades include folding in toasted walnuts for crunch or a pinch of flaky sea salt to enhance the chocolate flavor. Leftovers keep well at room temperature for up to 5 days, though they rarely last that long. Let’s get baking!
Ingredients for chewy brownie recipe with chocolate chips
Melted butter, rich cocoa, and chocolate chips—just 12 ingredients for restaurant-quality chewy brownies.
| Ingredient | Amount | Notes |
|---|---|---|
| Unsalted Butter 🧈 | 1 cup | Melted, cooled slightly |
| Granulated Sugar 🍚 | 1 ½ cups | Packed firmly |
| Unsweetened Cocoa Powder 🍫 | ¾ cup | Dutch-processed preferred |
| All-Purpose Flour 🌾 | ½ cup | Sifted for even texture |
| Large Eggs 🥚 | 2 whole | Room temperature |
| Vanilla Extract 🌿 | 1 tbsp | Pure extract preferred |
| Semisweet Chocolate Chips 🍫 | 1 ½ cups | High-quality, 60% cacao |
| Salt 🧂 | ½ tsp | Fine sea salt |
| Baking Powder 🍞 | ¼ tsp | Aluminum-free |
| Toasted Walnuts 🌰 | ½ cup | Optional, chopped |
| Flaky Sea Salt 🧂 | 1 tbsp | For garnish, optional |
| Powdered Sugar 🍚 | ¼ cup | For dusting, optional |
The cocoa powder is where the magic happens. Dutch-processed gives you that deep, velvety flavor without bitterness, but regular cocoa works too if that's what you've got. I always grab Ghirardelli or Hershey's Special Dark from the grocery store—both are reliable. For the chocolate chips, Ghirardelli or Lindt are my go-tos, but any high-quality brand with at least 60% cacao will do. The butter? Unsalted is a must—salted can make the brownies taste uneven. Melt it gently so it doesn't scorch, then let it cool just until it's warm to the touch.
No Dutch-processed cocoa? Natural cocoa powder at the same amount works, but they'll be slightly more bitter. Running short on chocolate chips? Chop a 6-ounce bar of chocolate into chunks—just make sure it's the same percentage cacao. The walnuts are optional, but if you use them, toast them first in a dry pan over medium heat until fragrant. For extra richness, fold in an extra 0.25 cup of chocolate chips if you're feeling indulgent. And if you're worried about the texture being too dense, don't be—the precise ratio of flour to cocoa keeps them perfectly fudgy.
These brownies are best served warm, straight from the oven, but they keep well at room temperature for 5 days in an airtight container. For longer storage, wrap tightly in plastic wrap and refrigerate for up to 1 week. If you're making ahead, bake them a day early and let them sit at room temperature—this actually enhances the flavor as the chocolate chips soften. Garnish with flaky sea salt and powdered sugar right before serving for that bakery-fresh touch. Leftovers reheat beautifully in the microwave for 10-15 seconds, though they're usually gone before that happens.
Why You'll Love This Recipe
- Same batter, endless uses: slice into bars for a quick snack, cut into squares for potlucks, or press into a loaf pan for a "brownie cake" that disappears faster than you can say "dessert."
- Foolproof Mixing: I swear by the 30-second "melt-and-stir" method—just toss butter, sugar, and cocoa in a bowl, microwave until smooth, then fold in eggs and flour. No sifting, no mess, no stress.
- Melty Chocolate Magic: That first bite? Rich, fudgy, with pockets of gooey chocolate chips melting into the dense, crackly top. The cocoa powder gives it depth—like a hug from a dessert you didn’t know you needed.
- Weeknight or Party Star: Same batter, endless uses: slice into bars for a quick snack, cut into squares for potlucks, or press into a loaf pan for a "brownie cake" that disappears faster than you can say "dessert."
Step-by-step instructions for fudgy chocolate chip brownies
Here's the method for perfectly chewy brownies with that signature crackly top and molten chocolate rivers.
Melt and Cool the Butter
In a microwave-safe bowl, melt the 1 cup unsalted butter in 30-second intervals, stirring between each, until completely smooth. I prefer microwave melting because it gives me precise control over the temperature. Let the melted butter cool for 5 minutes until it reaches about 100°F—it should be warm to the touch but not hot.
This cooling step is crucial. Too-hot butter can cook the eggs immediately when mixed, leading to dense brownies. If you're unsure about the temperature, test it by touching a drop on your wrist—it should feel warm but not scalding. The butter's temperature affects every step that follows, so don't rush this part.
Mix Wet Ingredients
In a large mixing bowl, whisk together the cooled butter, 1.5 cups granulated sugar, and 0.75 cup unsweetened cocoa powder until completely smooth. The mixture should be thick and glossy with no visible lumps of sugar or cocoa. I like to press the sugar into the butter with a spatula first to break up any clumps before whisking.
Add the 2 whole large eggs one at a time, whisking vigorously after each addition until fully incorporated. Stir in the 1 tbsp vanilla extract and 0.5 tsp salt. The batter should be thick and fudgy at this stage—almost like a very stiff pudding. If it looks too thin, you might have overmelted the butter or used too much egg. This is the foundation for that classic chewy texture we're after.
Combine Dry Ingredients
In a separate bowl, sift together the 0.5 cup all-purpose flour and 0.25 tsp baking powder. This sifting step prevents lumps and ensures even distribution throughout the batter. Gently fold the dry ingredients into the wet mixture using a spatula, mixing just until combined. Be careful not to overmix—you should still see some flour streaks. Overmixing develops gluten and can make your brownies tough.
Fold in the 1.5 cups semisweet chocolate chips and, if using, the 0.5 cup toasted walnuts. The chocolate chips should be evenly distributed throughout the batter. I like to use my hands for this part to ensure each spoonful gets its fair share of chocolate. The walnuts add a nice crunch contrast, but they're optional—don't skip them if you love texture.
Prepare and Bake the Brownies
Preheat your oven to 350°F and line an 8x8-inch baking pan with parchment paper, leaving an overhang on all sides for easy removal. Spread the batter evenly into the prepared pan, using a spatula to smooth the top. The batter will be thick, so don't worry if it doesn't spread completely—it will rise slightly in the oven.
Bake for 25-30 minutes, or until a toothpick inserted in the center comes out with a few moist crumbs but no wet batter. The edges should be set, but the center should still look slightly underdone. This is crucial for achieving that perfect chewy texture. If you're unsure, err on the side of underbaking—brownies continue cooking slightly after removal from the oven.
Cool and Finish
Remove the brownies from the oven and let them cool in the pan for 10 minutes. Then, using the parchment overhang, carefully lift the brownies out of the pan and place them on a wire rack to cool completely. This cooling step is important—it allows the brownies to set properly and develop those beautiful fudgy cracks on top.
Once completely cool, dust the top with 0.25 cup powdered sugar and sprinkle with 1 tbsp flaky sea salt. The powdered sugar adds a delicate sweetness that balances the rich chocolate, while the flaky salt enhances all the flavors. Cut into squares and serve warm for the ultimate experience—each bite should deliver that perfect combination of chewy texture, melty chocolate rivers, and a satisfying crackly top.
Pro Tips For Making Chewy Brownie Recipe With Chocolate Chips
- Melt Butter Slowly: If you’re using unsalted butter, melt it just until it’s liquid—no need to brown it. I learned this the hard way: overheating butter adds a weird, off-flavor that ruins the rich chocolate taste, and you’ll spend the whole baking time smelling burnt caramel instead of pure cocoa.
- Sift the Cocoa: Don’t just dump that cocoa powder straight from the bag—sift it first. Clumps in unsweetened cocoa make for uneven texture, and you’ll end up with dry spots or a cakey bite instead of that signature chewy center. A fine-mesh sieve takes 30 seconds and makes a real difference.
- Stop at Slightly Underbaked: The edges should look set, but the center should still have a wobble when you jiggle the pan. I used to pull them out too early, and they’d end up dense and dry. Let them sit 5 minutes in the pan—yes, even if you’re impatient like me—then transfer to a rack. They’ll firm up perfectly.
- Use Room-Temp Eggs: Cold eggs mix unevenly and can create pockets of dryness in the batter. Take them out 30 minutes before mixing, or even pop them in warm water for 5 minutes if you’re in a rush. Smooth batter = even baking, and that’s how you get the classic fudgy-chewy contrast.
Troubleshooting your chewy brownie recipe with chocolate chips
Crackly Top Fail
If your brownies emerge without those coveted fudgy cracks, you likely overbaked them. Pull them out when a toothpick comes out with moist crumbs—not clean. The cracks form during cooling as the brownie contracts.
For extra cracks, try baking at 375°F for 20-25 minutes instead of 350°F. The higher heat creates more surface tension as they cool. 🔥
Dense or Cakey Texture
Overmixing or using too much flour turns brownies dense. Measure flour by spooning it into the cup and leveling—don’t scoop directly from the bag. For extra insurance, replace 2 tbsp of flour with 2 tbsp of cocoa powder (keep total cocoa at 0.75 cup).
Also, ensure your butter is cooled to 100°F before mixing—hot butter cooks the eggs prematurely, leading to a cakey result.
Chocolate Chips Stay Hard
Hard chocolate chips usually mean the oven wasn’t hot enough or the brownies cooled too quickly. First, verify your oven’s accuracy with an oven thermometer—many run 25°F hotter or cooler than set. Second, let brownies cool slowly in the pan for 15 minutes before transferring to a rack.
The residual heat will melt the chips. For extra insurance, fold in 1 tbsp of milk or cream with the chocolate chips—they’ll soften faster. 💫
Brownies Stick to Pan
Use parchment paper with overhangs for easy removal, but if they still stick, your pan might be too large or the batter too wet. For an 8x8-inch pan, the batter should fill it ¾ full—don’t overfill.
If using a 9x9-inch pan, reduce baking time by 3-5 minutes. Grease the pan lightly with butter before adding parchment for extra insurance. For stubborn cases, run a hot knife under the edges before lifting.
Uneven Baking
Hot spots in your oven cause uneven edges. Rotate the pan halfway through baking (after 15 minutes) for even heat distribution. If your oven has hot corners, place a silicon baking mat under the parchment to create a slight barrier.
For convection ovens, reduce temperature by 25°F and bake time by 2-3 minutes. Always preheat for at least 15 minutes to ensure consistent heat. ⚡
Bitter or Bland Flavor
Bitterness often comes from natural (not Dutch-processed) cocoa or overbaking. Use Dutch-processed cocoa for smoother flavor, and bake until the toothpick test passes (moist crumbs, not wet batter). For bland brownies, ensure your chocolate chips are high-quality (60% cacao or higher) and toasted walnuts (if used) are fresh.
A pinch of espresso powder (½ tsp) deepens chocolate flavor without bitterness.
Nutrition facts
Frequently asked questions
Why do your chewy brownies need melted butter instead of creamed butter?
Melted butter creates a denser, fudgier texture by preventing air incorporation during mixing. When you cream butter and sugar, you trap air—which makes brownies cakey. The melted butter method keeps the crumb tight and chewy while developing rich, caramelized flavor. This is the secret behind that signature crackly top and melty interior!
Can I substitute dark chocolate chunks for chocolate chips?
Use 6 ounces of high-quality dark chocolate (60-70% cacao), chopped into ½-inch pieces. For best results, melt the chocolate slightly (just until it starts to soften) before folding it into the batter. This ensures the chocolate stays gooey in the center while creating dramatic rivers throughout. The texture will be slightly more rustic but equally delicious.
How do I adjust the recipe for a 9x13-inch pan?
For a 9x13-inch pan, use the same batter but increase baking time to 25-30 minutes. The larger surface area means the brownies will spread more and bake faster. Line the pan with parchment paper and reduce the oven temperature by 25°F (to 325°F) to prevent overbaking. Cut into 1.5-inch squares for perfect portions. The edges will be slightly thinner but still chewy!
Why do my brownies turn out cakey instead of chewy?
Cakey brownies usually result from overmixing, too much flour, or using cold butter. Measure flour by spooning it into the cup and leveling—don’t scoop directly from the bag. Also, ensure your butter is cooled to 100°F before mixing (test by touching a drop on your wrist). For extra insurance, replace 2 tbsp of flour with 2 tbsp of cocoa powder to maintain the perfect chewy texture.
Can I make these brownies gluten-free?
Yes! Swap the all-purpose flour for a 1:1 gluten-free baking flour blend (like Bob’s Red Mill or King Arthur). For best results, add ½ tsp xanthan gum to the dry ingredients to mimic gluten’s structure. The texture will be slightly denser but still chewy. Test your gluten-free flour blend first—some brands absorb more liquid than others. Always check for a rise in the center when testing doneness.