
Desserts
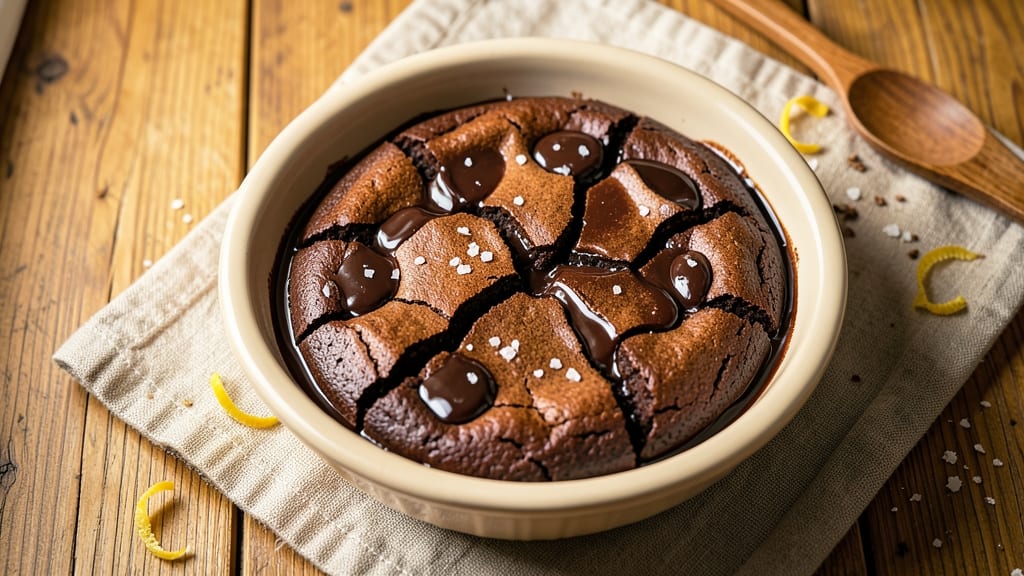
A brownie recipe using melted chocolate chips transforms simple ingredients into a decadent dessert with rich, fudgy texture and pockets of molten chocolate. The key lies in melting the chocolate chips properly—just enough heat to create smooth, glossy pools that stay gooey in every bite.
This method ensures no lumps, no dryness, and maximum chocolate satisfaction with minimal effort. The process starts with high-quality chocolate chips melted over a double boiler, then folded into a warm batter that promises a dense, crackly top and a center so soft it nearly slides off the fork.
A few simple ingredients—flour, sugar, eggs, and butter—come together in a way that feels indulgent yet approachable, perfect for both beginners and seasoned bakers.
What you’ll end up with is a pan of ultra-fudgy brownies, their edges slightly crisp and their centers rich with chocolate chunks that melt at the first touch. The aroma alone—warm cocoa and caramelized sugar—will have everyone gathering around the kitchen as soon as they’re done baking.
Serve warm with a dusting of powdered sugar, a scoop of vanilla ice cream, or a sprinkle of sea salt for a sophisticated finish. Here’s how to make them perfect every time.
Ingredients for brownie recipe using melted chocolate chips
High-quality chocolate chips and classic pantry staples create decadent, ultra-fudgy brownies with gooey centers.
| Ingredient | Amount | Notes |
|---|---|---|
| Dark Chocolate Chips 🍫 | 1 ½ cups | High-quality, 70% cocoa or higher |
| Unsalted Butter 🧈 | 1 cup | Cold, cubed for even melting |
| Granulated Sugar 🍚 | 1 ¼ cups | White or light brown preferred |
| Large Eggs 🥚 | 2 whole | Room temperature for smooth batter |
| All-Purpose Flour 🌾 | ¾ cup | Sifted for light texture |
| Vanilla Extract 🌿 | 1 tsp | Pure, high-quality preferred |
| Salt 🧂 | ½ tsp | Fine sea salt preferred |
| Powdered Sugar 🍚 | ¼ cup | For dusting, optional |
| Vanilla Ice Cream 🍦 | 1 cup | For serving, optional |
| Flaky Sea Salt 🧂 | 1 tbsp | For garnish, optional |
The chocolate chips make or break these brownies. Ghirardelli or Guittard are my go-tos—they melt perfectly without burning. Avoid anything with less than 70% cocoa; the flavor will be too sweet and lack depth. Butter matters too: unsalted is non-negotiable here, and it should be cold when you start melting it. If your grocery store's chocolate chips are past their prime (dull color, stale smell), skip them—Trader Joe's or Williams Sonoma always have fresh stock. For the sugar, white or light brown both work, but brown adds subtle caramel notes that pair beautifully with the chocolate.
No dark chocolate chips? Semisweet or milk chocolate chips will work, but the texture won't be as rich. Short on butter? Coconut oil works in a pinch, but it changes the flavor slightly—stick with butter for that classic taste. The vanilla extract should be pure, not imitation. If you're out, vanilla bean paste is a great upgrade. For the flour, don't substitute cake flour—it's too fine and will make these too crumbly. The powdered sugar and flaky sea salt are optional but highly recommended for that restaurant-quality finish. Pro tip: if you're using vanilla ice cream for serving, grab a high-quality brand like Ben & Jerry's or Häagen-Dazs—the flavor difference is noticeable.
Store the brownies in an airtight container at room temperature for up to 3 days, though they're best enjoyed fresh. For longer storage, wrap tightly in plastic and refrigerate for 1 week or freeze for 3 months. The chocolate chips will soften slightly when warm, so let them sit at room temperature for 10 minutes before serving. These reheat beautifully—30 seconds in the microwave brings back that gooey center. Portion into individual squares for easy serving, and always make a double batch—they disappear fast.
Why You'll Love This Recipe
- No-Weigh Fudge Factor: I melt the chocolate chips straight in the microwave—no fancy thermometer, no stress. The butter and sugar mix in the same bowl while it cools, and honestly? The eggs just come straight from the carton. Minimal cleanup, maximum brownie.
- Fudgy-Crackly Magic: That crispy edge with the gooey center? It’s all in the melted chocolate chips—no waiting for bars to chop. The dark chocolate’s bittersweet punch cuts through the richness, and the flour just enough to hold it together (not too cakey, not too dense).
- Party or Pajamas: Slice them for a last-minute dessert at a potluck, or freeze half for lazy weeknight cravings. The leftovers? Just as good reheated with ice cream or straight from the fridge. My daughter picks out the biggest pieces first—no judgment.
- Pantry Staple Hack: Five ingredients, all of which I already have. No specialty items, no last-minute grocery runs. The melted chocolate shortcut saves me 20 minutes vs. chopping bars, and the sugar-butter mix is foolproof—even when I forget to preheat. Budget-friendly and always reliable.
Step-by-step instructions for ultra-fudgy chocolate chip brownies
Mastering these brownies comes down to precise technique and patience—every detail matters.
Melt Chocolate and Butter for Perfect Texture
In a microwave-safe bowl, combine the 1.5 cups dark chocolate chips and 1 cup unsalted butter. Microwave in 30-second intervals, stirring between each, until completely melted and smooth. The mixture should reach 160°F—just below boiling. If you prefer stovetop melting, use a double boiler over medium-low heat, stirring constantly until fully combined. This gentle melting prevents burning while ensuring the chocolate develops that signature fudgy depth.
Here's the thing—don't rush this step. You'll know it's ready when the chocolate loses its graininess and the butter fully incorporates, creating a glossy, liquid base. If you see any unmelted bits, stir vigorously and microwave for another 10 seconds. The goal is perfect, even melting that translates to uniform texture in your brownies.
Whisk in Sugar and Eggs for Light Batter
Remove the melted chocolate mixture from heat and let it cool slightly for 2-3 minutes—it should be warm but not hot to the touch. In a separate bowl, whisk together the 1.25 cups granulated sugar and 2 whole large eggs until fully combined. Gradually pour the warm chocolate mixture into the egg-sugar bowl while whisking constantly. This creates a smooth batter without lumps.
Add the 1 tsp vanilla extract and 0.5 tsp salt, whisking until evenly distributed. The batter should be thick but pourable, with a rich chocolate hue. I always tap the whisk against the bowl's side to release any air bubbles that form during mixing. This step ensures your brownies have that signature tender crumb—no dry spots or dense pockets.
Fold in Flour and Chocolate Chips Gently
In a separate bowl, sift the 0.75 cup all-purpose flour to break up any lumps. Gently fold the flour into the chocolate mixture using a spatula, mixing just until combined. Overmixing develops gluten, which leads to tough brownies. Then, fold in the remaining 1.5 cups dark chocolate chips, reserving about 2 tablespoons for topping later. The batter should be thick and slightly streaky with visible chocolate chunks.
Don't be tempted to press the batter into the pan—this creates dense brownies. Instead, spread it evenly with the spatula, leaving the edges slightly uneven. The reserved chocolate chips go on top before baking, creating those coveted pools of molten chocolate in each bite. This is where the magic happens—those perfect pockets of gooey chocolate that make these brownies legendary.
Bake to Perfect Doneness
Preheat your oven to 350°F and line an 8x8-inch baking pan with parchment paper, leaving an overhang on all sides for easy removal. Pour the batter into the prepared pan and sprinkle the reserved 2 tablespoons dark chocolate chips evenly on top. Bake for 20-25 minutes—the brownies are done when a toothpick inserted in the center comes out with moist crumbs but no wet batter.
Here's the critical part: the edges should be set but the center should still look slightly underdone. If you wait until the toothpick comes out completely clean, your brownies will be cakey. They'll continue cooking as they cool. Let them rest in the pan for 10 minutes before transferring to a wire rack to cool completely. This resting period allows the fudge to set properly, ensuring clean slices every time.
Serve with Ice Cream and Flaky Salt
Once completely cooled, dust the top with 0.25 cup powdered sugar using a fine-mesh sieve for an elegant finish. Cut into 16 equal squares using a sharp knife—dip the knife in hot water between cuts for clean edges. Serve each brownie with a scoop of 1 cup vanilla ice cream and a sprinkle of 1 tbsp flaky sea salt for that perfect balance of sweet, salty, and rich chocolate.
These brownies deliver on every promise: ultra-fudgy texture, generous chocolate chunks, and that perfect contrast of warm brownie with cold ice cream. The flaky sea salt elevates each bite, cutting through the richness. Serve immediately for the ultimate experience—each slice should be dense enough to hold its shape but tender enough to melt in your mouth.
Pro Tips For Making Brownie Recipe Using Melted Chocolate Chips
- MELT CHOCOLATE SLOW: I used to blast chocolate chips in the microwave and end up with streaks of butterfat separating—ugh. Instead, melt them in a heatproof bowl over a pot of barely simmering water (about 170°F). Stir every 30 seconds until smooth, then immediately whisk in the butter. This keeps the chocolate silky and prevents seizing later.
- WEIGH YOUR FLOUR: Scooping flour from the bag packs in air, which makes your brownies cakey instead of fudgy. Use a kitchen scale for precision—1 cup of all-purpose flour is about 120 grams. If you’re measuring by volume, spoon it into the cup and level it off. Trust me, this small step changes the texture.
- BAKE UNTIL TOOTHPICK TEST FAILS: That “clean toothpick” rule is a myth for this recipe. Pull yours out when it has moist crumbs clinging to it—usually around 285–300°F internal temp. Overbaking dries out the fudgy center, and underbaking leaves them gummy. (Yes, even if the edges look set.)
- COOL IN PAN 10 MINUTES: I know you’re eager to cut into them, but resist. Let the brownies sit in the pan for 10 minutes before transferring to a wire rack. This prevents cracking and keeps the layers intact. (Pro move: Spritz the hot pan with nonstick spray right after baking for easier removal.)
Serving suggestions for leftovers
Warm Ice Cream Pairings
Serve your brownies warm for the ultimate indulgence—especially with a scoop of vanilla ice cream that's been softened slightly. I like to let the ice cream sit at room temperature for 5-10 minutes before scooping, so it melts just enough to create that perfect contrast with the warm brownie.
For an extra-special touch, try salted caramel ice cream—the caramel complements the chocolate while the salt enhances both flavors. 🍦
Powdered Sugar Dusting
After the brownies cool completely, dust the top with powdered sugar using a fine-mesh sieve for an elegant, restaurant-quality finish. This adds a delicate sweetness that balances the rich chocolate flavor.
For a creative twist, mix in ½ tsp cinnamon with the powdered sugar to add a warm spice note that pairs beautifully with the chocolate. A light dusting also helps absorb any excess moisture, keeping the brownies perfectly fudgy.
Flaky Sea Salt Finish
The secret to elevating these brownies is a sprinkle of flaky sea salt right before serving. The salt cuts through the richness of the chocolate, creating a perfect balance of flavors. I recommend using Maldon sea salt flakes—their delicate texture melts on your tongue, enhancing each bite.
Sprinkle just before serving so the salt doesn't lose its crispness. For a fun presentation, arrange the brownies on a plate and scatter the salt flakes artistically around the edges.
Chocolate Sauce Drizzle
No serving suggestion is complete without a drizzle of warm chocolate sauce. Heat ½ cup heavy cream with 4 oz dark chocolate, whisking until smooth, then drizzle over the brownies just before serving.
This adds an extra layer of chocolatey goodness that ties everything together. For a quicker option, use store-bought chocolate syrup like Ghirardelli or Hershey's, warmed slightly to make it pourable. 💫
Fruit Contrast Toppings
For a lighter twist, add fresh fruit toppings that cut through the richness. Thinly sliced strawberries or raspberries add a bright, tangy contrast to the chocolate. I also love adding a few orange zest strips on top—the citrus notes brighten the flavor profile and add a pop of color.
Arrange the fruit neatly on the plate for a visually appealing dessert that's as pretty as it is delicious.
Portioning for Parties
When serving these brownies at gatherings, cut them into 16 equal squares for easy portioning. Use a sharp knife and dip it in hot water between cuts to ensure clean edges.
For a fun presentation, stack two squares with a scoop of ice cream between them, then drizzle with chocolate sauce. This creates a mini dessert that's perfect for sharing.
Store any leftovers in an airtight container at room temperature for up to 3 days—they reheat beautifully in the microwave for 10-15 seconds to restore that gooey texture.
Nutrition facts
Frequently asked questions
Why do your brownies need melted chocolate chips instead of just regular chocolate?
Melted chocolate chips create that signature ultra-fudgy texture with pockets of gooey chocolate in every bite. When melted properly, the chocolate becomes smooth and glossy, blending seamlessly into the batter while still forming those irresistible molten pockets during baking. Regular chocolate bars can contain stabilizers that prevent proper melting, leading to grainy texture.
Can I substitute white chocolate chips for dark?
You can try, but the flavor and texture will be completely different. White chocolate lacks the depth of dark chocolate and melts differently, often resulting in a sweeter, less rich brownie. If you want to use white chocolate, reduce the amount by 25% and add 1 tbsp cocoa powder to maintain the fudgy character. For best results, stick with 70% cocoa or higher dark chocolate chips.
How do I fix brownies that came out too cakey?
Cakey brownies usually happen when overbaked or when too much flour is added. To fix them, try reheating slices in the microwave for 10-15 seconds with a damp paper towel covering them to restore moisture. For future batches, remove them from the oven when a toothpick comes out with moist crumbs (not completely clean) and let them rest in the pan for 10 minutes before cooling completely.
What's the best way to store these brownies?
Store brownies in an airtight container at room temperature for up to 3 days for best texture. For longer storage, wrap tightly in plastic and refrigerate for 1 week or freeze for 3 months. To reheat, microwave individual squares for 10-15 seconds or warm in a 300°F oven for 5 minutes to restore that gooey center.
Can I make these brownies gluten-free?
Yes! Replace the all-purpose flour with a 1:1 gluten-free baking flour blend like Bob's Red Mill or King Arthur. For best results, add ½ tsp xanthan gum** to help bind the batter. Keep in mind the texture may be slightly denser, but they'll still be delicious. Always measure carefully—gluten-free flours absorb moisture differently.