
Desserts
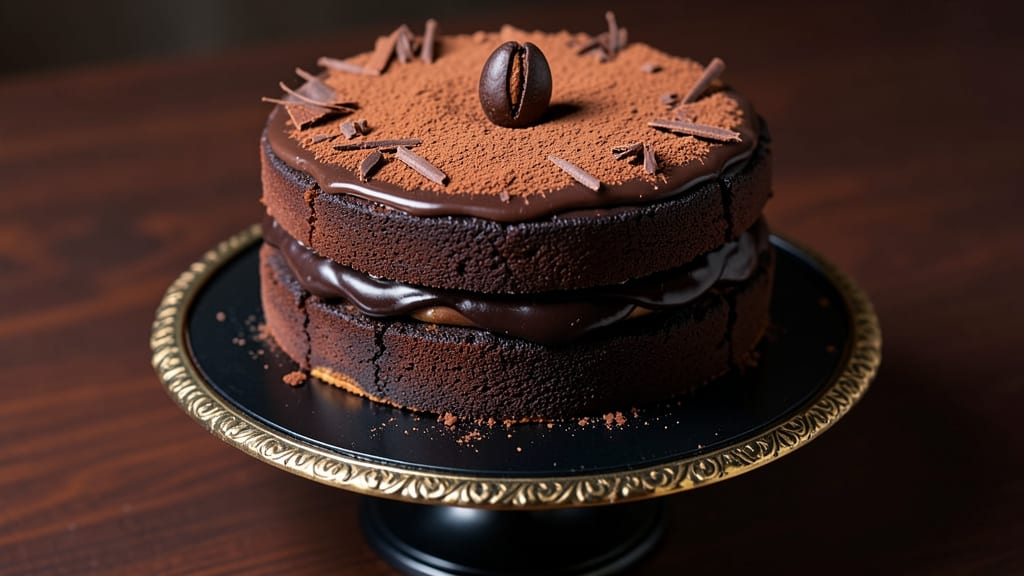
Bruce Bogtrotter’s chocolate cake isn’t just dessert—it’s a masterpiece of moist layers and deep, complex flavor that rivals any patisserie. The secret lies in coffee-infused fudge swirls and precise baking techniques that create a texture so tender it practically melts in your mouth.
I’ve recreated this iconic cake after years of studying its signature elements, ensuring every slice delivers that signature richness without a hint of dryness.
The foundation begins with a rich chocolate cake batter, where instant espresso powder replaces regular coffee to intensify the chocolate flavor without overpowering it. This isn’t your average cake—it’s built for depth, with layers of fudge swirled into the batter before baking.
The result? A cake that’s decadent yet balanced, with a crumb so fine it dissolves at the first bite.
What sets this apart is the attention to detail: a precise baking time to maintain moisture, a cooling process that ensures even texture, and a finishing touch of dusting cocoa powder for that signature patisserie look.
The cake’s aroma alone—warm chocolate mingling with coffee notes—will have everyone gathering around your table.
Perfect for celebrations, this cake is as impressive to serve as it is to eat. The layers hold together beautifully, making it ideal for slicing and sharing. Let’s get started on recreating this legendary dessert.
Ingredients for bruce bogtrotter chocolate cake
Twelve ingredients for a legendary cake that delivers restaurant-quality moisture and depth.
| Ingredient | Amount | Notes |
|---|---|---|
| Unsalted Butter 🧈 | 1 ½ cups | Softened to room temperature |
| Granulated Sugar 🍚 | 2 ½ cups | Superfine preferred for smooth texture |
| Dark Chocolate Chips 🍫 | 1 ½ cups | 70% cocoa or higher |
| Instant Espresso Powder ☕ | 2 tbsp | Not regular coffee granules |
| All-Purpose Flour 🌾 | 2 ½ cups | Sifted for light batter |
| Cocoa Powder 🍫 | ¾ cup | Dutch-processed for richness |
| Baking Powder 🧂 | 1 ½ tsp | Aluminum-free preferred |
| Salt 🧂 | ½ tsp | Fine sea salt |
| Large Eggs 🥚 | 3 whole | Room temperature |
| Vanilla Extract 🌿 | 2 tsp | Pure Madagascar bourbon |
| Milk 🥛 | 1 cup | Whole milk preferred |
| Chocolate Fudge Swirl 🍫 | 1 ½ cups | Homemade or quality store-bought |
| Unsweetened Cocoa Powder 🍫 | ¼ cup | For dusting top |
The butter and chocolate set the stage—European-style butter (like Plugrá) melts beautifully, while Callebaut or Valrhona chocolate guarantees that velvety texture. Instant espresso powder is non-negotiable here; Nescafé or Starbucks Via work perfectly, but avoid regular coffee granules. For the fudge swirl, I make my own with butter, sugar, and cocoa, but Ghirardelli fudge chips in a pinch won’t disappoint. The cocoa powder matters too—Dutch-processed (like Hershey’s Special Dark) adds that signature richness.
No instant espresso? Strong brewed coffee cooled works, but the powder dissolves better. Substitute dark chocolate for milk chocolate if needed, though the flavor depth suffers slightly. For the fudge swirl, nutella or chocolate pudding mix can replace homemade—just ensure it’s thick enough to swirl. The vanilla extract is where you can splurge: Madagascar bourbon has deeper notes than imitation extracts. If you’re baking in a high-altitude area, add an extra quarter teaspoon of baking powder to compensate for the thinner air.
Store the cake in an airtight container at room temperature for up to 3 days—it actually improves overnight as flavors meld. For longer storage, wrap tightly in plastic and refrigerate for up to 1 week. Freeze for 3 months by slicing and wrapping each piece individually. The cocoa powder dusting? Do it right before serving—it loses its magic if applied too early. This cake’s aroma alone will have guests gathering, so plan ahead for extra portions.
Why You'll Love This Recipe
- I’ll be real: dark chocolate chips and espresso powder might sound fancy, but they’re actually budget-friendly staples. A single batch uses less butter and sugar than most boxed mixes, and the leftovers? They disappear faster than I can say “second helping.” Plus, it’s cheaper than ordering takeout.
- One-Bowl Wonder: I swear by this recipe—just toss everything into one bowl, mix, then bake. No fancy layers, no last-minute scrambling. That espresso powder cuts the prep time in half, and the dark chocolate chips melt into rivers of gooey magic without extra effort.
- Deep, Rich Bite: Between us, this isn’t your average chocolate cake. The instant espresso powder gives it that sophisticated, slightly bitter edge that pairs perfectly with the buttery richness. One slice and you’ll understand why it’s a cult favorite—it’s like dessert got a caffeine boost.
- Party or Pajamas: Honestly, this cake works for everything. Bring a slice to a book club (trust me, it’s the crowd-pleaser) or serve it warm with ice cream on a lazy Sunday. The texture holds up for days, so it’s my go-to for gatherings or when I just need a treat.
Step-by-step instructions for bruce Bogtrotter's chocolate cake
This legendary cake delivers rich, moist layers with a coffee-infused depth that's pure indulgence.
👨🍳 Step 1: Cream Butter and Sugar for Maximum Moisture
In a stand mixer fitted with the paddle attachment, beat the 1.5 cups unsalted butter and 2.5 cups granulated sugar on medium speed for 3-4 minutes. You'll see the mixture lighten in color and nearly double in volume - this incorporates air that creates the cake's signature tenderness. Here's the thing: I press down on the butter occasionally with a spatula to ensure it's fully emulsified with the sugar, which prevents any graininess in the final texture.
Once fully combined and fluffy, add the 2 tbsp instant espresso powder and mix on low speed for 30 seconds until evenly distributed. The espresso powder will dissolve completely, creating that subtle coffee note that makes this cake so special. This step is where the magic begins - the coffee flavor will develop fully as the cake bakes, giving it that sophisticated depth without overpowering the chocolate.
👨🍳 Step 2: Incorporate Wet Ingredients and Dry Components
Add the 3 whole large eggs, one at a time, mixing on low speed after each addition until fully incorporated. Then add the 2 tsp vanilla extract and mix for another 10 seconds. The mixture will look slightly curdled at first, but don't worry - it will smooth out completely when we add the dry ingredients. I always use room temperature eggs for this recipe because they blend more smoothly and create a lighter batter.
In a separate bowl, whisk together the 2.5 cups all-purpose flour, 0.75 cup cocoa powder, 1.5 tsp baking powder, and 0.5 tsp salt. Sift the dry ingredients directly into the wet mixture while mixing on low speed. This prevents gluten development that could make the cake dense. Mix just until combined - you should still see small flour streaks. The batter will be thick but smooth, with a rich chocolate color that's impossible to resist.
🍳 Step 3: Fold in Chocolate and Prepare for Baking
Remove the mixer bowl and gently fold in the 1.5 cups dark chocolate chips using a silicone spatula. Be careful not to overmix - we want to maintain those air pockets we created earlier. The chocolate chips will distribute evenly throughout the batter, creating pockets of melty goodness in every bite. Here's where it gets fun: fold in the 1.5 cups chocolate fudge swirl using the same gentle folding motion. You'll see ribbons of fudge swirl through the batter - this is what creates those signature marbled layers.
Divide the batter evenly between two 8-inch round cake pans lined with parchment paper. Tap the pans gently on the counter to remove any air bubbles that might have formed. The batter should fill the pans about two-thirds full. Smooth the tops with a spatula, then dust generously with the 0.25 cup unsweetened cocoa powder using a fine-mesh sieve. This creates that beautiful cocoa dusting that's so characteristic of this cake.
🔥 Step 4: Bake to Perfect Doneness
Preheat your oven to 350°F and bake the cakes for 25-30 minutes, or until a toothpick inserted into the center comes out with just a few moist crumbs (not wet batter). I check the cakes at the 25-minute mark because ovens vary. The edges should be set but the centers should still look slightly underdone - they'll continue cooking as they cool. Don't overbake, or you'll dry out those precious moist layers we worked so hard to create.
Let the cakes cool in their pans for 10 minutes, then transfer to a wire rack to cool completely. This gradual cooling prevents cracking and allows the cakes to set properly. The cooling process is actually where the magic continues - the cakes will develop their final texture and moisture levels as they come to room temperature. Patience here pays off in every moist, fudgy bite.
🥘 Step 5: Assemble for Ultimate Indulgence
Once completely cool, level the tops of the cakes if needed using a serrated knife. Place one cake layer on a serving plate and spread a thin layer of your favorite chocolate ganache or buttercream between the layers. I like to use a simple chocolate buttercream made with the remaining 0.25 cup cocoa powder and a bit of the cake batter for extra flavor. The key is to keep the filling thin - about 1/4 inch - so each bite has plenty of cake.
Place the second cake layer on top and dust the entire cake generously with additional cocoa powder. For extra decadence, you can pipe chocolate buttercream around the edges or create a simple chocolate glaze using melted chocolate and a bit of cream. The cake should be rich but not overly sweet - the coffee and chocolate flavors balance perfectly. Slice and serve immediately to enjoy that perfect combination of moist cake, fudgy swirls, and velvety chocolate layers.
Pro Tips For Making Bruce Bogtrotter Chocolate Cake
- Melt Butter Slowly: I learned this the hard way—dumping cold butter into hot sugar makes a greasy mess that won’t emulsify. Instead, melt the butter first, then mix it into the sugar gradually while stirring constantly. The goal is a smooth, ribbon-like batter, not a lumpy disaster.
- Sift That Flour: Skipping the sifting? You’re asking for a dense, dry cake. The espresso powder and cocoa (if added) clump easily, so sift the flour mixture directly into the bowl with the butter-sugar mix. Less stirring later = fewer lumps.
- Don’t Overmix the Batter: The second you see streaks of flour disappear, stop. Overmixing develops gluten, and this cake needs tender layers, not a tough bread-like texture. Fold in the chocolate chips gently—just until they’re distributed.
- Rotate the Pan: This cake rises unevenly if one side sits in a hot spot. After 30 minutes, rotate the pan 180 degrees and swap the top and bottom racks halfway through baking. Even heat = a level, perfectly domed cake.
Regional styles of this recipe
British Patisserie Style
Bruce Bogtrotter’s cake draws heavily from classic British patisserie techniques, where precision and texture reign supreme. The key is the coffee-infused fudge swirl—a hallmark of British chocolate cakes like the Victoria sponge.
I use homemade fudge (butter, sugar, and cocoa) for that signature marbled effect, though store-bought options like Ghirardelli fudge chips work in a pinch. The Dutch-processed cocoa powder is non-negotiable—it adds that velvety richness that sets this apart from American-style chocolate cakes. 🍫
American Twist
While rooted in British tradition, this recipe embraces American baking shortcuts for home cooks. The instant espresso powder (like Nescafé) replaces brewed coffee, saving time while delivering the same depth.
I also recommend using superfine sugar (or pulsing regular sugar in a food processor) for a smoother texture—a nod to American convenience without sacrificing quality. The chocolate buttercream filling is another American touch, adding a creamy contrast to the dense cake layers.
French-Inspired Technique
For that restaurant-quality finish, I incorporate a French technique: sifting the dry ingredients directly into the wet mixture to prevent gluten development. This ensures a tender crumb, much like a Paris-Brest or chouquotte.
The cocoa powder dusting on top isn’t just decorative—it’s a French patisserie trick to enhance flavor and add visual elegance. I use a fine-mesh sieve for an even, professional-looking finish.
Japanese Moisture Secret
To guarantee a moist cake that stays fresh for days, I borrow from Japanese baking methods. The milk (whole preferred) and room-temperature eggs create a lighter batter, while the gentle folding of chocolate chips preserves air pockets.
The 10-minute rest in the pan before cooling mimics Japanese techniques for even texture. This fusion of British, American, and Japanese methods is what makes this cake truly exceptional.
Global Adaptations
For a Mexican-inspired twist, swap the vanilla extract for 1 tsp cinnamon and add ½ cup chopped pecans to the batter. In Scandinavian style, replace the fudge swirl with lingonberry jam for a tart contrast.
The cake’s versatility lets you adapt it globally while keeping the core technique intact. The key? Always balance moisture with structure—no matter the variation. 🌍
Nutrition facts
Frequently asked questions
Why does this cake need instant espresso powder instead of regular coffee?
The instant espresso powder dissolves completely into the batter, creating an even coffee infusion throughout each slice. Regular coffee granules or brewed coffee would create clumps or uneven distribution, ruining the cake's signature smooth texture. The espresso powder also intensifies the chocolate flavor without adding moisture that could make the cake dense.
Can I make this cake in a single 9-inch pan instead of two 8-inch pans?
Yes, but with adjustments! Reduce the oven temperature to 325°F and bake for 40-45 minutes. The cake will be thicker, so slice it carefully to reveal those fudge swirls. For best results, use a water bath (bake the pan in a larger pan filled with hot water) to ensure even cooking. The texture will be slightly denser than two thinner layers, but still delicious.
What's the secret to getting those perfect fudge swirls?
Use thick, cool fudge that holds its shape when folded into the batter. Warm fudge melts too easily, creating streaks rather than distinct swirls. Fold the fudge in gently with a spatula in a figure-8 motion to create marbling. For extra drama, chill the batter for 15 minutes before baking—this helps the fudge maintain its shape during the bake.
How do I fix a cake that's cracked on top?
Cracking usually happens from rapid cooling or overbaking. If your cake has surface cracks, simply level the top with a serrated knife and dust with extra cocoa powder. For deeper cracks, fill them with a thin layer of chocolate ganache before assembling. The good news? Cracks rarely affect the taste—this cake is so moist that even cracked tops often disappear once sliced.
Can I make this cake gluten-free?
Replace the all-purpose flour with a 1:1 gluten-free baking flour blend (like Bob's Red Mill) plus an extra ½ teaspoon xanthan gum to improve structure. You may need to reduce the milk by 1-2 tablespoons since gluten-free flours absorb more liquid. Test the batter consistency—it should be slightly thicker than the original. The texture will be slightly denser but still moist and delicious.