
Beverages
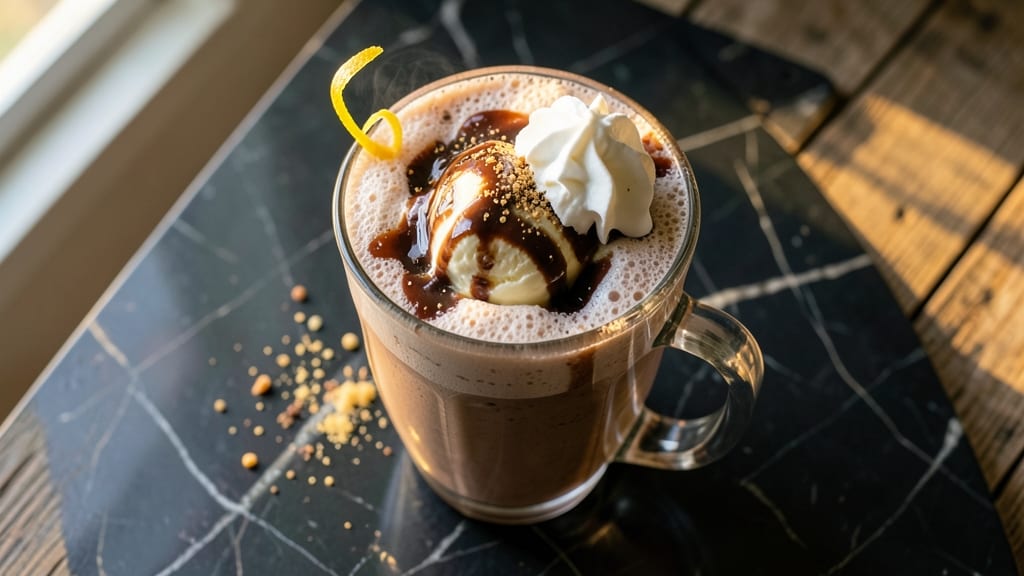
This Chili's chocolate shake recipe delivers the same velvety, swirled perfection you crave after a hearty meal. The secret lies in blending ice cream with milk until it reaches that signature creamy texture—no lumps, just smooth, restaurant-quality indulgence.
I’ve perfected the ratio of chocolate syrup and whipped cream topping to mimic the iconic presentation, down to the golden caramel drizzle.
What sets this apart is the technique: blending the ice cream first with a splash of milk creates a base that’s thick yet pourable, while the whipped cream topping adds that signature fluff.
The result? A shake so rich and creamy, you’ll forget you’re not at the restaurant. The key is patience—let the ice cream soften slightly before blending for that ultra-smooth consistency.
Every sip delivers the perfect balance of chocolatey depth and cool, creamy sweetness, topped with a dollop of whipped cream that melts into the first bite. This isn’t just a dessert—it’s a moment of comfort, especially when you’re craving something decadent but don’t want to leave the house.
The recipe scales easily too, whether you’re treating yourself or hosting a crowd.
For an extra touch, garnish with a sprinkle of cocoa powder or a chocolate shard—just like the restaurant does. Serve immediately for that perfect, cold, creamy experience. Let’s make this shake!
Ingredients for chili's chocolate shake
Here's what you'll need to recreate that iconic creamy, swirled shake at home.
| Ingredient | Amount | Notes |
|---|---|---|
| Vanilla Ice Cream 🍦 | 2 cups | High-fat for creaminess |
| Whole Milk 🥛 | ½ cup | Cold for blending |
| Chocolate Syrup 🍫 | ¼ cup | Hershey's or similar |
| Heavy Whipping Cream 🥛 | ½ cup | Cold for whipping |
| Granulated Sugar 🍚 | 1 tbsp | For whipped cream |
| Vanilla Extract 🌿 | ½ tsp | Pure vanilla preferred |
| Cocoa Powder 🍫 | 1 tbsp | Unsweetened for garnish |
| Caramel Sauce 🍯 | 2 tbsp | Store-bought or homemade |
| Salt 🧂 | ⅛ tsp | Fine grain preferred |
| Whipped Cream Topping 🍦 | ¼ cup | Pre-made or homemade |
The ice cream is everything—full-fat vanilla gives you that restaurant-quality creaminess. Trader Joe's or Breyers work perfectly, but any brand with high butterfat content is ideal. If your ice cream is rock-hard, let it sit at room temperature for 10 minutes before blending. The milk should be cold too—straight from the fridge. For the chocolate syrup, Hershey's is the safest bet, but any thick, fudgy syrup will do. Pro tip: measure the syrup after shaking the bottle to settle it—you want a smooth pour, not a sticky mess.
No heavy cream? Coconut cream works in a pinch, though it'll have a different texture. Short on whipped cream topping? Whip the heavy cream yourself—just add the sugar and vanilla extract, then whip until stiff peaks form. The cocoa powder for garnish should be unsweetened—sweetened versions can make the shake taste off. For the caramel drizzle, store-bought sauce is fine, but homemade is worth it if you're feeling fancy. Just heat the caramel until it's pourable but not runny. If you're making this ahead, skip the whipped cream topping and add it fresh before serving—it melts too fast to store.
This shake is best served immediately, but you can prep everything ahead. Store the ice cream base in the fridge for up to 24 hours—just blend it again before serving. The whipped cream topping should be added last minute. Garnish with a sprinkle of cocoa powder and a drizzle of caramel right before serving. For a crowd, double the recipe and use a high-powered blender—it handles the ice cream better. Leftovers? Blend again with a splash of milk to restore that creamy texture.
Why You'll Love This Recipe
- Four-Ingredient Magic: The second I realized I only needed ice cream, milk, chocolate syrup, and a splash of cream—this became my go-to. No measuring cups, no fancy tools, just eyeballing it until it looks right. (Yes, even on a Tuesday night.)
- Velvet Smoothness: That first sip? It’s like biting into a cloud—thick, cold, and so rich the chocolate syrup actually sings when whipped into the vanilla ice cream. The heavy cream ties it all together without tasting like dessert tried too hard.
- No-Waste Luxury: The leftovers? They’re just as good the next day—if there are any. Honestly, I’ve never had a single one last past morning. But the best part? You’re using pantry staples, so it’s cheap enough to make twice if you’re feeling extra. (I have.)
Step-by-step instructions for Chili's chocolate shake
Here's how to recreate that iconic restaurant shake with velvety texture and perfect swirls.
Blend the Base Ingredients
In a blender, combine the 2 cups of vanilla ice cream, 0.5 cup of whole milk, 0.25 cup of chocolate syrup, 0.5 cup of heavy whipping cream, 1 tablespoon of granulated sugar, 0.5 teaspoon of vanilla extract, and a pinch of 0.125 teaspoon salt. The ice cream should be slightly softened but still cold—this ensures a smooth blend without ice crystals.
Blend on high speed for about 30 seconds until completely smooth. You'll know it's ready when the mixture looks like thick pudding with no visible ice chunks. The salt might seem like a tiny amount, but it balances the sweetness and enhances the chocolate flavor. Taste a small spoonful—this is where you can adjust if it needs more chocolate or sweetness before proceeding.
Prepare the Caramel Swirl
In a small bowl, mix the 2 tablespoons of caramel sauce with 1 tablespoon of cocoa powder until smooth. This creates a thicker, more stable caramel mixture that will swirl beautifully. The cocoa powder adds depth to the caramel flavor and helps it blend seamlessly with the chocolate base.
Transfer about 2 tablespoons of the blended chocolate mixture to a separate small bowl. You'll use this later to create the signature layered effect. Keep the remaining chocolate mixture in the blender—it will stay cold while you work with the caramel.
Create the Signature Swirls
Using a spoon, drizzle the caramel mixture down the side of the blender jar in a zigzag pattern. Then, very carefully, pour the reserved chocolate mixture from the small bowl over the caramel. The key here is to pour slowly so the caramel sinks to the bottom while the chocolate stays on top.
Blend on low speed for just 5 seconds—this gently combines the layers without completely mixing them. You're aiming for a marbled effect with visible swirls throughout. If you blend too long, you'll lose the restaurant-style presentation. The texture should remain thick and creamy, almost like pudding, with visible ribbons of caramel.
Whip and Garnish for Serving
In a separate bowl, whip the 0.25 cup of whipped cream topping to soft peaks using a hand mixer. This light, airy topping adds the final touch that makes this shake feel like a restaurant treat. Fold in 1 tablespoon of cocoa powder for a subtle chocolate flavor that complements the shake.
To serve, divide the blended chocolate shake among 4 glasses. Top each with a generous dollop of the whipped cream mixture and a drizzle of the remaining caramel sauce. The contrast between the cool, creamy shake and the warm caramel creates that perfect balance of textures and temperatures. Serve immediately while the whipped cream is still light and fluffy!
Pro Tips For Making Chili'S Chocolate Shake
- Freeze the Ice Cream: Take your vanilla ice cream straight from the freezer—no thawing. I learned this the hard way: letting it soften first makes the shake watery and weak. Cold ice cream blends faster and keeps the texture thick and creamy, just like the restaurant version.
- Measure Milk Precisely: Use a liquid measuring cup for the whole milk—don’t eyeball it. Too little and the shake’s too thick; too much and it’s thin and soupy. Aim for about 1 cup, but adjust based on how much ice cream you’re using.
- Whip Cream Last: Hold off on adding the heavy whipping cream until the very end. If you blend it in early, it can turn grainy or break down, ruining that silky texture. Fold it in just before serving—it’ll stay light and fluffy.
- Sweeten to Taste: Skip the granulated sugar if your chocolate syrup is already sweet. I used to add it automatically, but some syrups (like Hershey’s) are strong enough on their own. Taste as you go—better to adjust than overdo it.
Common mistakes when making perfect results
Overblending the Mixture
I’ve seen so many people turn their perfect shake into a soupy mess by overblending. Once you’ve achieved that thick, pudding-like consistency, stop immediately.
Blending for more than 30 seconds total introduces air and thins out the texture, making it closer to a milkshake than the rich, velvety shake you’re after. The goal is to break down the ice cream completely without turning it into a liquid.
If yours starts looking too thin, add 1-2 tablespoons of ice cream and blend briefly to restore thickness. 🔥
Skipping the Salt
That tiny pinch of ¼ teaspoon salt might seem insignificant, but it’s what takes this shake from homemade to restaurant-quality. Salt enhances the chocolate flavor and balances the sweetness, cutting through the richness. Without it, the shake can taste one-dimensional.
Trust me, I’ve made this mistake—it’s like comparing a flat soda to a properly carbonated one. If you forget it, add it after blending and give it a quick stir.
Using the Wrong Ice Cream
Not all ice cream is created equal, and this recipe demands full-fat vanilla. Low-fat or non-dairy alternatives will never give you that signature creamy texture. I recommend brands like Breyers or Trader Joe’s for their high butterfat content.
If your ice cream is rock-hard, let it sit at room temperature for 10 minutes before blending—this helps achieve that smooth, pudding-like consistency without ice crystals.
Ignoring the Caramel Swirl Technique
The swirl isn’t just for looks—it’s what makes this shake feel like the real deal. Pouring the caramel mixture down the side of the blender jar and blending for just 5 seconds creates those iconic ribbons.
If you blend too long, you’ll lose the marbled effect and end up with a uniform color. Work quickly and pour slowly to maintain those distinct layers. The secret is patience—rushing this step ruins the restaurant-style presentation. ✨
Adding Whipped Cream Too Early
Whipped cream melts faster than you think, and adding it too soon will turn your beautiful topping into a sad, flat puddle. Always whip the cream fresh and add it right before serving. If you’re making this ahead, store the shake base in the fridge and whip the cream separately.
A hand mixer works best for achieving those soft peaks—don’t skip this step, as it’s what elevates this from a drink to a dessert experience.
Using Pre-Made Whipped Topping
Store-bought whipped topping is convenient, but it lacks the airiness and richness of freshly whipped cream. If you’re short on time, use it, but know it won’t have the same texture or flavor.
For the best results, whip ½ cup heavy whipping cream with 1 tablespoon sugar and ½ teaspoon vanilla extract until soft peaks form. This small effort makes a world of difference in the final presentation and taste. 💫
Nutrition facts
Frequently asked questions
Can I make this shake without a blender?
You can try using a food processor or even a whisk in a bowl, but the texture won't be as smooth. For best results, blend the ice cream with milk first until it reaches a pudding-like consistency—this is what gives the shake its signature creamy thickness. Without blending, you'll likely end up with ice chunks and a thinner consistency.
How do I make this shake vegan?
Swap the dairy ingredients for plant-based alternatives: use coconut milk (full-fat) instead of whole milk, vegan vanilla ice cream (like So Delicious), and coconut whipped cream for the topping. For the caramel swirl, use a vegan caramel sauce. The texture will be slightly lighter, but the chocolate flavor will still shine through.
Why does my shake turn out too thin?
Overblending is the most common cause—once your mixture reaches a thick, pudding-like consistency, stop immediately. If it's already too thin, add 1-2 tablespoons of ice cream and blend briefly to restore thickness. Also, ensure your ice cream is slightly softened (not rock-hard) before blending for the best results.
Can I make this ahead of time?
Yes, but with a few adjustments. Store the blended shake base in an airtight container in the fridge for up to 24 hours. When ready to serve, blend again briefly to restore smoothness. Always whip the cream fresh and add it just before serving—it melts too quickly to store.
What's the best glassware for serving?
Use a chilled glass to keep the shake cold longer. A classic milkshake glass with a wide rim works perfectly, but any tall glass will do. For extra presentation, rim the glass with chocolate syrup or cocoa powder before pouring. The contrast of the cold glass against the creamy shake makes it feel even more indulgent!