
Desserts
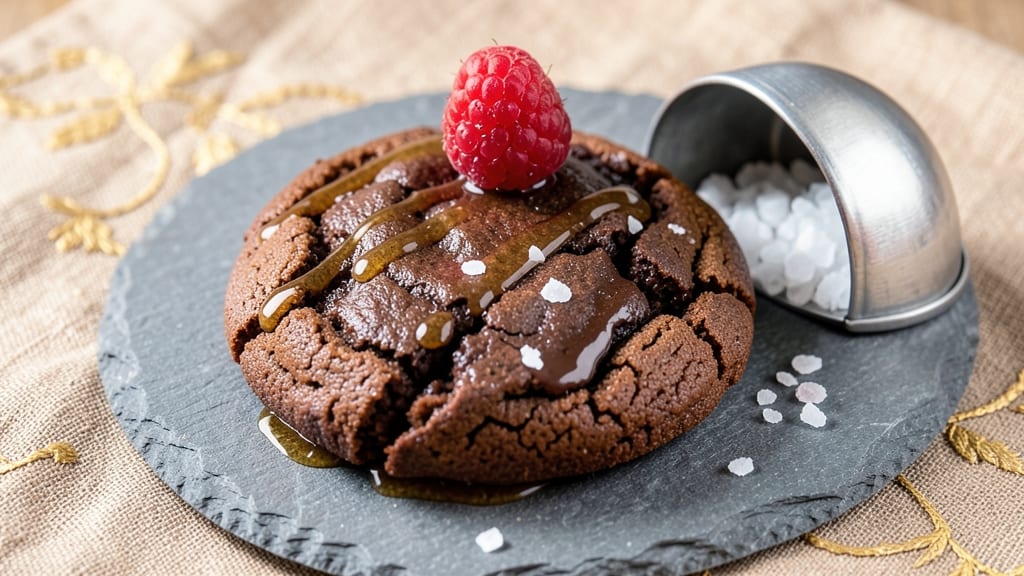
This chewy chocolate supreme cookie recipe delivers the perfect balance of fudgy cracks and molten chocolate rivers that make every bite irresistible. 💛 The secret lies in precise mixing techniques and a touch of brown sugar for that signature chewy texture—no dry, cakey results here.
I’ve baked these for years, and they never disappoint, whether you’re serving them at a holiday party or just treating yourself to a midweek indulgence.
The dough comes together in just 15 minutes, with a 350°F oven working its magic for 10–12 minutes to create edges that are crisp enough to hold their shape while staying soft and chewy inside.
High-quality chocolate—whether chunks, chips, or melted—is the star, and adding a pinch of sea salt or chopped nuts takes these cookies to the next level. Trust me, the aroma alone will have everyone in the kitchen asking for the recipe.
What you’ll end up with is a cookie that’s rich, decadent, and impossible to resist—golden edges with deep cracks that ooze with chocolate, a texture that’s neither too soft nor too firm, and a flavor that’s pure chocolate bliss.
The secret to success? Don’t overbake, and let the dough rest for 30 minutes before baking. This small step makes all the difference in achieving that perfect chewy center.
Serve warm with a glass of cold milk or a cup of coffee for the ultimate pairing, or dust with powdered sugar for an elegant touch. These cookies are versatile enough for gifting, baking sales, or simply enjoying with a favorite beverage. Let’s get baking—your taste buds will thank you.
Ingredients for chewy chocolate supreme cookie
The secret to these decadent cookies? Butter, brown sugar, and premium chocolate—just 11 ingredients for pure chocolate bliss.
| Ingredient | Amount | Notes |
|---|---|---|
| Unsalted Butter 🧈 | 1 cup | Softened to room temperature |
| Granulated Sugar 🍚 | ¾ cup | For sweetness balance |
| Light Brown Sugar 🍚 | ¾ cup | Packed for chewy texture |
| Large Eggs 🥚 | 2 whole | Room temperature preferred |
| Vanilla Extract 🌿 | 2 tsp | Pure vanilla preferred |
| All-Purpose Flour 🌾 | 2 ½ cups | Sifted for light texture |
| Baking Soda 🧂 | ½ tsp | For lift and spread |
| Diamond Crystal Kosher Salt 🧂 | ½ tsp | Adjust to taste |
| Ghirardelli Premium Baking Chocolate Chunks 🍫 | 1 ½ cups | High-quality chocolate |
| Flaky Sea Salt 🧂 | 1 tsp | For finishing touch |
| Optional Chopped Walnuts 🥜 | ½ cup | Toasted for crunch |
The chocolate makes or breaks these cookies. Ghirardelli baking chocolate chunks are my go-to—they melt beautifully and add that rich, intense flavor. If you can't find them, Valrhona or Lindt are solid backups. The butter needs to be soft but not melted—press a finger in, it should leave a slight indent. I always grab Plugrá butter from the refrigerated section at Whole Foods—it's consistently high quality. For the brown sugar, pack it firmly into the measuring cup. The difference between packed and unpacked is noticeable in the chewiness. And trust me, the extra 30 seconds of packing is worth it.
No vanilla extract? Vanilla bean paste works too—just use the same amount. Short on walnuts? Pecans or hazelnuts add a nice twist. The baking soda is non-negotiable here—it's what gives these cookies that signature crack and chew. If you're using a different brand of salt like Morton, reduce to 1/4 tsp since it's finer. For a deeper chocolate flavor, swap half the flour for Dutch-process cocoa powder. And if you're feeling fancy, add a pinch of espresso powder—it enhances the chocolate without tasting like coffee. The dough will be thick, but that's exactly what you want for those fudgy centers.
The dough needs that 30-minute rest—don't skip it. It makes all the difference in texture. Store dough in the fridge for up to 3 days or freeze for 3 months. Scoop with an ice cream scoop for uniform cookies. Bake one tray at a time—the oven gets crowded, and that affects temperature. These cookies reheat beautifully—just 10 seconds in the microwave brings back that warm, gooey magic. And if you make extras? They freeze perfectly—wrap individually and pull out just before serving.
Why You'll Love This Recipe
- Five-Ingredient Magic: I swear by this—just butter, sugars, eggs, vanilla, and a pinch of patience. No fancy mixers or hard-to-find ingredients clogging my pantry. Honestly, the only thing I measure is the chocolate chips, and even that’s flexible.
- Rich Without Effort: That perfect chew? It’s all in the brown sugar and melted butter mixed until it’s just thick enough. The vanilla ties it together like a warm hug—no overpowering notes, just pure chocolate satisfaction in every bite.
- Party or PJs: Between us, these are my go-to for holiday gifts and lazy Sunday mornings. Double the batch, freeze half, and boom—you’ve got dessert covered for weeks. (Yes, even on a Tuesday night.)
- Budget-Friendly Luxury: A single batch costs me less than takeout, but tastes like I spent hours baking. The butter and sugars stretch perfectly, and leftovers? They’re even better the next day—if they last that long.
Step-by-step instructions for chewy chocolate supreme cookies
Here's how to create cookies with that perfect chewy center and crackly crust—every bite will be pure chocolate bliss!
👨🍳 Step 1: Cream the Butter and Sugars to Peak Fluffiness
In a stand mixer fitted with the paddle attachment, beat the 1 cup unsalted butter (softened to room temperature) on medium speed for 1 minute until smooth. Add the 0.75 cup granulated sugar and 0.75 cup light brown sugar (packed), then beat for 3-4 minutes until the mixture is light, fluffy, and nearly doubles in volume.
This creaming process incorporates air, which creates those signature crackly tops and helps the cookies spread just enough for that perfect chewy texture. You'll know it's ready when the mixture looks pale and ribbons fall slowly from the paddle. Here's the thing—don't rush this step. Under-creaming leads to dense cookies instead of the chewy, fudgy texture we're after.
👨🍳 Step 2: Add Eggs and Vanilla for Rich Flavor
Add the 2 whole large eggs (room temperature preferred) one at a time, mixing on low speed for 30 seconds after each addition until fully incorporated. Then add the 2 teaspoons vanilla extract and mix for another 10 seconds until just combined.
The eggs add moisture and structure, while the vanilla enhances the chocolate flavor. I always use pure vanilla extract here—imitation just doesn't cut it for these cookies. You'll notice the mixture might look slightly curdled after adding the eggs, but don't worry. Once we add the dry ingredients, everything will come together beautifully.
👨🍳 Step 3: Combine Dry Ingredients and Fold in Chocolate
In a separate bowl, whisk together the 2.5 cups all-purpose flour, 0.5 teaspoon baking soda, and 0.5 teaspoon diamond crystal kosher salt. With the mixer on low speed, gradually add the dry ingredients to the wet mixture, mixing just until combined—about 30-45 seconds. You should still see a few flour streaks.
Remove the bowl from the mixer and fold in the 1.5 cups ghirardelli premium baking chocolate chunks and 0.5 cup optional chopped walnuts (if using) by hand with a silicone spatula. Make sure the chocolate chunks are evenly distributed throughout the dough. I like to press them in gently so they stay put during baking—this ensures those molten chocolate rivers we all love!
⏰ Step 4: Chill the Dough for Perfect Texture
Cover the bowl with plastic wrap and refrigerate for at least 30 minutes (I prefer 1 hour or even overnight). This chilling step is non-negotiable—it solidifies the butter, prevents excessive spreading, and allows the flour to fully hydrate for that perfect chewy texture.
Cold dough also means the cookies hold their shape better in the oven, resulting in thicker cookies with crispy edges and gooey centers. Real talk: Skipping this step leads to flat, cakey cookies. Trust me, your patience will pay off with cookies that are chewy, crackly, and packed with chocolate goodness.
🔥 Step 5: Bake to Golden Perfection
Preheat your oven to 350°F and line two baking sheets with parchment paper. Using a 2-tablespoon cookie scoop, portion the chilled dough into 24 equal portions (about 2 tablespoons each) and place them 3 inches apart on the prepared sheets.
Bake for 11-13 minutes until the edges are golden brown but the centers still look slightly underdone. They'll continue cooking on the hot pan after you remove them from the oven. Let them cool on the baking sheet for 5 minutes before transferring to a wire rack. While still warm, sprinkle each cookie with a pinch of flaky sea salt for that perfect salty-sweet balance.
Pro Tips For Making Chewy Chocolate Supreme Cookie
- CREAM THE BUTTER SLOW: Start with cold butter straight from the fridge—no need to soften it first. Use a wooden spoon or mixer on low, and let the heat from the sugars melt it gradually. I learned this the hard way after overworking the dough and ending up with tough cookies. The butter should look like wet sand, not a soupy mess.
- WEIGH YOUR SUGARS: Brown sugar packs differently than granulated, and scooping leads to inconsistent cookies. Use a kitchen scale for both sugars—this recipe needs precision. I was skeptical until I tried it; the chewiness and moisture balance became noticeably better.
- UNDERBAKE THE CENTERS: Pull cookies out when edges are golden but centers still look soft—about 10-12 minutes at 350°F (175°C). They’ll firm up as they cool. After burning three batches, I finally figured out that chocolate cookies need patience; overbaking turns them dry and crumbly.
- CHILL THE DOUGH: Divide the dough into two discs, wrap in plastic, and refrigerate for at least 24 hours. This isn’t the prettiest method, but it’s the tastiest—flavor deepens, and the texture becomes perfectly chewy. I skip this when I’m lazy, but the difference is real.
Perfect pairings for this chewy chocolate supreme cookie
Classic Milk Pairing
Warm cookies deserve cold milk—this is the ultimate pairing that balances the rich chocolate flavor perfectly. I recommend whole milk for its creamy texture, but 2% or skim works too if you're watching calories.
The cold temperature helps cut through the richness while enhancing the chocolate's depth. For extra indulgence, try half-and-half or vanilla almond milk for a sophisticated twist. 🥛
Espresso or Coffee
A shot of espresso or a cup of dark roast coffee elevates these cookies to restaurant-quality decadence. The bitterness in coffee complements the chocolate's sweetness, creating a sophisticated flavor profile.
I love a flat white or cappuccino with these cookies—the foam adds a creamy contrast. For a quicker option, instant espresso powder stirred into warm milk works in a pinch.
Tea Pairings
If you prefer tea, Earl Grey or chamomile are fantastic choices. The bergamot in Earl Grey adds a citrusy brightness that cuts through the chocolate's richness, while chamomile's floral notes create a soothing contrast.
For a bolder option, try matcha green tea—its earthy flavor pairs surprisingly well with the cookies' caramelized edges. Serve the tea slightly cooler than room temperature for best results.
Wine or Dessert Wine
For an adult twist, pair these cookies with a Port wine or tawny port—the nutty, caramelized flavors mirror the cookies' brown sugar and chocolate. A glass of Merlot also works beautifully, as its dark fruit notes complement the chocolate without overpowering it.
For a lighter option, Moscato d'Asti offers a sweet, fizzy contrast that's perfect for celebrations. 🍷
Creamy Toppings
Elevate your cookies with a dollop of vanilla ice cream or whipped cream for an ice cream sundae experience. I love Häagen-Dazs vanilla bean or Ben & Jerry's Phish Food for their rich, creamy textures.
For a lighter option, coconut whipped cream adds a tropical twist. A drizzle of melted chocolate or caramel sauce takes these cookies to the next level—just be prepared for seconds (or thirds!).
Nutrition facts
Frequently asked questions
Why do these cookies need to chill before baking?
The 30-minute chill is crucial for two reasons: it prevents excessive spreading (so your cookies stay thick and chewy) and lets the flour fully hydrate for that perfect texture. Skipping this step often results in flat, cakey cookies instead of the signature fudgy centers. Think of it as giving the dough time to "set up" for baking success!
Can I substitute chocolate chips for chunks?
Use 1.5 cups chocolate chips instead of chunks, but expect slightly less dramatic chocolate rivers. For best results, press the chips gently into the dough so they stay put during baking. Pro tip: Mix half chunks and half chips for a balance of texture and meltiness.
How do I fix cookies that spread too much?
If your cookies flatten out, they likely didn't chill long enough or your oven runs hot. Next time, chill dough for 1 hour and check your oven temperature with a thermometer. For immediate fixes, try baking at 325°F for 14-16 minutes instead. The secret to thick cookies? Cold dough and proper spacing on the baking sheet!
Can I make these cookies without nuts?
Simply omit the walnuts entirely. The recipe works beautifully with just chocolate as the star. For extra texture, try toasted coconut flakes or crushed pretzels (sounds odd, but it works!). The dough's richness comes from the butter and chocolate, so no nuts = no problem.
How should I store these cookies?
Keep cookies fresh in an airtight container at room temperature for 5 days. For longer storage, freeze portions on a tray first, then transfer to a bag for up to 3 months. Thaw at room temperature or warm for 10 seconds in the microwave to restore that gooey magic. Pro move: Freeze extras right after baking for perfect texture later!