
Desserts
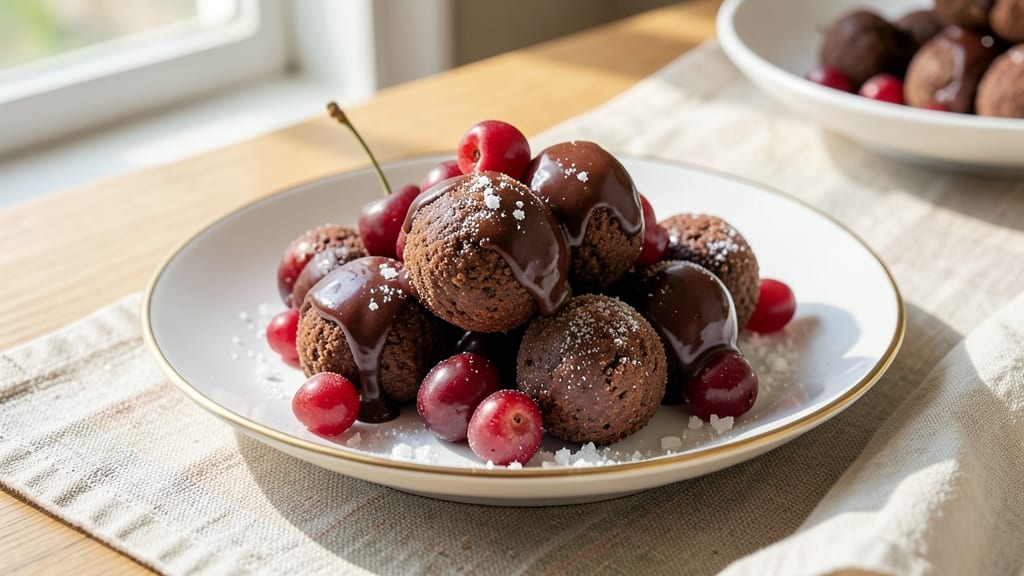
This no-bake cherry chocolate balls recipe delivers rich, velvety bites packed with tart cherry bursts—no oven required. ✨ The secret lies in melting dark chocolate with butter and powdered sugar, then folding in chopped cherries for pockets of fruity surprise.
These treats are foolproof, requiring just 15 minutes of prep and 30 minutes of chilling, making them perfect for last-minute desserts or holiday gifting.
The beauty of this recipe is its versatility—swap frozen cherries for fresh, dark chocolate for milk, or roll the balls in crushed nuts or coconut for added texture.
The no-bake method ensures tender, melt-in-your-mouth centers with a glossy chocolate exterior, while the tart cherries cut through the sweetness for a balanced flavor. It’s the kind of dessert that feels indulgent yet effortless, ideal for satisfying cravings without the fuss.
Once chilled, these bite-sized treats hold their shape beautifully, making them easy to pack and transport. Whether you’re serving them at a potluck, stashing them in the fridge for a quick snack, or gifting them in decorative boxes, they’re guaranteed to disappear fast.
The rich chocolate and bright cherry flavors make them a crowd-pleaser, perfect for any occasion.
For extra flair, drizzle the finished balls with melted chocolate or sprinkle them with flaky sea salt before they set. Store them in an airtight container for up to a week, though they rarely last that long. Let’s make these no-fuss, no-bake delights—your taste buds will thank you.
Ingredients for cherry chocolate balls
Eight simple ingredients transform into velvety chocolate bites with tart cherry surprises—no oven needed.
| Ingredient | Amount | Notes |
|---|---|---|
| Dark Chocolate Bars 🍫 | 12 oz | 70% cocoa or higher for best flavor |
| Unsalted Butter 🧈 | ½ cup | Cut into small pieces for easy melting |
| Powdered Sugar 🍚 | 1 ½ cups | Sifted for smooth texture |
| Frozen Tart Cherries 🍒 | 1 ½ cups | Pitted and chopped (or fresh if in season) |
| Vanilla Extract 🌿 | 1 tsp | Pure vanilla for authentic flavor |
| Flaky Sea Salt 🧂 | 1 tsp | For finishing touch (optional) |
| Coconut Flakes 🥥 | ½ cup | Toasted for extra crunch (optional) |
| Crushed Nuts 🌰 | ½ cup | Pecans or almonds work great (optional) |
The chocolate makes or breaks these. Ghirardelli or Lindt 70% bars melt perfectly—avoid the cheap stuff that gets grainy. Butter matters too: unsalted, cold from the fridge for smoothest melting. I grab powdered sugar in the baking aisle at Target—the boxed kind works fine, but sifting removes clumps. Cherries? Frozen tart cherries from the freezer section are perfect—they’re already pitted and sweet-tart. If you’re using fresh, make sure they’re fully ripe and pitted yourself (trust me, it’s worth the extra minute).
No dark chocolate? Milk chocolate works too—just know the flavor will be sweeter. Short on butter? Coconut oil at the same amount melts just as well. The vanilla extract is non-negotiable for depth, but if you’re out, vanilla bean paste at half the amount gives similar richness. For the rolling bits, coconut flakes or crushed nuts add texture—skip them if you prefer smooth balls. Pro tip: Toast the coconut flakes in a dry pan for 2-3 minutes before using—they’ll be crispier and taste better.
These keep beautifully—1 week in an airtight container at room temp or 2 weeks in the fridge. For extra shine, drizzle with melted chocolate before chilling. The balls firm up perfectly in the fridge, making them easier to handle. I always make a double batch—half for snacking, half for gifting in pretty boxes. They freeze well too, so stash extras in the freezer for up to 3 months. Just let them sit at room temp for 10 minutes before serving.
Why You'll Love This Recipe
- Five-Ingredient Magic: I swear by this recipe—just melt chocolate, toss in cherries, and roll. No fancy equipment, no stress, and honestly? It’s the kind of dessert that makes you feel like a baking pro without the fuss.
- Cherry-Chocolate Bliss: That burst of tart cherries cutting through rich dark chocolate? It’s like a flavor hug. The vanilla extract ties it all together so smoothly, you’ll want to eat the dough before it even rolls.
- Party or Pajamas: These balls are my secret weapon for holidays, potlucks, or lazy Sundays. They’re easy to portion, travel well, and between us? They disappear fast—whether you’re serving guests or sneaking bites straight from the bowl.
- No-Waste Win: Use up frozen cherries lurking in your freezer, and that dark chocolate bar you’ve been saving? Perfect. The leftovers? They’ll last days in the fridge, and honestly, I’ve never had anyone turn down a second batch.
Step-by-step instructions for no-bake cherry chocolate balls
Here's how to make these rich, fruity bites without turning on the oven.
🍳 Step 1: Melt Chocolate and Butter Together
Break the 12 oz dark chocolate bars into small pieces and place them in a microwave-safe bowl. Add the 0.5 cup unsalted butter (cut into small pieces) and microwave in 30-second bursts on high power, stirring between each interval. You're aiming for a smooth, glossy mixture that coats the back of a spoon—this should take about 2-3 minutes total.
Don't rush this step. The chocolate needs to melt completely and blend with the butter to create a silky base. If you see any unmelted bits, give it another 10-second burst. Once fully melted, remove from microwave and let it cool slightly for 2 minutes—it should be warm but not hot to the touch.
👨🍳 Step 2: Mix in Cherries and Vanilla
Add the 1.5 cups frozen tart cherries (still frozen) to the chocolate mixture and stir gently to distribute them evenly. The cherries will soften as they warm up, creating those beautiful tart bursts in each bite. Add the 1 tsp vanilla extract and mix thoroughly until combined.
Here's the thing—don't overmix. You want the cherries to stay in little clusters rather than turning into a smooth paste. Each spoonful should show visible cherry pieces surrounded by chocolate. If the mixture looks too thick, you can add 1-2 teaspoons of milk to loosen it slightly.
🥘 Step 3: Fold in Sugar and Nuts
Sift the 1.5 cups powdered sugar over the chocolate mixture and fold it in gently with a rubber spatula. This is where the magic happens—the sugar helps create that perfect balance of sweetness and tartness. Add the 0.5 cup crushed nuts and mix until evenly distributed throughout.
I like to press the mixture down lightly in the bowl to help it set up better. The texture should be thick but still scoopable—almost like a thick cookie dough. If it's too sticky, add a bit more powdered sugar (about 1 tablespoon at a time) until it holds its shape when you press it between your fingers.
⏰ Step 4: Chill and Shape the Balls
Transfer the mixture to a greased loaf pan or small baking dish and press it down firmly with a spatula. Cover with plastic wrap and refrigerate for at least 2 hours (or up to 24 hours). This chilling time is crucial—it lets the mixture firm up so you can handle it without it sticking to your hands.
Once chilled, use a small cookie scoop or tablespoon to portion out 1-inch balls of the mixture. Roll them gently between your palms to create smooth, round balls. If they feel too soft to handle, pop them back in the fridge for another 15 minutes. The cherries should still be visible through the chocolate coating.
🔪 Step 5: Coat and Finish with Salt
Melt the 0.5 cup coconut flakes in a dry skillet over low heat for 2-3 minutes, stirring constantly, until they turn golden and smell toasty. Remove from heat immediately and let cool slightly. Working quickly, roll each chocolate ball in the toasted coconut flakes until fully coated.
Place the finished balls on a parchment-lined plate and sprinkle each one with a tiny pinch of flaky sea salt. This final touch brings out all the flavors—sweet, tart, salty, and nutty. Let them set for 10 minutes before serving so the coating adheres properly. Store any leftovers in an airtight container in the fridge for up to 5 days—they'll keep getting better as they sit!
Pro Tips For Making Cherry Chocolate Balls
- Melt Chocolate Slowly: Chop the dark chocolate into small, even pieces—think rice-sized—not big hunks. If you rush and toss it all in at once, you’ll end up with streaks of unmelted chocolate in your dough. A double boiler or microwave in 20-second bursts keeps it smooth.
- Thaw Cherries First: Skip the frozen cherries straight from the freezer—they’ll turn your dough icy and uneven. Toss them in a bowl with a splash of warm water and let them sit for 10 minutes to soften. Drain well, or your balls will fall apart when rolling.
- Chill the Dough: This isn’t optional. After mixing, refrigerate the dough for at least 30 minutes—yes, even if you’re eager to roll. Cold dough holds its shape better, and the cherries won’t ooze out when you cut them. (I learned this after making a mess on my counter.)
- Use a Cookie Scoop: Measuring tablespoon after tablespoon gets tedious. Grab a small cookie scoop (or ice cream scoop) to portion the dough neatly. It saves time and ensures uniform balls—no lopsided, sad-looking treats. (Your hands will thank you too.)
Common mistakes when making great cherry chocolate balls
Overmixing the Cherries
The biggest mistake I see is blending the cherries into a smooth paste instead of keeping them in little pockets. When you overmix, you lose those beautiful tart bursts that make these treats special.
Stir just until the cherries are evenly distributed—think of it like folding in chocolate chips rather than making a smooth batter. 🍒
Skipping the Chill Time
Rushing the 2-hour chilling period is a recipe for disaster. The mixture needs time to firm up so it holds its shape when you roll the balls.
If you try to shape them too soon, they'll be sticky and fall apart. Trust me, the extra time is worth it for perfect texture. ❄️
Wrong Chocolate Temperature
Using chocolate that's too hot can cause the butter to separate, leading to a grainy texture. Always let the melted chocolate cool slightly for 2 minutes before adding the butter. And never microwave on high power continuously—30-second bursts with stirring prevent scorching. 🔥
Improper Sugar Measurement
Packing powdered sugar too tightly into your measuring cup means you're actually getting more than 1.5 cups. Use the spoon-and-level method for accurate measurements. Too much sugar makes the balls dry and crumbly, while too little leaves them too soft to handle.
A kitchen scale is your best friend here!
Handling Warm Balls
Rolling freshly shaped balls in coconut flakes when they're still warm will cause the coating to melt and slide off. Let them sit at room temperature for 10 minutes first so the coating sets properly. This simple step makes all the difference in presentation. 🥥
Using Old Ingredients
Stale powdered sugar or rancid butter will ruin your chocolate balls. Check your ingredients before starting—powdered sugar should be fresh (less than 6 months old) and butter should smell clean. The quality of these simple ingredients makes a surprising difference in the final product. 🧈
Nutrition facts
Frequently asked questions
Can I use fresh cherries instead of frozen?
Yes, but you'll need to pit them first—fresh cherries have pits that can ruin your texture. For best results, use 1.5 cups pitted fresh cherries and pat them completely dry with a paper towel before mixing. Frozen cherries are ideal because they're already pitted and their cold temperature helps prevent overmixing.
How do I make these without nuts?
Skip the nuts entirely or replace them with 0.5 cup extra powdered sugar for a smoother texture. For added crunch, try crushed pretzels or toasted coconut flakes instead. The key is maintaining the right balance—if you remove nuts, you might need to add 1-2 tablespoons more powdered sugar to help the mixture hold its shape.
Why did my chocolate balls turn out crumbly?
Crumbly texture usually means too much powdered sugar or not enough chilling time. Check your measurements—use the spoon-and-level method for powdered sugar. Also ensure you chilled the mixture for the full 2 hours. If they're still crumbly, try adding 1 tablespoon melted chocolate to the mixture before shaping.
Can I make these ahead of time?
These keep beautifully for 1 week at room temperature or 2 weeks in the fridge. For extra-long storage, freeze shaped (uncoated) balls for up to 3 months. Thaw in the fridge overnight before coating. The flavors actually develop and improve over time, making them perfect for making ahead.
What's the best way to store leftovers?
Store in an airtight container between layers of parchment paper to prevent sticking. For best quality, keep them in the fridge where they'll maintain their texture for up to 5 days**. If storing at room temperature, place them in a single layer on a tray first to prevent moisture buildup. The coconut coating stays crispest when refrigerated.