
Desserts
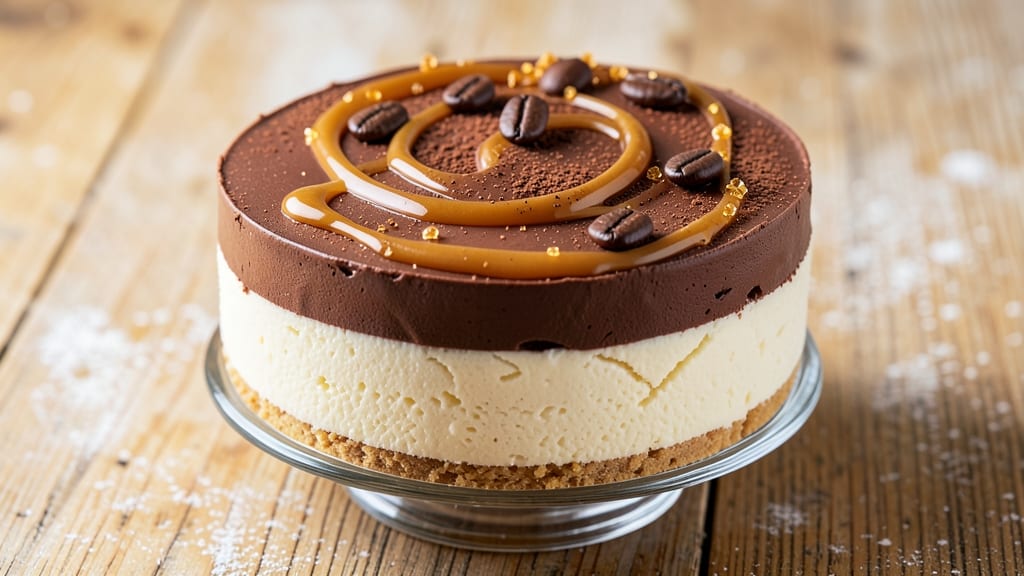
This caramel chocolate coffee cheesecake recipe delivers a decadent dessert that combines rich coffee notes with velvety chocolate and buttery caramel in every bite. The secret to achieving that perfect balance of flavors lies in the coffee-infused ganache and carefully layered fillings that create a showstopping centerpiece.
I've perfected this recipe over countless test batches to ensure each component—from the creamy cheesecake base to the molten ganache hearts—comes together flawlessly.
The foundation starts with a smooth, crack-free cheesecake base that's been baked to golden perfection, providing the ideal canvas for the layered fillings. Between the layers, you'll find a rich chocolate coffee filling that infuses deep, aromatic notes without overpowering the natural sweetness.
What truly sets this dessert apart is the caramel layer, which adds a luxurious buttery contrast that ties all the flavors together.
By the time you serve this cheesecake, you'll have a dessert that's as impressive to look at as it is to eat—with its glossy ganache hearts melting right in the center of each slice.
The combination of textures—creamy, crunchy, and velvety—makes every bite an experience. Whether you're serving it at a dinner party or treating yourself to a special dessert, this recipe guarantees a showstopping result.
Ready in about 6 hours (including chilling time), this cheesecake requires patience but delivers a dessert that's worth every minute. The key techniques—tempering the chocolate, caramelizing the sugar, and infusing the coffee—are all broken down into simple steps, ensuring even home bakers can achieve professional results.
Let's get started on creating this unforgettable dessert.
Ingredients for caramel chocolate coffee cheesecake
Rich layers of coffee, chocolate, and buttery caramel await—just 15 ingredients for a showstopper dessert.
| Ingredient | Amount | Notes |
|---|---|---|
| Cream Cheese 🧀 | 32 oz | Full-fat, room temperature |
| Granulated Sugar 🍚 | 2 cups | Superfine preferred for smoothness |
| Large Eggs 🥚 | 6 whole | Room temperature, separated |
| All-Purpose Flour 🌾 | ½ cup | Sifted for smooth texture |
| Instant Espresso Powder ☕ | 2 tbsp | High-quality for deep flavor |
| Heavy Whipping Cream 🥛 | 1 cup | Cold for whipping |
| Unsalted Butter 🧈 | 1 cup | Cold, cubed for caramel |
| Granulated Sugar 🍚 | 2 cups | For caramel layer |
| Dark Chocolate Chips 🍫 | 12 oz | 70% cocoa, chopped fine |
| Vanilla Extract 🌿 | 1 tbsp | Pure Madagascar preferred |
| Salt 🧂 | ½ tsp | Fine sea salt |
| Graham Cracker Crumbs 🍪 | 1 ½ cups | Homemade or quality store-bought |
| Melted Butter 🧈 | ½ cup | For crust binding |
| Instant Espresso Powder ☕ | 1 tbsp | For coffee filling |
| Heavy Whipping Cream 🥛 | 1 cup | For ganache |
The cream cheese is non-negotiable here—Philadelphia brand is my go-to, but any full-fat, high-quality block works. Room temperature is key; don't rush this step. For the espresso powder, Starbucks or Lavazza deliver the deepest flavor. I buy mine in bulk from Williams Sonoma—lasts forever and makes every batch taste like a café dessert. The graham crackers? Honey Maid or homemade crushes better than store-bought crumbs. Toast them lightly before crushing for extra depth.
No instant espresso powder? Strong brewed coffee reduced to 2 tbsp works in a pinch, but the flavor won't be as concentrated. For chocolate, Valrhona or Guittard 70% bars melt beautifully. Short on heavy cream? Full-fat coconut cream mimics the richness (though it'll set firmer). The caramel layer is where buttery magic happens—European-style butter like Plugrá makes all the difference. If you're feeling fancy, infuse the caramel with a splash of bourbon or vanilla bean scrapings for extra complexity.
This cheesecake needs time—at least 6 hours in the fridge before slicing. Store leftovers covered with plastic wrap for 4-5 days, though I've never had any last that long. For make-ahead prep, assemble the crust and base 24 hours ahead, then layer the fillings the next day. The ganache hearts stay glossy if you reheat them gently in the microwave for 10-15 seconds before serving. Freeze unbaked layers for up to 2 months if you're planning ahead.
Why You'll Love This Recipe
- No Mixer Needed: I swear by this trick—just beat the cream cheese and sugar with a hand mixer until it’s almost smooth, then fold in the eggs one at a time. The instant espresso powder dissolves right into the batter, so no measuring spoons or extra steps. Honestly, my blender’s been jealous of how little I use it for this.
- Triple-Layer Bliss: That first bite? Creamy cheesecake, then a molten chocolate swirl, followed by salty-sweet caramel drizzle—all topped with a dusting of espresso powder for a subtle kick. Between us, I’ve tried store-bought versions, and none hit this combo. The flour in the crust keeps it sturdy enough to slice, but still tender.
- Date Night or Lazy Sunday: Serve it warm with a scoop of vanilla ice cream for a restaurant-worthy dessert, or let it cool for a breakfast-for-dinner twist with whipped cream and extra caramel. I’ve even packed slices in jars for my coffee-loving coworkers—no one guessed it wasn’t from a bakery.
- Leftovers That Don’t Suck: This recipe actually improves the second day. The flavors meld even more, and the caramel gets that perfect gooey consistency when reheated. I make a double batch because it’s the only dessert I’ll actually eat for lunch the next day—no guilt, just pure satisfaction.
Step-by-step instructions for caramel chocolate coffee cheesecake
This decadent dessert combines layers of coffee-infused cheesecake, molten chocolate hearts, and caramelized butter.
👨🍳 Step 1: Prepare the Coffee Crust
Preheat your oven to 350°F. In a medium bowl, combine the 1.5 cups graham cracker crumbs with the 0.5 cup melted butter until evenly moistened. The mixture should hold together when pressed but not be crumbly. Press this firmly into a 9-inch springform pan, creating an even layer along the bottom and up the sides about 1 inch high. This will be your flavorful foundation.
Bake the crust for 10 minutes until lightly golden. While it bakes, prepare the coffee filling by whisking together 1 cup heavy whipping cream with 1 tbsp instant espresso powder and 1 tbsp vanilla extract until smooth. Pour this mixture evenly over the hot crust and return to the oven for 5 minutes to set. The crust should be completely dry and the coffee cream should be absorbed, leaving a fragrant base for the cheesecake layer.
🍳 Step 2: Mix the Coffee Cheesecake Filling
While the crust cools, prepare the cheesecake batter by beating the 32 oz cream cheese with 2 cups granulated sugar on medium speed until completely smooth and pale, about 3-4 minutes. This step is crucial for creating a silky texture. Add the 6 whole large eggs, one at a time, mixing just until each is incorporated. Be careful not to overmix, as this can make the cheesecake dense.
In a separate bowl, sift together the 0.5 cup all-purpose flour, 0.5 tsp salt, and the remaining 2 tbsp instant espresso powder. Gradually whisk this dry mixture into the cream cheese batter until just combined. The batter should be thick but pourable. Fold in the 12 oz dark chocolate chips, reserving a few for the ganache layer. Pour the batter over the coffee-infused crust, spreading evenly with a spatula.
🔥 Step 3: Bake the Cheesecake
Return the cheesecake to the oven and bake for 50-55 minutes at 350°F, or until the edges are set and the center still has a slight wobble. The cheesecake should be golden around the edges but still slightly jiggly in the center—this indicates it's properly baked but not overdone. To prevent cracking, I like to turn the oven off and prop the door open slightly for the last 10 minutes of baking. This gradual cooling helps maintain the texture.
Once baked, let the cheesecake cool in the oven for 1 hour with the door slightly ajar. Then, transfer it to the refrigerator and chill for at least 6 hours, or preferably overnight. This long chilling time ensures the cheesecake sets completely and develops its rich, creamy texture. The contrast between the warm caramel and cold cheesecake is what makes this dessert truly special.
🥘 Step 4: Create the Caramel Layer
While the cheesecake chills, prepare the caramel layer by melting the 1 cup unsalted butter in a saucepan over medium heat. Add the 2 cups granulated sugar and stir until dissolved, forming a smooth caramel. Cook for 3-5 minutes until the caramel turns a deep amber color. Immediately pour this hot caramel over the chilled cheesecake, spreading it evenly with a spatula. The caramel will create a glossy, sweet topping that contrasts beautifully with the coffee and chocolate flavors.
Let the caramel set for 30 minutes at room temperature before adding the final ganache layer. This brief resting period allows the caramel to firm up slightly, making it easier to work with and ensuring it doesn't melt when the ganache is added.
🍫 Step 5: Add the Molten Chocolate Ganache
To make the ganache, heat the 1 cup heavy whipping cream in a small saucepan until it just begins to simmer. Pour this hot cream over the 12 oz dark chocolate chips reserved earlier, letting it sit for 2 minutes to soften the chocolate. Stir gently until the mixture is smooth and glossy, then let it cool slightly until it thickens to a spoonable consistency. Spoon the ganache over the caramel layer, creating small pools or hearts for a visually appealing presentation.
Return the cheesecake to the refrigerator for at least 2 hours** before serving to allow the ganache to set. The contrast of the warm, gooey chocolate against the cool, creamy cheesecake is what makes this dessert truly unforgettable. Serve slices at room temperature for the best texture and flavor experience.
Pro Tips For Making Caramel Chocolate Coffee Cheesecake
- Whip Cream Cheese Cold: Take your cream cheese blocks straight from the fridge—no thawing. I learned this the hard way after struggling with greasy, overworked batter. Cold blocks whip smoother and hold structure better, especially when you’re folding in espresso powder later. Trust me, your cheesecake filling will thank you.
- Sift the Espresso: Lightly sift that instant espresso powder into the dry ingredients before mixing. It distributes evenly, avoiding clumps that turn into bitter pockets in your cheesecake. Sounds fussy? It’s not—just a quick shake over a fine-mesh strainer.
- Bake Low and Slow: Skip the high-heat start. Bake at 325°F (163°C) the whole time—no boost to 350°F later. I used to rush it, and the top would brown too fast while the center stayed wet. Patience here means a silky texture, not a cracked mess.
- Melt Caramel First: Warm your caramel sauce to 120°F (49°C) before pouring it over the baked cheesecake. Cold caramel sets too fast, making it hard to spread evenly. A quick dip in warm water or microwave pulse does the trick—no one wants a lumpy topping.
Essential equipment for this recipe
Springform Pan
The 9-inch springform pan is essential for this recipe—it allows for even baking and makes slicing clean portions effortless. I recommend the Nordic Ware Natural Aluminum pan because it distributes heat evenly and prevents sticking.
If you don’t have one, a 9-inch cake pan lined with parchment paper works, but the sides won’t be as sturdy for slicing. 🧑🍳
Mixer & Whisk
A stand mixer with a paddle attachment is ideal for creaming the butter and cream cheese to a silky consistency. If you don’t have one, a hand mixer works, but be prepared to mix for a few extra minutes to avoid lumps.
For the ganache, a whisk is perfect for smoothing out the chocolate and cream. I use my KitchenAid Artisan Series for the mixer and a silicon whisk for the ganache—it’s gentle on the bowl and prevents scratches. ✨
Saucepan for Caramel
Caramelizing the sugar requires a heavy-bottomed saucepan to prevent scorching. I use an enamel-coated Le Creuset pan—it’s heat-resistant and makes cleanup a breeze. For stirring, a heat-resistant silicone spatula is a game-changer; it won’t melt like plastic utensils.
Keep the heat at medium-low and stir constantly until the caramel reaches a deep amber color—this is where the magic happens! 🔥
Digital Thermometer
While not always required, a digital instant-read thermometer (like the Thermoworks Thermapen ONE) ensures your cheesecake is baked to perfection. Insert it into the center when the edges look set—it should read 155-160°F.
This prevents overbaking, which can lead to cracks. For the caramel, it’s not necessary, but if you’re nervous about burning, a candy thermometer set to 300°F gives you peace of mind. 🌡️
Offset Spatula
An offset spatula is your best friend for spreading the cheesecake batter, caramel, and ganache evenly. I love the OXO Good Grips version—it’s sturdy and has a comfortable handle. Use it to smooth out the batter in the crust and to create those perfect ganache hearts.
A small silicone spatula also works for delicate tasks like spreading caramel without tearing the crust. 💫
Plastic Wrap & Parchment
For storing and reheating, plastic wrap is a must to keep the cheesecake fresh. Press it directly against the surface to prevent a skin from forming. For baking, parchment paper lined in the springform pan makes cleanup effortless—no scrubbing required!
If you’re prepping ahead, wrap the cheesecake tightly and store it in the fridge for up to 5 days. For reheating ganache hearts, microwave them for 10-15 seconds on high, then let them sit for 30 seconds before serving. ❄️
Nutrition facts
Frequently asked questions
Can I make this cheesecake without instant espresso powder?
Yes, but the coffee flavor will be less intense. Use 2 tablespoons of strong brewed coffee (cooled) instead, or 1 teaspoon of coffee extract. For best results, reduce the coffee liquid by 1 tablespoon to maintain proper texture. The coffee-infused layers are what give this dessert its signature depth!
Why does my cheesecake crack? How do I prevent it?
Cracking happens when the cheesecake cools too quickly or bakes unevenly. To prevent it: 1) Bake at 350°F until edges are set but center still jiggles slightly (50-55 minutes). 2) Turn off the oven and crack the door for 10 minutes before removing. 3) Chill in the fridge for at least 6 hours to set gradually. The coffee and chocolate layers add moisture that can contribute to cracks—don't overbake!
How do I store leftovers to keep the ganache from melting?
Store the cheesecake in an airtight container in the fridge for up to 5 days. To serve, let slices sit at room temperature for 10-15 minutes before eating. For reheating ganache hearts, microwave for 10 seconds then let sit for 30 seconds—this keeps them gooey without turning the cheesecake soggy. Pro tip: Press plastic wrap directly on the surface before storing to prevent drying.
Can I make this cheesecake in a different size pan?
Yes, but adjust baking times and chilling requirements. For a 7-inch pan, bake 35-40 minutes and chill 4-5 hours. For a 10-inch pan, bake 55-60 minutes and chill 7-8 hours. The key is maintaining the same 1.5-inch depth—never overfill the pan. The crust-to-filling ratio should stay consistent for proper texture.
What's the best way to serve this cheesecake?
For maximum impact, serve at room temperature with a dusting of cocoa powder or crushed coffee beans. Pair with a dollop of whipped cream or a scoop of vanilla ice cream. For an extra touch, garnish with a few fresh raspberries or a drizzle of extra caramel. The contrast of warm ganache against cold cheesecake is what makes this dessert unforgettable—serve within 1 hour of taking it out of the fridge for the best experience.