
Desserts
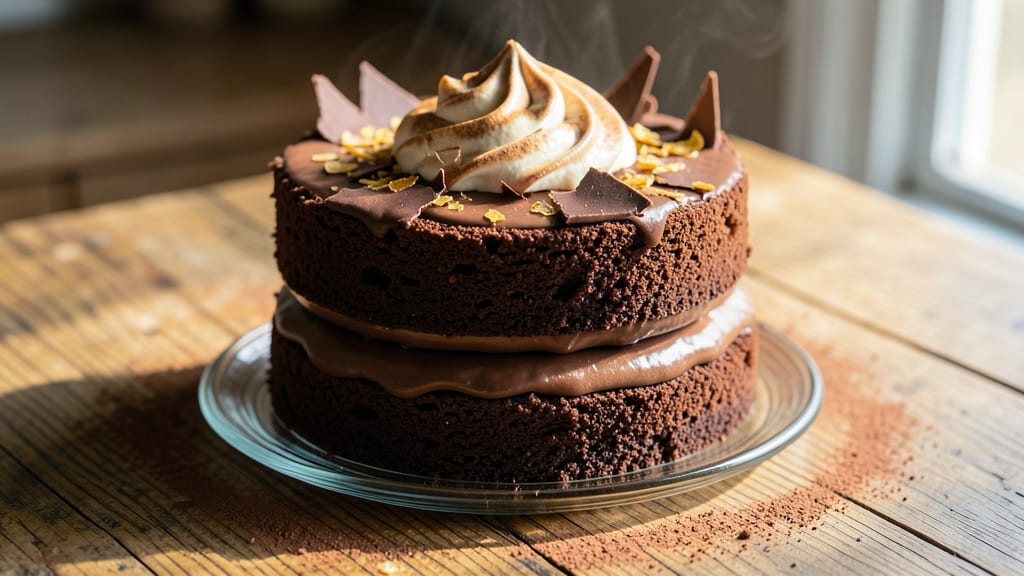
This café latte chocolate cake delivers the rich, mocha-infused indulgence of your favorite Starbucks drink—now in decadent layer form. 💛 The secret lies in a perfectly balanced cake batter infused with espresso powder and cocoa, creating a tender crumb that absorbs the coffee-chocolate filling between layers.
Every bite combines the deep, velvety notes of chocolate with the smooth, aromatic warmth of café latte, making it impossible to resist a second slice.
What sets this recipe apart is the mocha frosting that mimics Starbucks' signature blend—smooth, slightly tangy, and just sweet enough to complement the cake's richness. The frosting isn't overly sweet; instead, it enhances the coffee and chocolate flavors without overpowering them.
This cake is designed to impress, whether you're serving it at a dinner party or treating yourself to a special dessert.
The assembly process is straightforward but requires precision to ensure clean layers and a flawless finish. You'll bake a rich chocolate cake, prepare a luscious coffee-chocolate filling, and whip up the signature mocha frosting.
Each layer is carefully stacked and chilled, resulting in a cake that's as visually stunning as it is delicious. The optional garnish of cocoa powder and whipped cream adds that final touch of elegance.
Ready in just 3 hours (including chilling time), this café latte chocolate cake is perfect for coffee lovers who crave a dessert that tastes like their morning ritual. The combination of espresso-infused cake, chocolate filling, and mocha frosting creates a harmonious balance that's both comforting and luxurious. Let's get baking!
Ingredients for cafe latte chocolate cake
Mocha magic starts here—16 ingredients to recreate Starbucks' café latte essence in cake form.
| Ingredient | Amount | Notes |
|---|---|---|
| All-Purpose Flour 🌾 | 3 cups | Sifted for light texture |
| Granulated Sugar 🍚 | 2 ½ cups | White or light brown |
| Unsalted Butter 🧈 | 1 ½ cups | Room temperature, full-fat |
| Large Eggs 🥚 | 4 whole | Room temperature, separated |
| Espresso Powder ☕ | 2 tbsp | High-quality, finely ground |
| Unsweetened Cocoa Powder 🍫 | ¾ cup | Dutch-processed preferred |
| Baking Powder 🧂 | 1 ½ tsp | Diamond Crystal brand |
| Salt 🧂 | ½ tsp | Fine sea salt |
| Vanilla Extract 🌿 | 1 tsp | Pure, high-quality |
| Milk 🥛 | 1 cup | Whole milk preferred |
| Heavy Cream 🥛 | 1 cup | Cold for frosting |
| Powdered Sugar 🍚 | 4 cups | Sifted for smooth frosting |
| Instant Espresso Granules ☕ | 1 tbsp | Dissolved in warm milk |
| Dark Chocolate Chips 🍫 | 1 ½ cups | Semi-sweet, chopped |
| Cocoa Powder 🍫 | ¼ cup | For filling and garnish |
| Whipped Cream 🍦 | 1 cup | Stabilized for piping |
The espresso powder and cocoa are non-negotiable for that signature Starbucks taste. Lavazza or Starbucks brand espresso powder delivers the most authentic flavor—don't skimp on quality here. For the cocoa, Valrhona or Ghirardelli brands give that velvety richness. The butter? Plugrá or Land O'Lakes work perfectly, but make sure it's full-fat—none of that low-fat nonsense. Room temperature butter is key for that light, airy cake texture. I always buy my espresso powder from Williams Sonoma or Bed Bath & Beyond—their bulk bins have the freshest stock.
No espresso powder? 2 tbsp instant coffee granules dissolved in 2 tbsp hot water works in a pinch, but it won't be quite the same. The chocolate chips can be swapped for chopped dark chocolate bars (70% cocoa or higher)—just melt them first. Running low on powdered sugar? Sifted granulated sugar works at 1.5x the amount, but it won't be as smooth. The heavy cream needs to be cold when you whip it for the frosting—pull it out of the fridge 10 minutes before using. For the filling, if you can't find instant espresso granules, dissolve 1 tsp instant coffee in 2 tbsp warm milk instead. The whipped cream? Stabilize it with 1 tsp powdered sugar to keep it fluffy longer.
This cake needs 3 hours of chilling time—don't rush it. Store leftovers in an airtight container with parchment paper between layers for up to 5 days. The frosting? Keep it in the fridge, covered, for 3 days max—it softens at room temperature. For a showstopper presentation, dust with cocoa powder and add whipped cream rosettes right before serving. The cake actually tastes better the next day as the flavors meld together—worth making ahead for parties.
Why You'll Love This Recipe
- No Mixer Needed: I swear by this—just a bowl, a whisk, and 10 minutes of elbow grease. The butter and sugar cream together so smoothly (thanks to room temp shortcuts), and the espresso powder dissolves right into the dry ingredients. No stand mixer? No problem.
- Rich Without Bitterness: That espresso powder isn’t just for flavor—it’s the secret to deep, velvety chocolate that doesn’t taste like burnt coffee. The butter keeps it moist, and the eggs bind it just enough to stay tender. Honestly, it’s the kind of cake that makes you forget store-bought ever existed.
- Date Night or Dessert Party: This cake’s got two personalities—elegant enough for a fancy dinner but simple enough for a last-minute dessert spread. Serve it warm with whipped cream or let it cool for a more structured slice. Between us, it’s my go-to when I want to impress without stressing.
- Leftovers That Still Shine: Bake one pan, eat it over three days—no one will complain. The texture stays perfect (no dry edges, no soggy middle), and it reheats beautifully in the microwave. Plus, the cost? A fraction of what you’d pay for a café version. My secret weapon for lazy Sundays.
Step-by-step instructions for café latte chocolate cake
Here's how to create a decadent mocha cake with layers of espresso-infused flavor and velvety frosting.
👨🍳 Step 1: Prepare the Espresso-Infused Cake Batter
Preheat your oven to 350°F and grease three 8-inch round cake pans, lining the bottoms with parchment paper. In a medium bowl, whisk together the 3 cups All-Purpose Flour, 1.5 tsp Baking Powder, 0.5 tsp Salt, and 0.75 cup Unsweetened Cocoa Powder. Sift this dry mixture into a large mixing bowl to aerate it.
In a separate large bowl, cream the 1.5 cups Unsalted Butter (at room temperature) and 2.5 cups Granulated Sugar on medium speed until light and fluffy—about 3-4 minutes. Add the 4 whole Large Eggs one at a time, mixing well after each addition. Stir in the 2 tbsp Espresso Powder, 1 tsp Vanilla Extract, and the dissolved 1 tbsp Instant Espresso Granules (mixed with 2 tbsp warm milk to create an espresso syrup).
Gradually add the dry ingredients to the wet mixture, mixing on low speed just until combined. Fold in the 1.5 cups Dark Chocolate Chips using a spatula. Divide the batter evenly among the prepared pans. Bake for 25-30 minutes or until a toothpick inserted into the center comes out clean. Let the cakes cool in the pans for 10 minutes, then transfer to a wire rack to cool completely.
🍳 Step 2: Create the Mocha Cream Filling
In a medium saucepan, combine the remaining 1 cup Milk and 0.25 cup Cocoa Powder. Whisk over medium heat until the cocoa powder is fully dissolved and the mixture begins to simmer. Remove from heat and stir in 1 tbsp Espresso Powder and 1 tsp Vanilla Extract.
In a separate bowl, whip the 1 cup Heavy Cream to soft peaks. Gradually fold the warm cocoa mixture into the whipped cream until fully combined. The filling should be thick but still pipeable. Let it cool completely before using.
🥘 Step 3: Assemble the Cake Layers
Place the first cake layer on a serving plate. Spread an even layer of the mocha cream filling over the top, leaving a ½-inch border uncovered. Repeat with the remaining two cake layers, creating a triple-layered cake. Chill the assembled cake in the refrigerator for at least 2 hours to allow the filling to set.
Here's the thing—this chilling step is crucial. It prevents the filling from leaking out when you add the frosting later. If you're impatient, you can speed it up by placing the cake in the freezer for 30 minutes.
🍽️ Step 4: Prepare and Apply the Mocha Buttercream Frosting
In a stand mixer fitted with the paddle attachment, beat the 1.5 cups Unsalted Butter (softened) and 4 cups Powdered Sugar on medium speed until light and fluffy. Add the remaining 1 cup Milk (from the ingredients list), 1 tbsp Espresso Powder, and 1 tsp Vanilla Extract, mixing until fully incorporated and smooth.
Spread the frosting evenly over the chilled cake, creating a smooth surface. For extra flair, pipe rosettes or swirls around the edges using a piping bag fitted with a star tip. Dust the top with a light layer of 0.25 cup Cocoa Powder for a professional finish.
⏰ Step 5: Garnish and Serve for Maximum Flavor
Whip the 1 cup Whipped Cream to stiff peaks and pipe decorative swirls around the base of the cake. Add a final touch by sprinkling Dark Chocolate Chips on top. Serve immediately for the best texture, or refrigerate for up to 4 hours before serving.
This cake delivers that perfect balance of rich chocolate, espresso intensity, and velvety frosting. Each bite should transport you to your favorite coffee shop—without the caffeine jitters.
Pro Tips For Making Cafe Latte Chocolate Cake
- Melt Butter Slowly: I learned this the hard way—dumping cold butter into hot liquid makes clumps that won’t dissolve properly. Warm your butter in the microwave for 15 seconds first, then whisk it into the sugar while still warm. The cake’s texture will be smoother, and you’ll avoid that grainy mouthfeel.
- Weigh Your Flour: Scooping flour from the bag packs too much air, and your cake will turn out dense. Use a kitchen scale for precision—this recipe works best with 225 grams of all-purpose flour. If you must use measuring cups, spoon it in gently and level it off with a knife. Trust me, your layers will thank you.
- Don’t Overmix the Batter: After adding the eggs, mix just until combined—maybe 10-12 strokes. Overmixing develops gluten and makes the cake tough. The batter should look slightly streaky, not perfectly smooth. I used to whip it like I was making pancakes, and the result was a sad, dense brick.
- Use Cold Eggs for Stability: Pull the eggs straight from the fridge and let them sit out for 5 minutes before cracking them. Cold eggs hold their shape better in the batter, which helps the cake rise more evenly. Warm eggs? They’ll spread too much, and your layers might collapse. Sounds weird, but it works—tested after three failed attempts.
Make-ahead tips for this cafe latte chocolate cake
Batter Prep Ahead
Mix the cake batter up to 24 hours in advance and store it in an airtight container in the fridge. The flavors deepen overnight, and the espresso infusion becomes more pronounced.
When ready to bake, let the batter sit at room temperature for 30 minutes before dividing into pans—this ensures even baking. I always prep mine the night before so I can enjoy the aroma while I sleep. 💛
Filling Prep Timeline
The mocha cream filling can be made 1 day ahead and stored in the fridge in a sealed jar. When ready to assemble, whisk it briefly to restore its smooth texture.
For extra stability, add ½ tsp unflavored gelatin dissolved in 1 tbsp cold water to the warm cocoa mixture before folding into the cream. This prevents soggy layers when you add the frosting later. Trust me, this small step makes all the difference. ✨
Layer Assembly Trick
Assemble the cake layers 4 hours before serving—this gives the filling time to set without making the cake too firm. Use a serrated knife to level each cake layer for even frosting application. Place parchment paper between layers if storing overnight to prevent sticking.
For a restaurant-quality finish, brush each layer with 2 tbsp coffee syrup (mix 1 tbsp sugar with 2 tbsp hot water) before adding filling—this adds moisture and enhances flavor. 🍫
Frosting Make-Ahead
Prepare the mocha buttercream 2 days in advance and store it in the fridge in a covered container. Let it sit at room temperature for 15-20 minutes before using—this makes it easier to spread. If the frosting hardens, microwave it in 10-second bursts while stirring until smooth.
For a smoother finish, chill the cake for 1 hour before frosting to prevent melting. I like to make mine the day before so I can focus on decorating right before serving. 🎂
Full Cake Prep
Assemble the entire cake 8 hours ahead and refrigerate it, covered. The frosting will firm up slightly, making it easier to slice and serve. To reheat individual slices (if needed), warm them in the microwave for 10-15 seconds—this revives the texture without melting the frosting.
For a showstopper presentation, dust with cocoa powder and add whipped cream rosettes right before serving. The cake actually tastes better the next day as the flavors meld together—perfect for parties or special occasions. 💡
Freezer-Friendly Option
For longer storage, wrap the fully assembled cake in plastic wrap and store it in the freezer for up to 1 month. Thaw it in the fridge overnight before serving. To reheat, let it sit at room temperature for 30 minutes—this restores the texture beautifully.
Freezing works best for the cake layers alone (without frosting), so assemble it fresh after thawing. This is my go-to method for holiday baking when I know I’ll need leftovers. ❄️
Nutrition facts
Frequently asked questions
Can I make this cake without espresso powder?
Yes! If you don't have espresso powder, use 2 tbsp instant coffee granules dissolved in 2 tbsp hot water instead. For a stronger coffee flavor, steep 1 tbsp finely ground coffee beans in 2 tbsp hot water for 5 minutes, then strain before adding. The flavor won't be identical, but it'll still capture that mocha essence.
How do I level the cake layers perfectly?
Use a serrated knife and a leveling guide (like a ruler or cake leveler) to create clean, even tops. Place the cake layer on the guide and gently saw back and forth until you reach the desired height. For extra precision, chill the cakes for 15 minutes before leveling—they'll be firmer and easier to slice.
Why did my cake sink in the middle?
This usually happens from overmixing the batter or opening the oven too soon. Mix the batter just until combined (no streaks of flour) and avoid overbaking—check for doneness at 25 minutes. Let the cakes cool completely in the pans for 10 minutes before removing. For extra support, bake the layers in 7-inch pans instead of 8-inch.
Can I make this cake gluten-free?
Replace the all-purpose flour with a 1:1 gluten-free baking flour blend (like Bob's Red Mill). Add 1 tsp xanthan gum to help bind the layers. For the mocha cream filling, use gluten-free cocoa powder and ensure your whipped cream is stabilized with 1 tsp powdered sugar. The texture may be slightly denser, but the flavor will still shine.
How do I store leftovers?
Keep the cake in an airtight container at room temperature for up to 3 days or refrigerate for 5 days. For longer storage, freeze individual slices (without frosting) for up to 1 month. To reheat, microwave for 10-15 seconds—this revives the texture beautifully. The frosting should be refrigerated separately.