
Desserts
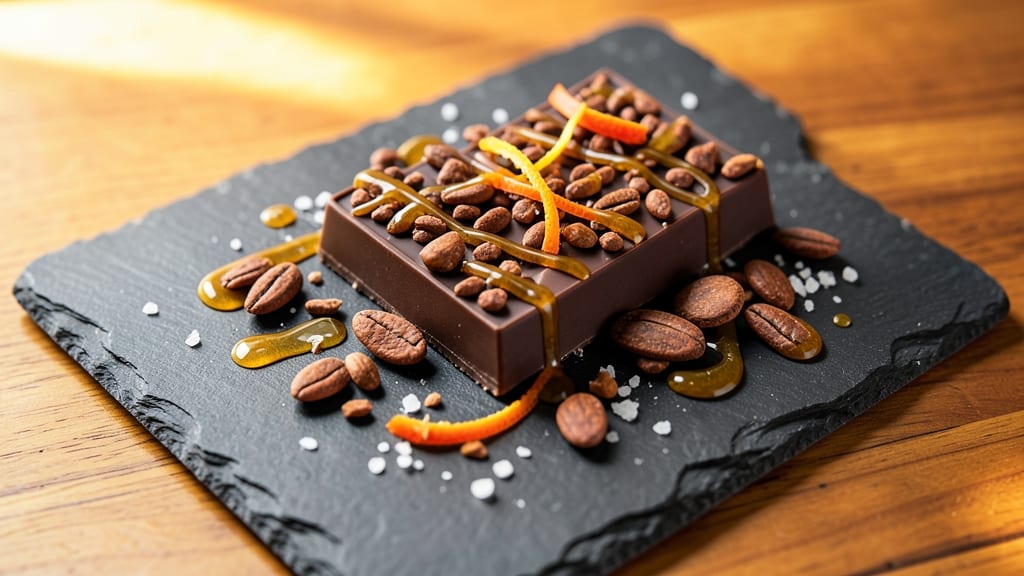
This cacao nibs chocolate recipe delivers the perfect marriage of crunchy texture and intense cacao flavor in every bite. 💛 The secret lies in blending rich, velvety dark chocolate with raw cacao nibs—creating a dessert that's both elegant and irresistibly addictive.
What sets this apart is the contrast: smooth chocolate meets the sharp, toasty crunch of nibs with every bite.
The process is surprisingly simple yet professional—melting chocolate to 110°F for perfect tempering, then folding in cacao nibs just before setting. This ensures the nibs stay crisp rather than dissolving, delivering that satisfying textural surprise with every mouthful. No special equipment is needed beyond a double boiler and parchment paper.
What you'll achieve is a restaurant-quality dessert that looks stunning and tastes even better—ideal for gifting, holiday treats, or satisfying your own chocolate cravings. The finished pieces have a glossy, crackly surface with pockets of crunchy cacao nibs embedded throughout, making them perfect for breaking into smaller, shareable bites.
This recipe works beautifully as chocolate bark, truffles, or even as a topping for ice cream. The versatility means you can adapt it for any occasion while keeping the star ingredient—the cacao nibs—front and center. Let's create something extraordinary together.
Ingredients for cacao nibs chocolate
Rich, velvety chocolate meets bold cacao crunch in this restaurant-quality dessert creation.
| Ingredient | Amount | Notes |
|---|---|---|
| Valrhona Guanaja 70% Dark Chocolate 🍫 | 12 oz | High-quality, single-origin preferred |
| Raw Cacao Nibs 🌿 | ½ cup | Unroasted for maximum crunch |
| Extra-Virgin Coconut Oil 🫒 | 2 tbsp | For smooth melting and glossy finish |
| Pure Maple Syrup 🍯 | 1 tbsp | For subtle sweetness balance |
| Flaky Sea Salt 🧂 | 1 tsp | For finishing touches |
| Orange Zest 🍊 | 1 tsp | Freshly grated for bright contrast |
| Unsweetened Coconut Flakes 🥥 | ¼ cup | Toasted lightly for added texture |
| Vanilla Bean Paste 🌸 | ½ tsp | For depth of flavor |
| Parchment Paper 📄 | 1 sheet | For easy release and presentation |
| Dark Chocolate Chips 🍫 | ¼ cup | 70% cacao for extra richness |
| Almond Slivers 🌰 | ¼ cup | Toasted for nutty crunch |
The chocolate is everything here—Valrhona Guanaja delivers that perfect balance of bitterness and smoothness. If you can't find it, Ghirardelli 70% works in a pinch, but trust me on the Guanaja. Cacao nibs? Navitas Organics or Terrasoul are my go-tos—they're unroasted so they stay crunchy and pack the most intense flavor. The coconut oil is non-negotiable for that glossy finish and easy release from the parchment. Grab the extra-virgin kind at Whole Foods or Trader Joe's—it makes all the difference. Fresh orange zest is a game-changer, so don't skip it unless you're making this for someone with citrus allergies. Toast your coconut flakes and almond slivers in a dry pan for just 2 minutes—they'll add that irresistible crunch without overpowering the chocolate.
No Valrhona? Lindt 70% or Callebaut are solid alternatives, but Guanaja's complexity is unmatched. Running out of cacao nibs? Chopped dark chocolate bars at half the amount can mimic the crunch, though it won't have that same sharp bite. The maple syrup can be swapped for agave nectar if you prefer, but maple adds that subtle caramel note that pairs beautifully. For extra decadence, fold in 1 tbsp of hazelnut butter when the chocolate is melted—it adds a nutty depth that's to die for. The vanilla bean paste? Dole or Frontier brands are affordable and pack serious punch. If you're feeling fancy, split a vanilla bean and scrape out the seeds yourself for that authentic luxury feel. The flaky sea salt is the final touch—Maldon is my absolute favorite, but any good-quality flaky salt will do.
This chocolate bark keeps beautifully—2 weeks at room temperature if you store it in an airtight container with a piece of bread inside (the bread absorbs moisture and keeps it fresh). For longer storage, freeze the pieces for up to 3 months. The chocolate will soften slightly when taken out of the freezer, but let it sit at room temp for 10 minutes before serving. I like to break mine into irregular pieces for that artisanal look, but if you're gifting, use a chocolate bark cutter for clean edges. Double the batch—it disappears faster than you'd think. These pieces are perfect for breaking into smaller bites, making them ideal for parties or as a luxurious snack. The contrast of textures and flavors makes every bite feel special.
Why You'll Love This Recipe
- No Melting Hassle: I’ve made chocolate recipes that require double boilers and tempering—this one just needs a microwave. Toss the chopped Valrhona Guanaja with coconut oil for 30 seconds, stir in the cacao nibs and maple syrup, then roll. Done. That’s it. No stress, no cleanup beyond a spoon.
- Crunch That Stops You: Between us, the cacao nibs are the star. They’re like tiny, bitter crunchy kisses that wake up your taste buds—especially when paired with the deep, fruity notes of Guanaja chocolate. Sprinkle flaky salt on top, and suddenly, you’ve got a flavor combo that’s hard to resist.
- Date Night or Snack Attack: This recipe works for both. Whip up a batch for elegant truffles to impress at a dinner party, or grab a handful straight from the fridge when you’re craving something rich after work. Honestly, I’ve eaten it at 9 AM with coffee—no judgment.
- Makes a Month’s Worth: A single batch yields enough for gifts, stashing in the freezer, or sneaking bites. The coconut oil keeps it shelf-stable for weeks, and the cost per serving is a steal when you’re using high-quality chocolate. Plus, the leftovers? Even better the second day.
Step-by-step instructions for crunchy cacao nibs chocolate bites
Here's how to create decadent, textured chocolate bites that pack intense cacao flavor with every bite.
🍳 Step 1: Melt the Chocolate and Coconut Oil
Break the 12 oz Valrhona Guanaja 70% Dark Chocolate into small pieces and place in a microwave-safe bowl. Add the 2 tbsp Extra-Virgin Coconut Oil and microwave in 20-second intervals, stirring between each, until completely melted and smooth. You want a glossy, liquid consistency—no streaks or unmelted bits. If using a double boiler, melt gently over simmering water, stirring constantly until fully combined.
Here's the thing—don't rush this step. The chocolate needs to melt evenly to avoid seizing later. I like to check the temperature with a candy thermometer at 110°F for perfect working consistency. If you don't have one, just watch for that silky sheen that tells you it's ready.
👨🍳 Step 2: Mix in Sweet and Aromatic Elements
Remove the melted chocolate from heat and stir in the 1 tbsp Pure Maple Syrup, 0.5 tsp Vanilla Bean Paste, and 1 tsp Orange Zest until fully incorporated. The mixture should be vibrant with orange flecks and have a rich, aromatic scent. This is where the complex flavors start coming together—sweet, citrusy, and deeply chocolatey all at once.
I know it seems like too much orange zest, but trust me—it brightens the intense cacao flavor beautifully. Add the 0.5 cup Raw Cacao Nibs and 0.25 cup Dark Chocolate Chips next, stirring gently to distribute evenly. The cacao nibs should remain whole and crunchy—don't overmix or they'll break down.
🥘 Step 3: Fold in Crunchy Additions
In a separate bowl, lightly toast the 0.25 cup Unsweetened Coconut Flakes and 0.25 cup Almond Slivers in a dry skillet over medium heat for 2-3 minutes until golden and fragrant. Watch them carefully—they burn quickly! Immediately transfer to the chocolate mixture and fold gently with a spatula until fully coated.
This is the moment that matters: you want even distribution of all those crunchy elements. The coconut should be golden, not white, and the almonds should have a toasty aroma. If any components seem undercooked, toast them another 30 seconds before adding to the chocolate.
⏰ Step 4: Shape and Set the Bites
Line a baking sheet with the 1 sheet Parchment Paper and spoon the chocolate mixture into 12 equal mounds, about 1 tablespoon each, spacing them 2 inches apart. Use a damp spoon to smooth the tops—this helps them release cleanly later. Immediately sprinkle each bite with a pinch of Flaky Sea Salt for that perfect salty contrast.
Refrigerate for 30 minutes until firm but still pliable. The bites should hold their shape when gently pressed but not be rock-hard. If they're too soft, return to the fridge for another 10 minutes. The ideal texture is firm enough to handle but still melts beautifully on the tongue.
🍽️ Step 5: Finish and Store Perfectly
Once set, transfer the bites to a serving plate or airtight container. These beauties keep for 1 week at room temperature or 2 months in the freezer—though they rarely last that long! For an extra-special touch, dust with additional Raw Cacao Nibs or Flaky Sea Salt before serving.
Each bite delivers that perfect balance: rich chocolate, intense cacao crunch, sweet maple notes, citrus brightness, and salty contrast. The texture should be luxurious—creamy chocolate with satisfying crunch in every mouthful. Serve with a glass of chilled white wine or strong coffee for the ultimate flavor pairing.
Pro Tips For Making Cacao Nibs Chocolate
- Temper the Coconut Oil: Heat the coconut oil just until it melts—no higher. I learned this the hard way when I accidentally turned it golden and ruined the chocolate’s smoothness. Keep it at 100°F (38°C) max, or the Guanaja’s rich flavor will turn bitter faster than you can say "oops."
- Toast the Nibs First: Dry-toast your cacao nibs in a dry pan for 2 minutes before adding them to the chocolate. This deepens their nutty flavor and prevents them from sinking to the bottom like lazy sediment. (Yes, even if you’re impatient like me.)
- Whisk, Don’t Stir: Use a fork or small whisk to fold in the nibs and syrup—don’t just stir. The Guanaja melts unevenly if you’re gentle, and you’ll end up with grainy pockets of unmelted chocolate. Agitate it like you’re angry at the nibs for being stubborn.
- Salt at the End: Sprinkle the flaky sea salt after the chocolate has set, not before. If you add it too early, it’ll dissolve into the coconut oil and turn your chocolate into a sad, salty paste. Plus, the contrast of fresh salt on set chocolate is the thing that matters most.
Essential equipment for this dish
Melting Essentials
You'll need a double boiler or microwave-safe bowl for melting the chocolate—both work well, but a double boiler gives you more control. I recommend a stainless steel double boiler from OXO for even heat distribution.
If microwaving, use 20-second intervals to avoid overheating, and stir between each burst to prevent burning. A candy thermometer is your best friend here—aim for 110°F for perfect tempering. 🌡️
Mixing Tools
A silicone spatula (like the OXO Good Grips) is perfect for folding in the cacao nibs and other mix-ins without scratching your bowl. For shaping the chocolate bites, a damp spoon works best—just dip it in water before smoothing the tops.
A small offset spatula helps spread the chocolate evenly onto the parchment paper. Avoid metal tools, as they can cause the chocolate to seize.
Toasting Equipment
Toast your coconut flakes and almond slivers in a small stainless steel skillet over medium heat. A non-stick skillet works too, but stainless steel gives better heat control. Keep a small metal spoon handy to stir constantly and prevent burning.
A fine-mesh strainer comes in handy if you need to drain any excess oil after toasting—just place it over a bowl to catch the flakes while letting oil drip away.
Setting and Storage
For setting the chocolate bites, you'll need parchment paper (I love Amazon Basics for its durability) and a baking sheet—preferably one with rimmed edges to prevent spills. Store finished bites in an airtight container like a glass jar with a silicone lid (from Weck) to keep them fresh.
If freezing, use quart-sized freezer bags with zip-top closures—leave 1 inch of headspace to prevent freezer burn.
Temperature Control
A candy thermometer (like the Thermoworks Thermapen) ensures your chocolate reaches the perfect 110°F for tempering. If you're melting chocolate over a double boiler, maintain gentle simmering heat—never let the water boil directly under the bowl.
For toasting, a kitchen timer helps prevent over-toasting—set it for 2-3 minutes and watch closely. A digital scale (like the OXO Good Grips) ensures precise measurements for all ingredients, especially the cacao nibs and chocolate chips. ⏱️
Nutrition facts
Frequently asked questions
What makes cacao nibs different from chocolate chips?
Cacao nibs are made from crushed cacao beans with no added sugar or cocoa butter, giving them a sharp, intense flavor and crunchy texture. Chocolate chips are pre-sweetened and smooth, designed to melt completely. The nibs add a complex, almost peppery bite that elevates desserts. Think of them as nature's spice for chocolate!
Can I use this recipe with milk chocolate instead of dark?
Not ideal—milk chocolate's sweetness will overpower the cacao nibs' bold flavor. For best results, stick with 70% or higher dark chocolate. If you must use milk chocolate, reduce the maple syrup to ½ tbsp and add 1 tsp espresso powder to balance the sweetness.
How do I prevent the cacao nibs from sinking to the bottom?
Stir the chocolate mixture gently but thoroughly after adding nibs, then let it sit for 1 minute before pouring onto parchment. The nibs will naturally float upward as the chocolate cools slightly. For extra insurance, chill the mixture for 5 minutes before shaping—this helps distribute them evenly.
What's the best way to store these chocolate bites?
Keep them in an airtight container at room temperature for up to 1 week, or freeze for 3 months. For extra freshness, place a slice of bread in the container to absorb moisture. If storing long-term, wrap individual pieces in parchment paper before freezing.
Can I make this recipe nut-free?
Simply omit the almond slivers and replace them with ½ cup toasted pumpkin seeds or crushed freeze-dried strawberries for crunch. The recipe maintains its texture and flavor profile without nuts. For added richness, fold in 2 tbsp coconut cream instead of coconut oil.