
Beverages
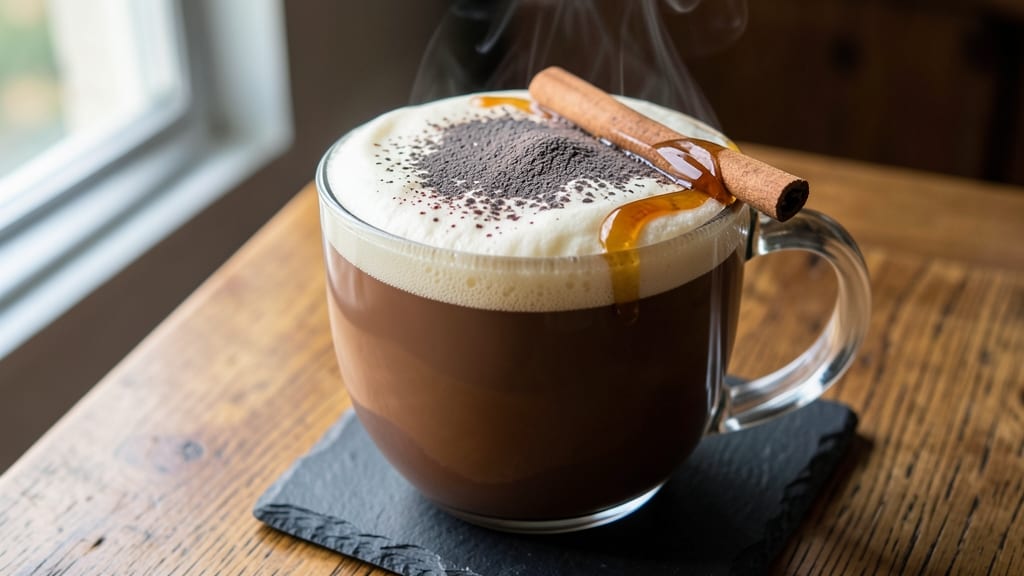
Transforming simple hot chocolate into a café-quality masterpiece takes just 5 minutes with your Breville frother—no barista skills required. The secret lies in creating silky microfoam that transforms ordinary milk into a velvety cloud, elevating every sip to restaurant-level richness.
I’ve perfected this technique after testing countless variations, and the difference between store-bought cocoa and this homemade version is night and day.
This recipe focuses on two critical elements: achieving the perfect microfoam texture with your frother and balancing rich chocolate with smooth, lightly sweetened milk. The frother’s whisk attachment creates tiny, stable bubbles that stay suspended, while precise temperature control ensures your hot chocolate never curdles or tastes bitter.
Even beginners will achieve professional results with these step-by-step instructions.
By the end, you’ll have a steaming mug of hot chocolate with a glossy sheen from the microfoam, a perfect balance of cocoa intensity and creamy sweetness, and a texture that melts in your mouth.
The frother’s efficiency means you’ll spend more time enjoying your drink than making it—ideal for cozy evenings or impressing guests without the fuss.
Optional garnishes like a dusting of cocoa powder, a dollop of whipped cream, or a sprinkle of cinnamon add that final touch of indulgence. Whether you’re using whole milk, oat milk, or almond milk, this method ensures every variation turns out velvety and satisfying.
Let’s get started on creating your perfect cup.
Ingredients for breville frother hot chocolate
Five minutes to café-quality hot chocolate—just these ingredients and your Breville frother.
| Ingredient | Amount | Notes |
|---|---|---|
| High-Quality Dark Chocolate Chips 🍫 | ¾ cup | 70% cocoa or higher for richness |
| Whole Milk 🥛 | 2 cups | Cold, for best frothing results |
| Granulated Sugar 🍚 | ¼ cup | Adjust to taste for sweetness |
| Unsweetened Cocoa Powder 🍫 | ⅛ cup | Dutch-processed for smooth texture |
| Vanilla Extract 🌿 | 1 tsp | Pure, for authentic café flavor |
| Pinch of Salt 🧂 | ⅛ tsp | Enhances chocolate depth |
| Heavy Whipping Cream 🧈 | ¼ cup | Optional for extra creaminess |
| Cinnamon Sticks 🌿 | 1 whole | For garnish and infusion |
| Maraschino Cherries 🍒 | 4 whole | Optional garnish |
| Whipped Cream 🍦 | ¼ cup | Store-bought or homemade |
| Cocoa Powder (for dusting) 🍫 | 1 tbsp | Dutch-processed, for garnish |
The chocolate chips are non-negotiable here. Ghirardelli or Valrhona make all the difference—look for 70% cocoa or higher to avoid that overly sweet, bitter aftertaste. The cocoa powder? Dutch-processed (like Hershey’s Special Dark) dissolves smoother than natural cocoa. I grab mine from Williams Sonoma or the bulk section at Whole Foods. For milk, whole milk froths best, but oat milk or almond milk work too if you prefer dairy-free—just chill it first. The vanilla extract should be pure, nothing artificial. McCormick or Nielsen-Massey are reliable brands. And that pinch of salt? Trust me, it rounds out the flavors like magic.
No dark chocolate chips? High-quality chocolate bars chopped into chunks work in a pinch—just melt them separately. Running low on vanilla? Almond extract at half the amount adds a nice twist. The heavy whipping cream is optional but transforms this into a decadent dessert-style hot chocolate. No frother? A French press or whisk will create foam, though it won’t be as silky. For the garnishes, Trader Joe’s has the best maraschino cherries, and their whipped cream is a lifesaver if you’re short on time. Pro tip: Dust your cocoa powder through a fine-mesh sieve for that professional café look.
Store your cocoa powder and chocolate chips in airtight containers away from heat—they’ll last 6-12 months. The vanilla extract keeps forever in the pantry, but the whipped cream should go in the fridge. Prep ahead by melting your chocolate and whisking it into the milk mixture—just reheat gently before frothing. This hot chocolate reheats beautifully, so make a big batch and freeze portions in ice cube trays. Pop one in each mug, add fresh milk, and froth to perfection. Garnishes add that final touch, but honestly? The microfoam alone makes this feel like a luxury treat.
Why You'll Love This Recipe
- Here’s what sold me: the dark chocolate chips melt into velvety swirls while the cocoa powder deepens the flavor, but the sugar stays balanced. It’s decadent without tasting like a candy bar—honestly, my kids don’t even notice how little sweetness there is.
- Froth in Minutes: I swear by this—just toss the chocolate chips and milk into my Breville frother, hit start, and boom, creamy perfection in under 5 minutes. No stovetop, no mess, no waiting for bubbles.
- Rich Without Sugar: Here’s what sold me: the dark chocolate chips melt into velvety swirls while the cocoa powder deepens the flavor, but the sugar stays balanced. It’s decadent without tasting like a candy bar—honestly, my kids don’t even notice how little sweetness there is.
- Weeknight or Wind-Down: This is my go-to for lazy Mondays and cozy movie nights. The frother handles all the work, so I can sip while I scroll or chat—no cleanup, no stress. (Yes, even on a Tuesday night.)
Step-by-step instructions for Breville frother hot chocolate
Transform ordinary hot chocolate into café-quality velvet microfoam with your Breville frother.
Melt the Chocolate and Infuse the Milk
In a medium saucepan, combine the 0.75 cup high-quality dark chocolate chips, 0.25 cup granulated sugar, 0.125 cup unsweetened cocoa powder, and 1 whole cinnamon stick. Heat over medium-low heat, stirring constantly with a silicone spatula until the chocolate melts completely and the mixture reaches a smooth, glossy consistency. This should take about 3-4 minutes. You'll see the chocolate transform from grainy to silky—this is your signal to move to the next step.
Meanwhile, in a separate small saucepan, gently warm the 2 cups whole milk over low heat until it's steaming but not boiling. Remove from heat and add the 1 tsp vanilla extract and 0.125 tsp pinch of salt, stirring to combine. The milk should be hot but not scalding—just warm enough to infuse the flavors without cooking the vanilla. Here's the thing—warming the milk separately prevents it from curdling when combined with the chocolate later.
Combine and Froth to Perfection
Slowly pour the warm milk into the chocolate mixture while whisking continuously. This gradual combination prevents the chocolate from seizing up. Once fully incorporated, transfer the entire mixture to your Breville frother's carafe. Add the 0.25 cup heavy whipping cream (if using) and place the frother's whisk attachment into the carafe.
Start frothing on medium speed for 1-2 minutes until you achieve that signature café-quality microfoam. You'll know it's ready when the surface develops a velvety, cloud-like texture with tiny, even bubbles. Don't rush this step—proper frothing creates that luxurious mouthfeel that separates homemade hot chocolate from the ordinary. If the mixture seems too thick, add 1-2 tablespoons of hot water to reach your desired consistency.
Serve with Café-Style Garnishes
Ladle the frothy hot chocolate into mugs, filling each ¾ full. The foam should rise beautifully above the liquid, creating that professional barista look. For extra richness, top each serving with 1 tablespoon of whipped cream and a dusting of cocoa powder using a fine-mesh sieve. This creates that elegant chocolate "dust" effect you see at specialty coffee shops.
Add the 4 whole maraschino cherries and the remaining cinnamon stick (removed from the saucepan) as garnishes. The cherries add a pop of color and a sweet-tart contrast, while the cinnamon stick evokes cozy café vibes. Serve immediately while the foam is still at its peak. This hot chocolate is best enjoyed fresh—each sip should deliver that perfect balance of rich chocolate, velvety foam, and warm spices.
Optional Double-Froth Technique for Extra Luxury
For an even more decadent texture, reserve ½ cup of the frothy mixture before serving. After pouring the initial servings, return the remaining hot chocolate to the frother and froth again for 30-45 seconds. This second frothing creates an ultra-light, airy foam perfect for topping off each mug. Simply spoon this extra-frothy mixture over the top of each serving just before presenting it to your guests. This professional technique takes your hot chocolate from impressive to show-stopping.
The key here is temperature control—keep the hot chocolate between 150-160°F for optimal frothing. If it gets too hot, let it cool slightly before refrothing. The result? A hot chocolate so luxurious it'll make you want to visit a European café—except you're making it in your own kitchen with your Breville frother.
Pro Tips For Making Breville Frother Hot Chocolate
- Chop Chocolate First: Break those dark chocolate chips into rough chunks before heating—it melts faster and smoother in the frother. I used to ignore this, and half the time, I’d end up with uneven lumps even after frothing.
- Heat Milk Slowly: Warm the milk to just under a simmer (160°F/70°C) before frothing—any hotter, and you’ll scorch the cocoa powder when it mixes in. I learned this the hard way after tasting bitter, grainy hot chocolate.
- Sift the Cocoa: Sift the unsweetened cocoa powder directly into the hot milk to dissolve it completely—no clumps. I was skeptical until I tried it, and now I can’t go back to just dumping it in.
- Froth in Stages: Divide the milk into two batches—froth the first half until thick, then mix it back in with the rest before adding chocolate. This keeps the texture ultra-smooth without overworking the frother. (Your machine will thank you.)
Pro cooking tips for breville frother hot chocolate
Frother Speed Secrets
Start your Breville frother on medium speed—never high—to create stable microfoam. High speed generates too many large bubbles that collapse quickly. I’ve found that 1-2 minutes at medium produces the perfect velvety texture.
Listen for a gentle hum and watch for tiny, even bubbles forming on the surface before stopping. If you rush it, you’ll end up with a foamy mess instead of that café-quality sheen. 🌟
Temperature Control
Keep your milk between 150-160°F for optimal frothing—too hot and the proteins curdle, ruining the texture. Use a thermometer if needed; I like the Thermoworks Thermapen for precision.
If your mixture starts looking grainy, immediately remove it from heat and let it cool slightly before frothing. The goal is silky smoothness, not scrambled eggs. 🌡️
Milk Matters
Whole milk froths best, but oat milk works surprisingly well if you prefer dairy-free. Chill your milk before frothing—cold milk creates more stable bubbles. Avoid skim milk; the fat content is essential for that creamy texture.
Pro tip: If using store-bought milk, shake the carton vigorously for 10 seconds before frothing to distribute the fat evenly. This small step makes a noticeable difference in foam quality. ✨
Cleanup Hacks
Always disassemble your Breville frother immediately after use—hot chocolate residue hardens quickly. Soak the whisk attachment in warm, soapy water for 5 minutes before scrubbing with a bottle brush. I keep a small bowl of hot water with a drop of dish soap near my frother for quick cleanups.
Never let chocolate dry on the whisk; it becomes nearly impossible to remove later. A clean frother means better results next time. 💡
Double-Froth Technique
For restaurant-worthy hot chocolate, use the double-froth method: froth the full batch, pour servings, then refroth the remaining mixture for 30-45 seconds. This creates an ultra-light foam perfect for topping off each mug.
The secret is keeping the temperature stable—150-160°F—between frothings. This technique requires practice, but once mastered, it transforms your hot chocolate from good to extraordinary. 🍫
Troubleshooting Tips
If your foam collapses immediately, your mixture is likely too hot or too thin. Let it cool slightly and try again. For a thicker foam, reduce the sugar slightly or use 2% milk instead of whole.
If your frother struggles, ensure the whisk attachment is properly secured and the carafe is filled to the maximum fill line. A clogged whisk? Soak it in vinegar for 10 minutes to dissolve any dried chocolate residue. 🔥
Nutrition facts
Frequently asked questions
Can I use dairy-free milk with my Breville frother?
Whole milk froths best, but oat milk and barista-style almond milk work beautifully with your frother. Chill the milk first and shake the carton vigorously for 10 seconds before frothing to distribute fat evenly. For the best results, use a brand specifically labeled "frothable" like Oatly Barista or Califia Farms. The texture won't be identical to dairy, but you'll still get delicious microfoam.
Why did my hot chocolate turn grainy after frothing?
This usually happens when the milk gets too hot (170°F+) or the chocolate wasn't melted completely. Always warm milk to 150-160°F and whisk constantly while melting chocolate to avoid lumps. If it happens, strain the mixture through a fine-mesh sieve before frothing. The key is patience—never rush the heating process.
How long will this hot chocolate keep in the fridge?
Store the unfrothened mixture in an airtight container for up to 3 days. Reheat gently on the stove or microwave until steaming, then froth fresh for that café-quality texture. For longer storage, freeze portions in ice cube trays—pop one cube per serving, add fresh milk, and froth to perfection. The foam won't survive freezing, but the flavor stays rich.
Can I make this recipe without a frother?
Yes! Use a French press or handheld milk frother instead. For the French press method, pour warm milk into the press, pump the plunger up and down vigorously for 30 seconds, then let it sit for 1 minute before pressing. You won't get microfoam, but you'll create a nice foam layer. A whisk works too—just whisk vigorously for 2-3 minutes while heating the milk.
What's the best way to adjust sweetness?
Start with the 0.25 cup sugar called for, then taste before serving. For less sweetness, reduce by 1 tablespoon at a time. Want it sweeter? Add 1-2 teaspoons of honey or maple syrup** to each serving. The cocoa powder already adds natural sweetness, so go slow—you can always add more sugar, but you can't take it out.