
Desserts
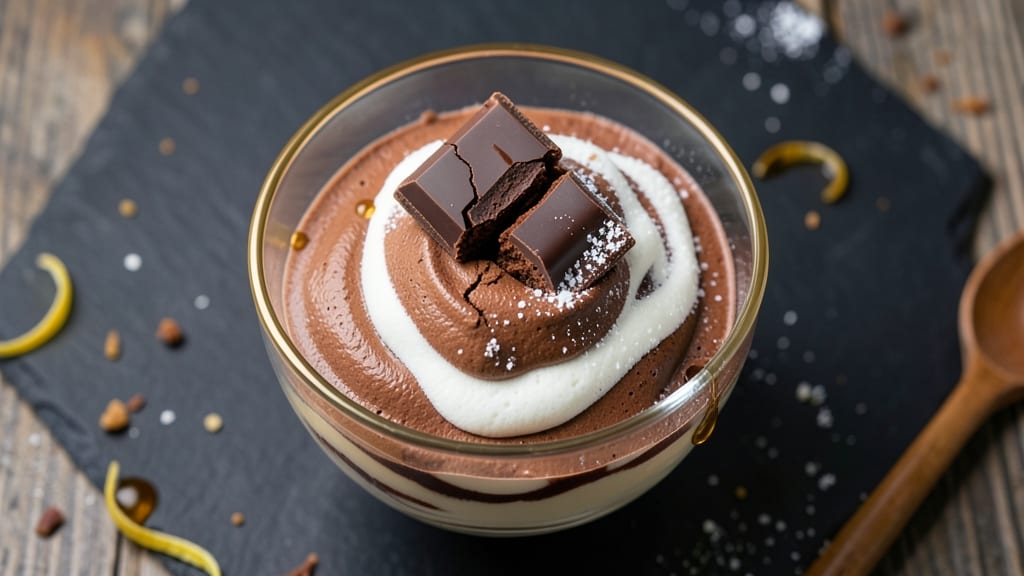
This bitter chocolate mousse recipe transforms intense 70% cocoa into a silky, velvety dessert that balances deep chocolate flavor with smooth texture—no artificial sweetness needed.
The secret lies in tempering the chocolate properly and stabilizing the mousse with egg whites or gelatin, creating a structure that holds its shape without being overly dense.
I perfected this technique after years of experimenting with high-cocoa desserts, ensuring every bite delivers rich cocoa notes without bitterness overwhelming the palate.
The process begins with carefully melting the chocolate to achieve the perfect tempered consistency—smooth yet firm enough to hold its shape when chilled. Whipped egg whites or cream are folded in just enough to lighten the texture without compromising that velvety richness.
A touch of cornstarch or gelatin ensures the mousse stays stable, even after hours in the fridge, while a final dusting of cocoa powder or dark chocolate shavings adds that restaurant-quality finish.
What you’ll end up with is a dessert that’s decadent yet refined—deep cocoa flavor tempered by a delicate, airy texture that melts on the tongue. The contrast between the smooth mousse and optional garnishes like orange zest or crushed hazelnuts elevates it from simple to extraordinary.
This recipe is perfect for impressing guests or treating yourself to a luxurious dessert that feels special without being overly complicated.
Ready in just 30 minutes of active time (plus chilling), this mousse is ideal for last-minute gatherings or when you crave something sophisticated yet approachable. The key is patience—letting the chocolate temper and the mousse set properly makes all the difference.
Here’s how to achieve that perfect balance of richness and smoothness every time.
Ingredients for bitter chocolate mousse
Eight essential ingredients transform bold 70% chocolate into velvety, restaurant-worthy mousse that surprises with its depth and smoothness.
| Ingredient | Amount | Notes |
|---|---|---|
| 70% Dark Chocolate Bars 🍫 | 8 oz | High-quality, no added sugar |
| Large Egg Whites 🥚 | 4 whole | Fresh, room temperature |
| Granulated Sugar 🍚 | ¼ cup | Fine grain preferred |
| Unsalted Butter 🧈 | 4 oz | European style, 82% fat |
| Cornstarch 🌾 | 1 tbsp | For texture stability |
| Vanilla Extract 🌿 | ½ tsp | Pure Madagascar preferred |
| Pinch of Salt 🧂 | ⅛ tsp | Fine sea salt |
| Cocoa Powder 🍫 | 1 tbsp | Unsweetened, for garnish |
| Crushed Hazelnuts 🌰 | ¼ cup | Toasted, optional garnish |
| Orange Zest 🍊 | 1 tsp | Fresh, for brightness |
| Heavy Cream 🥛 | ½ cup | Optional for lighter texture |
The chocolate is non-negotiable here—Valrhona or Callebaut 70% bars deliver that perfect balance of bitterness and richness. Ghirardelli is a solid grocery store alternative, but avoid anything with added sugar or emulsifiers. For the egg whites, freshness matters—they should whip to stiff peaks. If you're nervous about tempering, use a double boiler with gentle heat and stir constantly until smooth. The butter? European-style, 82% fat melts beautifully and adds luxurious mouthfeel. Pro tip: Toast your hazelnuts in a dry pan for 5 minutes before crushing—they’ll taste infinitely better.
No cornstarch? 1 tsp powdered gelatin works in a pinch, but texture won’t be identical. Heavy cream optional but worth it for ultra-lightness—fold in last. Short on vanilla? Seeds from 1 vanilla bean are a game-changer. The orange zest brightens the bitterness beautifully, but lemon zest works too. For a vegan version, replace egg whites with aquafaba (¼ cup) or silken tofu (½ cup). And if you’re feeling fancy, infuse the butter with orange zest while melting—trust me, it’s magical.
Chocolate stays fresh 2 weeks at room temperature in an airtight container, but 1 month refrigerated if sealed properly. Whipped egg whites lose volume fast—use within 2 hours of whipping. The mousse itself keeps 5 days refrigerated and freezes beautifully for 3 months. For serving, let it sit at room temp for 10 minutes—it’ll be silky smooth. Garnishes? Toast the hazelnuts fresh each time—they lose flavor fast. Store cocoa powder in a cool, dark place to prevent rancidity.
Why You'll Love This Recipe
- No Whisk Required: I swear, the only tools you need are a fork and a bowl—no fancy gadgets, no stress. You’ll melt the 70% dark chocolate with butter, whisk the egg whites to stiff peaks with sugar, then fold them together like you’re mixing a lazy Sunday pancake batter. Honestly, it’s the kind of recipe that makes me feel like a baking genius without actually trying.
- Deep, Rich Payoff: That first bite? Chef’s kiss. The 70% dark chocolate delivers a serious, velvety bitterness that’s anything but harsh—it’s balanced by the airy, almost marshmallow-like texture from the egg whites and cornstarch. Between us, it’s the kind of dessert that makes you slow down and savor it, like a little moment of indulgence that doesn’t feel guilty.
- Date Night or Meal Prep: This isn’t just a fancy dessert for weekends. I’ve served it to friends who ooh’d and ahh’d, and I’ve packed it in jars for my lunchbox when I needed a sweet pick-me-up. The cornstarch keeps it stable for a day or two in the fridge, so it’s equal parts impressive and practical—no one will guess it’s this easy to pull together.
- Budget Luxury: Dark chocolate at 70%? That’s the good stuff, but it’s not splurge territory when you’re using just two bars. The egg whites and sugar are pantry staples, and butter? Well, you’re probably already buying it. It’s the kind of treat that feels luxurious without draining your wallet—especially when you’re making it in bulk for holidays or gifts. My wallet thanks me every time.
Step-by-step instructions for bitter chocolate mousse
This method transforms bold 70% dark chocolate into silky, balanced mousse with vibrant citrus notes.
Temper the Chocolate for Perfect Texture
Break the 8 oz 70% dark chocolate bars into small pieces and place them in a heatproof bowl set over a pot of barely simmering water. Keep the water at a gentle simmer—you want to melt the chocolate gradually to avoid seizing. Stir occasionally until the chocolate reaches 110°F, just until it's fully melted but not overheated. This controlled melting preserves the chocolate's complex flavors while creating a smooth base.
Remove the bowl from heat and immediately whisk in the 1 tbsp cornstarch and 1 tbsp cocoa powder. This creates a stable emulsion that prevents graininess in the final mousse. Let the mixture cool slightly to 90°F while you prepare the egg whites. The temperature drop is crucial for achieving peak volume in the next step.
Whip Egg Whites to Stiff Peaks with Precision
In a separate, spotlessly clean bowl, combine the 4 whole large egg whites and 0.125 tsp pinch of salt. Using a stand mixer fitted with the whisk attachment, beat on medium speed until soft peaks form. Gradually add the 0.25 cup granulated sugar while continuing to mix. Increase speed to high and whip until the meringue is glossy and holds firm peaks when the whisk is lifted.
This is where the magic happens—the meringue should be thick enough to hold its shape but still light enough to incorporate smoothly. If you see sugar grains, your mixture isn't fully incorporated. Here's the thing—don't overmix or you'll develop gluten and ruin the delicate texture. The perfect meringue should look like thick, fluffy clouds.
Fold Chocolate and Egg Whites Together
With the mixer running on low speed, gently pour about ⅓ of the egg white mixture into the tempered chocolate. Mix just until combined, then add another ⅓ and fold until no white streaks remain. Finally, add the remaining egg whites in one motion, folding from the bottom up using a spatula to maintain air incorporation. The goal is to create a smooth, velvety batter that's thick but still pourable.
This folding technique is critical—it incorporates air while keeping the chocolate's richness intact. If the mixture looks too thick, you can gently warm it in the microwave for 10-15 seconds to loosen it slightly. The batter should coat the back of a spoon but still move easily. Add the 0.5 tsp vanilla extract and 1 tsp orange zest now and mix until evenly distributed.
Incorporate Butter for Ultimate Smoothness
Cut the 4 oz unsalted butter into small cubes and add them to the chocolate mixture. Using a spatula, gently fold the butter until fully incorporated and the mousse reaches a smooth, glossy consistency. This step eliminates any graininess and creates that signature velvety texture. The butter also adds richness that balances the chocolate's intensity.
For an even lighter texture, you can now incorporate the 0.5 cup heavy cream if using. Fold it in gently to maintain airiness. The mousse should be thick but still able to hold its shape when spooned. If it's too thick, you can warm it slightly to loosen it—just don't overheat or the egg whites will deflate.
Chill and Garnish for Perfect Serving
Divide the mousse among 6 serving glasses and refrigerate for at least 4 hours, or until completely set. The longer it chills, the more intense the flavors become. For best results, let it set overnight—this allows the flavors to meld perfectly and the texture to become truly velvety.
Before serving, garnish each portion with a sprinkle of crushed hazelnuts and a dusting of cocoa powder. The nutty crunch contrasts beautifully with the silky mousse, while the cocoa powder adds a final touch of chocolate intensity. Serve immediately after removing from the fridge to enjoy the perfect balance of rich chocolate and bright citrus notes in every bite.
Pro Tips For Making Bitter Chocolate Mousse
- Temper the Chocolate: DESCRIPTION: Chop that 70% dark chocolate into tiny, even pieces—no bigger than a pea—and melt it in a double boiler over barely simmering water. If you rush it with direct heat, you’ll scorch the bitterness right out of it, leaving you with something closer to burnt coffee than rich chocolate. I learned this the hard way when I tried to speed things up.
- Whip Egg Whites Cold: DESCRIPTION: Chill your large egg whites in the fridge for at least 30 minutes before whipping, and use a completely clean, dry bowl—no grease, no moisture. Cold whites whip faster and hold their structure better, and if you skip this, you’ll end up with a sad, flat mousse that’s more puddle than cloud.
- Cornstarch is Non-Negotiable: DESCRIPTION: Mix that 1 teaspoon of cornstarch into your melted chocolate before adding the egg yolks—it’s the only thing keeping this mousse from turning into a grainy disaster. I used to add it last, and the texture was always off. Trust the science: it’s what makes the mousse silky, not just sweet.
- Fold Like You Mean It: DESCRIPTION: When folding in the whipped egg whites, use a spatula and work in three additions—don’t just dump them all at once. Overmixing deflates the whites, and underfolding leaves streaks of raw egg white. Think of it like gently marrying the two: slow, deliberate, and with purpose. Your future self will notice the difference.
Make-ahead tips for this bitter chocolate mousse
Prep Ahead Timeline
Plan your timing carefully—this mousse benefits from a 24-hour prep schedule. Start by melting the chocolate and whipping egg whites 12 hours before serving. Store the tempered chocolate mixture in an airtight container at room temperature, and refrigerate the whipped egg whites in a sealed container.
This gives flavors time to meld while keeping components stable. 📅
Chilling Strategy
For maximum flavor development, chill the assembled mousse for 6-8 hours before serving. Use 6-8 oz ramekins for individual portions—they hold shape better than wide glasses. Cover with plastic wrap pressed directly onto the surface to prevent skin formation.
I like to place ramekins on a tray in the fridge to catch any drips. Pro tip: Freeze ramekins for 10 minutes before filling to speed up setting time.
Storage Hacks
This mousse keeps beautifully for 5 days refrigerated in airtight containers. For longer storage, freeze for up to 3 months—thaw overnight in the fridge before serving. To reheat, microwave individual portions for 15-20 seconds on low power.
The texture remains silky when handled gently. For make-ahead parties, assemble mousse 2 days ahead and store components separately until ready to combine.
Garnish Prep
Toast hazelnuts and zest citrus 1 day ahead—they lose flavor quickly when fresh. Store in separate airtight containers at room temperature. For cocoa powder, sift through a fine mesh sieve 30 minutes before serving to prevent clumping.
Keep garnishes in a cool, dark place until ready to use. The contrast between fresh garnishes and chilled mousse makes all the difference in presentation. ✨
Serving Prep
Remove mousse from fridge 30 minutes before serving to soften slightly. This makes it easier to scoop and serve. Use a ring mold if you want clean edges—press it gently into the mousse before chilling.
For a restaurant-style finish, dust with cocoa powder using a fine-mesh sieve. Serve with chilled sparkling wine or espresso to complement the chocolate flavors. The anticipation of serving builds excitement—your guests will love the effort!
Nutrition facts
Frequently asked questions
Why does my bitter chocolate mousse turn grainy?
Graininess usually happens when chocolate overheats or isn't properly tempered. Always melt chocolate gently over simmering water (never boiling) and keep temps below 110°F. The cornstarch and cocoa powder help stabilize texture—make sure they're fully dissolved when whisked into the melted chocolate. If it's too thick, warm for 10 seconds to loosen before folding.
Can I make this recipe without egg whites?
Yes! For a vegan version, replace egg whites with ¼ cup aquafaba (chickpea brine) or ½ cup silken tofu, both whipped until stiff. Add 1 tsp cream of tartar to stabilize. The texture will be slightly denser but still velvety. For gluten-free, ensure your cornstarch is certified GF.
How do I fix if my mousse is too runny?
Runny mousse often means overwhipped egg whites or insufficient chilling. For immediate fixes, chill for 1 extra hour or fold in 1 tbsp extra cornstarch mixed with 1 tsp water. If still too loose, let it set 24 hours—flavors develop better when fully set. Pro tip: Use 6-oz ramekins instead of wide glasses for better structure.
What's the best chocolate percentage for this recipe?
70% cocoa is ideal—it delivers deep flavor without overwhelming bitterness. For milder taste, try 65%, but avoid anything below 60% (too sweet). Higher percentages (85%) work but may need extra sugar or citrus to balance. Always use high-quality chocolate—Valrhona or Callebaut brands are excellent choices.
Can I make this ahead for a dinner party?
Assemble the mousse 2 days ahead and store components separately: refrigerate whipped egg whites and keep tempered chocolate at room temperature. Combine 4 hours before serving to let flavors meld. For garnishes, toast hazelnuts and zest citrus 1 day ahead—they lose freshness quickly. Serve with chilled espresso or sparkling wine for a sophisticated touch.