
Desserts
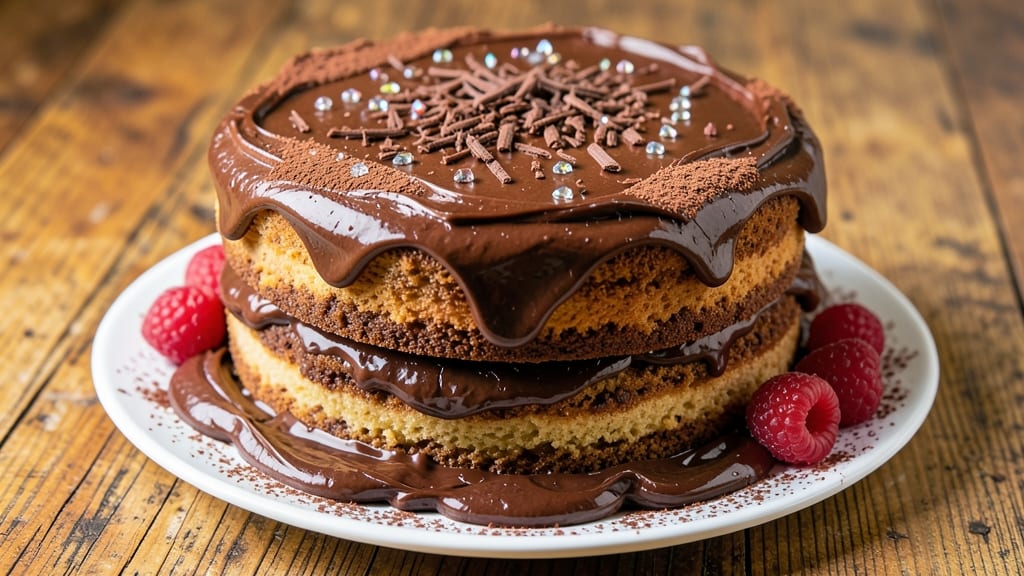
This big chocolate birthday cake recipe delivers the perfect balance of rich cocoa flavor and tender, moist middle layers that keep every slice decadent. The secret lies in a precise blend of cocoa powder, melted butter, and buttermilk—ingredients that create a fudgy yet tender crumb without drying out.
I’ve baked this cake for countless celebrations, and it never fails to impress, whether it’s a child’s birthday or a milestone gathering.
What sets this triple-layered cake apart is its foolproof technique for even baking and smooth frosting application. Each layer is baked at 350°F for 25–30 minutes, ensuring a golden crust while maintaining a velvety interior.
The frosting—a velvety chocolate ganache—ties everything together with its glossy finish and deep chocolate flavor, making it ideal for piping between layers or drizzling on top.
By the time you’re done, you’ll have a stunning centerpiece that’s as impressive to look at as it is to eat. The layers stay moist for days, and the ganache adds a luxurious touch that elevates this cake from homemade to restaurant-quality.
Whether you’re adding candles, fresh berries, or a dusting of cocoa powder, this recipe ensures your celebration cake will be the star of the show.
Perfect for 8–12 servings, this cake is designed to feed a crowd while keeping prep manageable. The instructions break down each step—from mixing the batter to layering and frosting—so you can focus on enjoying the process.
Let’s get started on creating a cake that’ll make the birthday person feel like the king or queen they are.
Ingredients for big chocolate birthday cake
Twelve ingredients create layers of decadence—rich chocolate flavor meets velvety moisture for a showstopping centerpiece.
| Ingredient | Amount | Notes |
|---|---|---|
| Unsalted Butter 🧈 | 1 ½ cups | Melted and cooled to room temperature |
| Granulated Sugar 🍚 | 2 ½ cups | White or light brown preferred |
| Unsweetened Cocoa Powder 🍫 | ¾ cup | Dutch-processed for smoother texture |
| All-Purpose Flour 🌾 | 3 ½ cups | Sifted for light, airy batter |
| Buttermilk 🥛 | 1 ½ cups | Room temperature for best results |
| Large Eggs 🥚 | 6 whole | Room temperature for even mixing |
| Vanilla Extract 🌿 | 2 tsp | Pure, high-quality extract |
| Baking Powder 🧂 | 2 tsp | Aluminum-free for best flavor |
| Salt 🧂 | ½ tsp | Fine sea salt preferred |
| Semisweet Chocolate Chips 🍫 | 2 cups | High-quality, 60% cocoa |
| Heavy Cream 🥛 | 1 ½ cups | Cold for ganache stability |
| Dark Chocolate Bars 🍫 | 12 oz | 70% cocoa for rich ganache |
| Powdered Sugar 🍚 | 2 cups | Sifted for smooth frosting |
| Vegetable Oil 🫒 | ½ cup | For greasing pans |
The cocoa powder and butter are your flavor anchors. Hershey's Special Dark or Valrhona cocoa powder (Dutch-processed) delivers that deep, smooth chocolate taste without bitterness. For butter, Plugrá or Land O'Lakes are reliable, but if you want to splurge, European-style unsalted butter like President or Échiré adds an extra layer of richness. The chocolate chips? Ghirardelli or Lindt—avoid the store brand. They melt unevenly and lack depth. Buy the 70% cocoa bars for the ganache; they give you that perfect balance of sweet and bitter. And don't skip the buttermilk—it keeps the cake moist without making it dense.
No buttermilk? Mix 1.5 tbsp lemon juice or vinegar with 1.5 cups milk and let it sit for 5 minutes. Running out of vanilla? Almond extract at half the amount works in a pinch, but it has a distinct flavor. The baking powder is non-negotiable—it's what gives the cake that light, airy texture. If you're gluten-sensitive, swap the all-purpose flour for a 1:1 gluten-free baking flour blend, but add an extra 0.5 tsp xanthan gum to mimic the structure. For the ganache, heavy cream must be cold—room temperature cream makes a greasy mess. And if you're short on time, microwave the chocolate in 20-second bursts instead of melting it on the stove.
Store the cake layers in an airtight container between layers for up to 2 days—they actually improve overnight. The ganache keeps for 1 week in the fridge, but it's best used within 3 days for peak texture. To reheat slices, microwave for 10 seconds—just enough to soften the ganache without melting it completely. For a showstopping presentation, dust the cake with powdered sugar right before serving. And if you're prepping ahead, assemble the cake the day before—the flavors meld beautifully overnight, and the ganache sets up perfectly.
Why You'll Love This Recipe
- No Mixer Needed: I swear by this recipe—just a bowl, a whisk, and a spatula. The butter and sugar get creamed by hand (yes, it’s doable), and the buttermilk keeps the batter light without fuss. Honestly, my arms are tired but my cake isn’t.
- Rich Without Bitterness: That cocoa powder isn’t just any cocoa—it’s the good stuff, balanced by the sugar and buttermilk to keep it luscious, not dry. The butter makes every slice melt-in-your-mouth, and the flour gives it that perfect, tender crumb. (Yes, even on a Tuesday night.)
- Feeds a Crowd (Literally): This recipe is my go-to for birthdays, showers, or just because—it’s big enough for 12+ servings, but the leftovers? They disappear faster than you can say “second slice.” Between us, I’ve frozen slices for months, and they still taste fresh.
- Budget-Friendly Luxury: Unsalted butter, sugar, cocoa—these are pantry staples that don’t break the bank. The buttermilk adds richness without the price tag of heavy cream, and the flour stretches to make a cake that feels indulgent. My secret weapon for looking fancy without spending extra.
Step-by-step instructions for triple-layered chocolate birthday cake
Let's build this showstopper cake with rich, moist layers and velvety ganache filling.
Prepare the Cake Pans and Mix the Batter
Grease three 8-inch round cake pans with the 0.5 cup vegetable oil, then line the bottoms with parchment circles. Preheat oven to 350°F while you prepare the batter. In a stand mixer, beat the 1.5 cups unsalted butter and 2.5 cups granulated sugar on medium speed for 3-4 minutes until light and fluffy—you're looking for that ribbon stage where the mixture holds its shape when the beaters lift.
Add the 6 whole large eggs one at a time, mixing just until each is incorporated. I like to let the mixer run for 10 seconds after each egg to ensure full combination. Then stir in the 2 tsp vanilla extract and 2 tsp baking powder. In a separate bowl, whisk together the 3.5 cups all-purpose flour, 0.75 cup unsweetened cocoa powder, and 0.5 tsp salt. With the mixer on low, gradually add the dry ingredients to the wet, mixing just until combined—overmixing develops gluten and makes the cake dense.
Fold in Chocolate Chips and Bake the Layers
Remove the bowl from the mixer and gently fold in the 2 cups semisweet chocolate chips using a spatula. Divide the batter evenly among the prepared pans. Bake for 25-30 minutes or until a toothpick inserted in the center comes out clean. Here's the thing—don't open the oven during the first 20 minutes of baking. The steam needs to build for those perfectly domed tops.
Let the cakes cool in their pans for 10 minutes, then transfer to a wire rack to cool completely. This resting period prevents the cakes from collapsing when you remove them. I've learned the hard way that rushing this step leads to crumbly layers. Pro tip: Tap the sides of the pans gently after removing from the oven—if they sound hollow, they're ready to cool.
Create the Chocolate Ganache Filling
While the cakes cool, prepare the ganache by chopping the 12 oz dark chocolate bars into small pieces. In a heatproof bowl, combine the chocolate with the 1.5 cups heavy cream. Let it sit for 2 minutes, then place the bowl over a pot of simmering water, ensuring the bottom doesn't touch the water. Stir gently until the chocolate and cream melt completely and the mixture becomes silky smooth—about 3-4 minutes. Real talk: Don't walk away during this process, or you might end up with grainy ganache.
Let the ganache cool to room temperature, stirring occasionally, until it thickens enough to hold its shape but still spread easily. This should take about 20-25 minutes. The perfect ganache consistency is like thick pudding—it should coat the back of a spoon but not drip. If it sets too quickly, warm it gently over low heat and stir until smooth again.
Assemble the Cake with Moist Layers
Place the first cake layer on a cake stand or plate. Spread a generous layer of the cooled ganache over the top, leaving a ½-inch border. Here's where it gets fun—place the second cake layer on top and press down gently to create a clean edge. Repeat with the final layer, reserving about ½ cup ganache for the outside. This ensures you have enough filling to seal all three layers properly.
Once assembled, refrigerate the cake for at least 4 hours or overnight. This chilling time is crucial for the ganache to set completely and the layers to meld together. I know it's tempting to frost immediately, but patience here prevents a messy cake that slides apart. For extra insurance, I like to wrap the cake in plastic wrap and place it in the fridge while I make the frosting.
Frost and Decorate for Showstopping Height
Prepare the chocolate buttercream by beating the 2 cups powdered sugar, 1.5 cups unsalted butter, and 1 tsp vanilla extract together until light and fluffy. Spread a thin crusting layer of buttercream over the entire cake, then refrigerate for 15 minutes to set. This step creates a smooth base for your final frosting and prevents the ganache from showing through.
Apply the remaining buttercream to the sides and top of the cake, using an offset spatula to create smooth, even swipes. For that signature triple-layered height, I like to add a decorative border at the base where the layers meet. Finish with chocolate shavings, fresh berries, or sprinkles for a festive touch. The cake will keep in the refrigerator for up to 5 days, though I doubt it will last that long!
Pro Tips For Making Big Chocolate Birthday Cake
- MELT BUTTER SLOWLY: I learned this the hard way—dumping cold butter into hot sugar makes a greasy mess that won’t emulsify properly. Instead, warm the butter in the microwave for 20-30 seconds (just until it softens but isn’t liquid) before mixing with sugar. The cake’s texture will be smoother, and you’ll avoid that weird, dense crumb.
- SIFT THE COCOA: Unsweetened cocoa powder clumps like a grumpy cat if you don’t handle it right. Sift it with the flour and baking powder before adding to the dry ingredients—this guarantees even distribution and prevents pockets of bitter, undissolved cocoa. (Yes, even if you’re impatient like me, take the extra 30 seconds.)
- TEST FOR DONENESS: A toothpick with a few moist crumbs is fine, but for a proper big chocolate cake, press the center lightly—it should spring back almost instantly. If it bounces back slowly, bake another 3-5 minutes. Overbaking dries out the layers, and no one wants a cake that fights back.
- ADD VANILLA EXTRA: The recipe might call for vanilla, but trust me: double it. Chocolate cake needs that bright, warm note to cut through the bitterness, especially in a big batch where flavors can get muted. A teaspoon more won’t ruin it—it’ll just make the whole thing taste like a bakery, not a science experiment.
Essential equipment for great big chocolate birthday cake
Stand Mixer Essentials
Your stand mixer is the workhorse of this recipe—don’t skip it! A KitchenAid Artisan or Hamilton Beach model with a paddle attachment is perfect for creaming butter and sugar to that light, fluffy ribbon stage.
I’ve used my KitchenAid Professional 600 for years, and it never fails to deliver consistent results. For smaller batches, a hand mixer works, but you’ll need to mix in 1-minute intervals to avoid overheating the eggs. 💛
Cake Pans and Parchment
Invest in three 8-inch round cake pans with removable bottoms—they’re a game-changer for easy release. I swear by Wilton Perfect Results pans because they bake evenly and release cleanly. Line the bottoms with parchment circles (not just parchment paper) to prevent sticking.
Pro tip: Use vegetable oil (not butter) to grease the pans—it creates a non-stick barrier that won’t burn. Store your pans in a dedicated stack to keep them organized and rust-free.
Offset Spatula and Cake Turntable
A high-quality offset spatula (like the OXO Good Grips) is non-negotiable for spreading frosting smoothly. Pair it with a cake turntable to rotate the cake effortlessly while frosting—it makes all the difference for even coverage.
I like the Wilton Cake Stand and Turntable Set because it’s sturdy and easy to clean. For decorating, a small piping bag with a star tip helps create those professional-looking borders between layers. 🎂
Thermometer for Precision
An instant-read thermometer (I use the Thermoworks ThermoPop) ensures your cake bakes to perfection—210°F at the center is ideal for a moist crumb. It also helps monitor the ganache temperature during melting to avoid overheating.
For the oven, a baking thermometer (like the Thermoworks Oven Thermometer) ensures your 350°F setting is accurate—ovens vary wildly! Trust me, a few degrees can make or break your cake’s texture.
Chocolate Melting Tools
Melting chocolate properly is key, so grab a heatproof bowl (like Pyrex) and a double boiler setup (or a bowl over a pot of simmering water). I also keep a spatula and a fine-mesh sieve on hand to strain any lumps from the ganache.
For chocolate shavings, a vegetable peeler works wonders on a block of dark chocolate. Store your chocolate bars in an airtight container in a cool, dry place to prevent blooming (white powdery residue).
Storage Containers
After baking, store your cake layers in airtight containers (like Rubbermaid Brilliance) to keep them fresh for up to 2 days. For the ganache, a glass jar with a tight-sealing lid preserves its texture for 1 week in the fridge.
When serving, use a sharp serrated knife (like the Mercer Culinary Genesis) to slice clean, even portions. And if you’re prepping ahead, plastic wrap is your best friend for covering the cake while it chills in the fridge.
Nutrition facts
Frequently asked questions
Can I make this cake without a stand mixer?
While a stand mixer makes creaming butter and sugar easier, you can use a hand mixer or even do it by hand with a wooden spoon. Just mix the butter and sugar for 5-7 minutes until light and fluffy, then proceed with the recipe. For the eggs, mix them in one at a time, letting the mixture come to room temperature between each addition to prevent curdling.
How do I adjust the recipe for a smaller cake?
For a 2-layer cake (serving 6-8), reduce the batter by 1/3 and bake in two 8-inch pans. Cut the ganache in half and the buttercream to 1 cup powdered sugar + 1 cup butter. The same techniques apply, just scaled down! For a single-layer cake, use one pan and half the batter, but expect a shorter, wider cake rather than tall layers.
Why did my cake turn out dense instead of moist?
Dense cake usually happens from overmixing or underbaking. Check your mixing: stop as soon as the dry ingredients are just incorporated. Also, ensure your oven is at 350°F (use an oven thermometer) and bake until a toothpick comes out clean—210°F internal temp is ideal. Another common issue? Not letting cakes cool completely before frosting. Always wait until they're room temperature or slightly warm.
Can I substitute buttermilk in this recipe?
Yes! Mix 1.5 tbsp lemon juice or white vinegar with 1.5 cups milk and let it sit for 5 minutes to curdle. This homemade buttermilk works perfectly. For dairy-free options, use unsweetened almond milk + 1.5 tbsp vinegar, but note the texture may be slightly lighter. The acidity is key for that tender crumb—don't skip it!
How far ahead can I make this cake?
You can assemble the cake 2 days in advance! Store the baked layers wrapped in plastic at room temperature, and keep the ganache refrigerated. Assemble the cake 4 hours before serving to let the ganache set properly. For best flavor, let it sit at room temperature for 1-2 hours before serving—this brings out the chocolate's richness. The frosting can be made 1 day ahead and stored in the fridge.