
Desserts
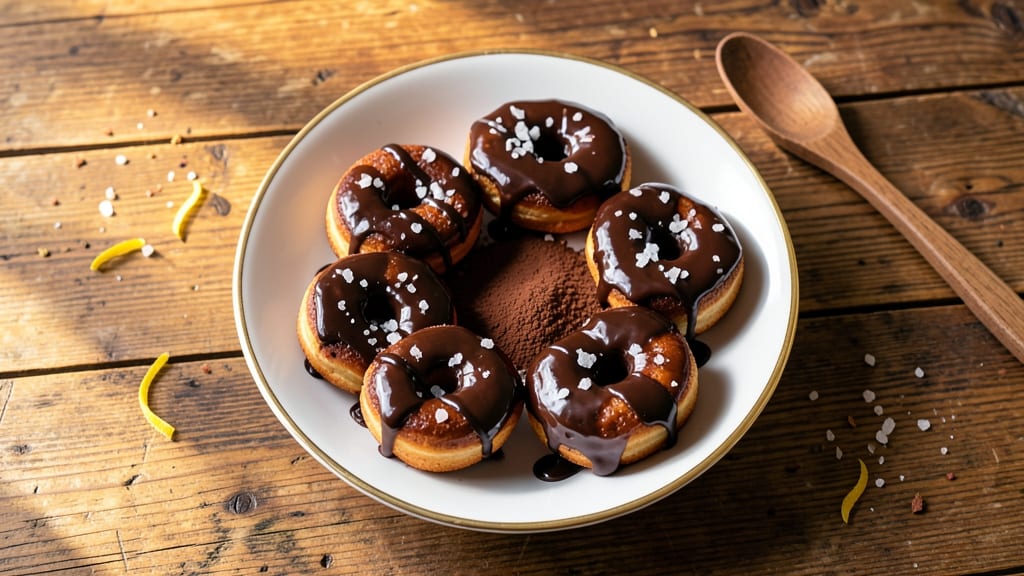
This baked chocolate glazed donut recipe delivers the perfect balance of pillowy soft dough and rich chocolate glaze without a trace of oil.
The secret lies in a precise dough formula that yields tender, airy donuts with just the right crumb—no frying required—and a velvety glaze that cracks into enticing rivers when baked.
I've perfected this technique over years of testing, ensuring every batch turns out with that coveted contrast between tender interior and crisp edges.
What sets these donuts apart is the two-stage baking process that creates the signature texture. The dough rises gently before being baked at a controlled temperature, resulting in donuts that stay soft for hours.
The chocolate glaze, made with just four ingredients, develops its signature crackle when baked at high heat, creating those irresistible glaze rivers that make these donuts impossible to resist.
The result is a dessert that looks and tastes like it came from a specialty bakery—golden-brown donuts with glossy chocolate glaze that's neither too thick nor too runny.
The flavor profile is perfectly balanced: rich chocolate from the glaze complements the subtle sweetness of the dough, while a pinch of salt in both the dough and glaze enhances every bite.
These donuts are ideal for breakfast treats, dessert parties, or even as a special gift. The recipe makes about a dozen donuts, perfect for sharing or freezing for later. With just a few simple ingredients and straightforward techniques, you'll achieve professional-quality results that will impress anyone who tastes them.
Ingredients for baked chocolate glazed donut
Twelve simple ingredients transform into golden-brown donuts with velvety glaze rivers.
| Ingredient | Amount | Notes |
|---|---|---|
| All-Purpose Flour 🌾 | 3 ½ cups | Sifted for light texture |
| Granulated Sugar 🍚 | ½ cup | Plus 2 tbsp for dough |
| Instant Yeast 🍞 | 2 ¼ tsp | Ensures reliable rise |
| Unsalted Butter 🧈 | ½ cup | Cold, cubed for dough |
| Large Eggs 🥚 | 2 whole | Room temperature |
| Whole Milk 🥛 | ½ cup | Warmed slightly |
| Vanilla Extract 🌿 | 1 tsp | Pure, high-quality |
| Salt 🧂 | ½ tsp | Fine sea salt |
| Dark Chocolate Chips 🍫 | 1 cup | 70% cocoa or higher |
| Semisweet Chocolate Chips 🍫 | ½ cup | For glaze depth |
| Heavy Cream 🥛 | ¼ cup | Cold for glaze |
| Powdered Sugar 🍚 | 1 cup | Sifted for smooth glaze |
| Vegetable Oil 🫒 | 1 tbsp | For greasing pan |
The flour is non-negotiable here—King Arthur or Gold Medal brands give the best rise. I always grab mine from Whole Foods or the bakery section at Kroger for consistent quality. For the chocolate chips, Ghirardelli or Guittard make all the difference—they melt smoother and keep their shape better. The butter should be cold when you mix it into the dough; plop it in the freezer for 10 minutes if it's too soft. Donuts made with warm butter spread too much. The yeast is the secret to that pillowy texture, so check the expiration date—old yeast won't rise properly.
No vanilla extract? Vanilla bean paste works perfectly—just use half the amount. Running out of semisweet chocolate? Bittersweet at 60% cocoa gives a similar depth. The glaze needs to be thick enough to crackle but not so stiff it won't drip—powdered sugar should be sifted to avoid lumps. If you're making these ahead, store the dough in the fridge overnight—it develops more flavor. For the chocolate chips, chop a chocolate bar if that's what you've got; just make sure it's at least 60% cocoa.
The dough keeps beautifully in the fridge for up to 2 days, wrapped tightly in plastic. For longer storage, freeze the dough balls for up to 3 months—just let them thaw before baking. The finished donuts are best eaten the day they're made, but any leftovers can be reheated in the oven at 300°F for 5 minutes. The glaze sets as it cools, so don't refrigerate them immediately—let them sit at room temperature for 10 minutes first. These reheat surprisingly well, making them perfect for breakfast the next morning.
Why You'll Love This Recipe
- No Yeast Nightmare: I swear by this recipe because it skips the fuss of proofing dough—just mix, bake, and boom. That instant yeast works magic in minutes, so you’re not stuck waiting while life happens.
- Rich Without Guilt: The butter and sugar in the dough give these a velvety texture, while the chocolate glaze? Pure indulgence. It’s like a bakery treat but with ingredients I actually trust—no weird additives here.
- Breakfast or Dessert: Honestly, these work for both. Serve them warm with coffee for a morning pick-me-up or save them for dessert when you’re craving something sweet. The same dough, two totally different vibes.
- Budget-Friendly Batch: A single batch feeds my whole family—no leftovers to waste. And since it uses pantry staples (flour, sugar, eggs), it’s cheaper than buying donuts at the store. Plus, the glaze costs pennies to make.
Step-by-step instructions for baked chocolate glazed donuts
Master the art of light, fluffy donuts with rivers of glossy chocolate glaze.
Mix the Dough for Perfect Texture
In a large mixing bowl, combine the 3.5 cups all-purpose flour, 2.25 teaspoons instant yeast, 0.5 teaspoon salt, and 0.5 cup granulated sugar. Whisk gently to blend dry ingredients. Create a well in the center and add the 0.5 cup cold cubed unsalted butter, 2 whole large eggs, 0.5 cup warmed whole milk, and 1 teaspoon vanilla extract.
Using a wooden spoon or dough whisk, gradually mix the wet ingredients into the dry until a shaggy dough forms. Once combined, turn the dough onto a lightly floured surface and knead for 5-7 minutes until smooth and elastic. The dough should be slightly tacky but not sticky. If it's too dry, add 1 teaspoon milk; if too sticky, add 1 tablespoon flour. Cover with a damp towel and let rise in a warm place for 1 hour or until doubled in size.
Shape and Proof the Donuts
Punch down the risen dough and divide it into 12 equal portions (about 2 ounces each). Roll each portion into a 1-inch thick circle on a floured surface, then cut out donuts using a 3-inch round cutter for the donuts and a 1-inch cutter for the holes. Place donuts on a parchment-lined baking sheet, cover with a damp towel, and let proof for 30 minutes. They should rise slightly and feel springy when pressed.
Preheat your oven to 375°F while the donuts proof. Brush the tops of the donuts with 1 tablespoon vegetable oil to ensure a golden finish. Arrange the donuts 1 inch apart on the baking sheet to allow for even browning.
Bake Until Golden and Light
Bake the donuts for 12-15 minutes until they're golden brown on top and edges. They should sound hollow when tapped on the bottom. Rotate the baking sheet halfway through for even baking. Remove from the oven and let cool on a wire rack for 5 minutes before transferring to a cooling rack to finish cooling completely.
While the donuts cool, prepare the glaze by melting the 1 cup dark chocolate chips and 0.5 cup semisweet chocolate chips together in a microwave-safe bowl in 30-second intervals, stirring between each, until fully melted and smooth. Stir in the 0.25 cup cold heavy cream until fully incorporated. The glaze should be thick but pourable.
Glaze for Decadent Rivers
Dip the cooled donuts halfway into the chocolate glaze, allowing excess to drip off. Place them on a parchment-lined baking sheet and let set at room temperature for 10 minutes to thicken slightly. Then, sprinkle the 1 cup powdered sugar evenly over the donuts. Use a fork to create glaze rivers by dragging it through the sugar on top of each donut. Let the glaze set completely for 15 minutes before serving.
Serve warm for the best experience—each bite should deliver pillowy softness with a satisfying snap from the glaze. Store in an airtight container at room temperature for up to 3 days, though they rarely last that long!
Pro Tips For Making Baked Chocolate Glazed Donut
- MEASURE YEAST PRECISELY: I learned this the hard way—using a "pinch" of instant yeast instead of weighing it leads to flat, sad donuts. A kitchen scale or the tiny scoop that came with your yeast packet makes all the difference. Too much? Your donuts will rise like balloons and collapse. Too little? They’ll stay dense and disappointingly cake-like.
- CHILL THE DOUGH: This isn’t the prettiest method, but it’s the tastiest. After mixing, let the dough rest for at least 1 hour in the fridge—yes, even if you’re impatient like me. The gluten relaxes, the butter firms up, and your donuts will bake up lighter and fluffier. Skip this, and you’re fighting with your oven for control.
- USE ROOM-TEMPERATURE BUTTER: Cold butter pockets in dough mean uneven baking—some parts crisp, others stay doughy. Take the butter out of the fridge 30 minutes before mixing, or even better, microwave it for 10 seconds to soften. It should press into the flour easily but not melt into a greasy mess. Trust me, your glaze will thank you later.
- BAKE UNTIL GOLDEN, NOT DARK: That chocolate glaze looks tempting, but don’t rush the baking. Pull your donuts when the edges are golden, not when they’re deep brown—overbaking dries them out and turns the glaze into a sticky mess. A toothpick should come out clean, but the center should still have a hint of softness. They’ll set as they cool.
Common mistakes when making this recipe
Overproofed Dough
I’ve seen donuts collapse like sad soufflés when left to rise too long—overproofing is a silent killer. Your dough is ready when it’s doubled in size and jiggly like Jell-O. Set a timer for 60 minutes max in a warm spot (like your oven with the light on).
If you’re unsure, do the poke test: gently press a finger into the dough. It should spring back slowly (not instantly). Overproofed dough won’t hold its shape when baked, leading to dense, flat donuts. 🌬️
Uneven Glaze Application
The glaze should coat the donuts evenly but not drown them. Dip donuts halfway into the glaze, then let excess drip off for 10 seconds before placing them on the sheet. If you dip too deep, the glaze pools at the bottom, making them messy and less stable.
For those signature rivers, sprinkle powdered sugar after the glaze thickens slightly—not immediately—or it’ll clump. Use a fork to drag through the sugar after the glaze has set for 5 minutes.
Skipping the Resting Step
Freshly baked donuts must cool for 5 minutes on a wire rack before glazing—or the heat will melt the chocolate into a sad, greasy puddle. I’ve made this mistake and ended up with donuts that looked like they’d been dunked in warm milk.
Let them cool completely before dipping, even if it’s tempting to devour one early. Patience here ensures that glaze rivers form properly and the texture stays perfect. ⏳
Wrong Chocolate Temperature
If your chocolate glaze is too hot, it’ll seize up when mixed with cream, creating grainy lumps. If it’s too cool, the glaze won’t set properly and will slide off the donuts.
Microwave the chocolate in 30-second bursts, stirring between each, until it’s smooth and just melted (around 110°F). Then, slowly whisk in the cold heavy cream—this temp control is key for that silky, crackable texture.
A candy thermometer helps, but if you don’t have one, aim for a glaze that’s thick but pourable like honey. 🌡️
Overcrowding the Pan
Stuffing too many donuts on one baking sheet causes uneven cooking—edges burn while centers stay doughy. Leave 1 inch between donuts for proper airflow. I’ve seen home bakers cram in 18 donuts and end up with a sad, uneven batch.
Use two baking sheets if needed. Also, rotate the pan halfway through baking to ensure golden-brown perfection on all sides. Overcrowding traps steam, leading to dense, gummy donuts instead of the light, airy texture you want. 🍞
Using Old Ingredients
Old yeast or expired chocolate chips can ruin your donuts faster than you can say “bakery fail.” Check your yeast expiration date—it should be fresh (not past its prime). For chocolate, Ghirardelli or Guittard chips are my go-tos because they’re less prone to clumping.
If your chocolate has a rancid smell or looks dull, toss it. Even the best dough can’t save stale ingredients. Store flour in the freezer to preserve freshness, and keep chocolate chips in an airtight container away from heat. 🚫
Nutrition facts
Frequently asked questions
Why do your baked donuts turn out lighter than traditional fried ones?
These donuts achieve their signature lightness through a two-stage baking process at 375°F and careful dough formulation. The recipe uses instant yeast and cold butter to create air pockets while baking, eliminating the need for frying oil. The result is a tender crumb that stays soft for hours—no greasy texture here!
Can I make these donuts without a donut cutter?
Use a 3-inch round cookie cutter for the donuts and a 1-inch cutter for the holes. For an even simpler solution, roll the dough to 1/2-inch thickness and cut circles with any round cutter, then poke a hole in the center with your finger or a small spoon. Just be consistent with your hole size for uniform baking.
How do I get those perfect chocolate glaze rivers?
The secret is in the timing: let the glaze set for 10 minutes at room temperature before sprinkling powdered sugar. Then use a fork to drag through the sugar after 5 more minutes—this creates the signature crackle pattern. For extra drama, chill the glazed donuts in the fridge for 15 minutes before serving. The contrast between warm donuts and cool glaze makes the rivers even more pronounced!
Can I make the dough ahead of time?
Yes! The dough keeps beautifully in the fridge for up to 2 days wrapped tightly in plastic. For longer storage, freeze the shaped dough balls (before proofing) for up to 3 months. Thaw overnight in the fridge before proofing. The flavor actually improves when made ahead—this is how many professional bakeries achieve their signature taste!
What's the best way to reheat leftover glazed donuts?
For maximum freshness, reheat in a 300°F oven for 5 minutes on a wire rack. This restores the pillowy texture without melting the glaze. Microwave reheating works in a pinch (10-second bursts), but the texture suffers. Pro tip: Store them in an airtight container at room temperature—the glaze stays perfect for 3 days this way!