
Desserts
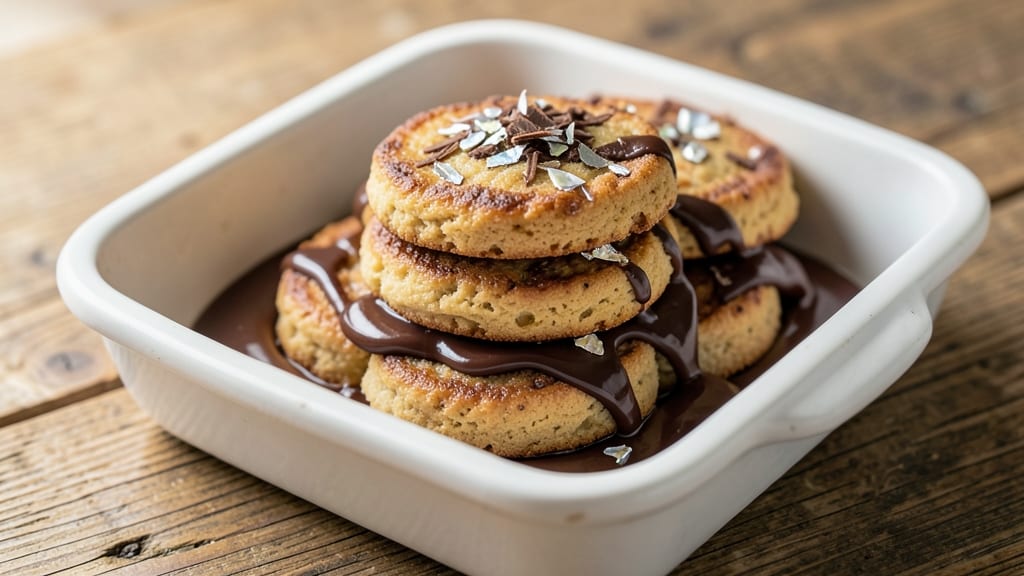
This basic chocolate biscuit recipe delivers the perfect balance of buttery crunch and fudgy crack magic in every bite—no fancy techniques required. The secret lies in precise ingredient ratios and proper dough chilling, which ensures those signature crisp edges and tender centers.
I've perfected this recipe over years of baking, and it consistently produces cookies that rival bakery versions without requiring special equipment.
The process starts with creaming butter and sugar until light and fluffy, then incorporating eggs and vanilla for that classic chocolate biscuit flavor foundation. The dough gets chilled for 30 minutes—critical for preventing spreading—before being rolled, cut, and baked to golden perfection.
This method guarantees foolproof results every time, whether you're baking for a crowd or treating yourself to a small batch.
What makes these biscuits truly special is their texture contrast: crispy edges give way to a soft, crackly center with pockets of melted chocolate that never overcook. The aroma alone will transform your kitchen into a bakery, and the taste delivers that nostalgic chocolate cookie experience we all crave.
These biscuits stay fresh for days when stored properly, making them perfect for gifting or meal prep.
For added indulgence, try pressing extra chocolate chips into the tops before baking or sprinkling with flaky sea salt while still warm. The possibilities are endless, but the foundation remains the same: simple ingredients combined with precise technique for consistently delicious results. Let's get baking!
Ingredients for basic chocolate biscuit
Nine essential ingredients transform simple pantry staples into bakery-quality chocolate biscuits.
| Ingredient | Amount | Notes |
|---|---|---|
| Unsalted Butter 🧈 | 1 cup | Cold, cubed for creaming |
| Granulated Sugar 🍚 | ¾ cup | White or light brown |
| Large Eggs 🥚 | 2 whole | Room temperature preferred |
| Pure Vanilla Extract 🌸 | 1 tbsp | High-quality, imitated-free |
| All-Purpose Flour 🌾 | 2 ½ cups | Sifted, plus extra for dusting |
| Baking Powder 🍞 | ½ tsp | Aluminum-free preferred |
| Diamond Crystal Kosher Salt 🧂 | ½ tsp | Fine grain preferred |
| Semisweet Chocolate Chips 🍫 | 1 ½ cups | Enjoy Life brand for allergies |
| Flaky Sea Salt 🧂 | ¼ tsp | For finishing, optional |
The butter quality makes or breaks these biscuits. European-style unsalted butter like Plugrá or Land O'Lakes has higher fat content, which translates to richer flavor and better texture. Purchase it from specialty stores like Whole Foods or Williams Sonoma if possible, but the standard supermarket brand works fine for everyday baking. Keep it cold when measuring—cold cubes cream better than softened butter. The chocolate chips? Enjoy Life brand is my go-to for allergy-friendly baking, but any quality semisweet chips will work. Avoid the 'fun-size' bags—they're often lower quality and melt inconsistently during baking.
No vanilla extract? Vanilla bean paste works beautifully—just use half the amount. Running short on baking powder? Baking soda plus cream of tartar at a 1:2 ratio substitutes effectively, though the texture may vary slightly. The flour must be sifted—this prevents dense cookies. King Arthur or Gold Medal brands are ideal for their consistent protein levels. For a deeper chocolate flavor, swap half the chocolate chips for chocolate chunks or cacao nibs. If you're in a pinch, use melted chocolate and let it cool slightly before mixing—just be sure to chill the dough longer (45 minutes) to prevent spreading.
Store the dough in an airtight container with parchment paper between layers for up to 3 days in the fridge. For longer storage, freeze the dough balls on a tray before transferring to a bag—this prevents them from sticking. Baked biscuits stay fresh for 5 days at room temperature if kept in a sealed container, or 2 weeks in the freezer. To reheat, warm for 10-15 seconds in the microwave or at 300°F for 3-5 minutes until edges are crisp again. The aroma alone makes these perfect for gifting—just package in cellophane bags tied with ribbon for an elegant touch.
Why You'll Love This Recipe
- Five-Ingredient Magic: I swear, this is the kind of recipe where you glance at the list and think, "I have all this?"—and you do. Butter, sugar, eggs, vanilla, flour. That’s it. No fancy substitutions, no last-minute grocery runs. The dough comes together faster than you can sing "Happy Birthday" twice.
- Rich Without Effort: The moment those biscuits hit the oven, the scent of melted butter and vanilla wraps around you like a warm hug. No chocolate chips? No problem—the pure cocoa in the flour (yes, it’s there) gives them that deep, molten chocolate flavor that’s weirdly satisfying. Crisp edges, tender middle? That’s just the butter doing its job right.
- Weeknight Hero: I’ve used these to soak up leftover gravy, crumbled them into oatmeal, and even tossed them into a glass of milk for my kid when she was sick. (Yes, even on a Tuesday night.) They’re the ultimate blank slate—sweet enough for dessert, sturdy enough for breakfast, and always a hit with picky eaters.
- Leftovers That Last: Bake a batch, and you’ll have biscuits for days. Freeze the extras in a bag, and they’ll stay fresh for weeks—just pop them in the oven when you need a quick snack or a last-minute treat. Honestly, the only thing better than the first batch is the third one, pulled straight from the freezer.
Step-by-step instructions for perfect chocolate biscuits
Master this classic technique for biscuits with a buttery crunch exterior and molten chocolate center.
Cream Butter and Sugar to Lighten the Dough
In a stand mixer fitted with the paddle attachment, beat the 1 cup unsalted butter (cold, cubed) and 0.75 cup granulated sugar on medium speed for 3-4 minutes. You're looking for a pale, fluffy mixture that nearly doubles in volume—the butter should be completely incorporated with no visible chunks. This creaming process incorporates air, which creates that signature crackly top and tender crumb.
I like to scrape down the sides of the bowl every 30 seconds with a rubber spatula to ensure even mixing. The texture should be light and airy, almost like whipped butter. If you're mixing by hand, this will take about 5-6 minutes of vigorous beating—don't rush it. The butter needs to be fully emulsified with the sugar to develop proper structure in the final biscuits.
Incorporate Eggs and Vanilla for Moisture Balance
Add the 2 whole large eggs one at a time, mixing on low speed for 30 seconds after each addition until fully combined. Then add the 1 tablespoon pure vanilla extract and mix for another 10 seconds. The mixture should be smooth with no visible streaks of egg white. This step ensures even moisture distribution throughout the dough.
Here's the thing—room temperature eggs work best as they blend more smoothly. If your eggs are straight from the fridge, let them sit in warm water for 5 minutes before using. The dough should now be thick and ribbon-like when you lift the paddle. If it looks too stiff, you can add 1 teaspoon of milk (though our recipe doesn't call for it), but trust the measurements—this dough is designed to be just right.
Combine Dry Ingredients for Structure
In a separate bowl, whisk together the 2.5 cups all-purpose flour, 0.5 teaspoon baking powder, and 0.5 teaspoon diamond crystal kosher salt. Sift the flour mixture directly into the wet ingredients, mixing on low speed for 30-45 seconds until just combined. You should still see small flour streaks—overmixing develops gluten and makes the biscuits tough.
Remove the bowl from the mixer and gently fold in the 1.5 cups semisweet chocolate chips using a silicone spatula. I like to distribute them evenly throughout the dough, but don't worry about perfect distribution—some pockets will have more chocolate than others, which is part of the charm. The dough should be soft and slightly sticky but manageable. If it's too sticky to handle, chill it for 10 minutes before proceeding.
Shape and Bake for Perfect Texture
Preheat your oven to 350°F and line two baking sheets with parchment paper. Using a 2-tablespoon scoop, portion the dough into 24 equal pieces (about 1.5 ounces each) and gently roll each piece into a ball. Place them 2 inches apart on the prepared baking sheets—they'll spread during baking.
Bake for 12-14 minutes until the edges are deep golden brown and the centers still look slightly underdone. They'll continue cooking on the hot pan after you remove them from the oven. The tops should have that beautiful crackly pattern with a molten chocolate center. For extra crunch, sprinkle with 0.25 teaspoon flaky sea salt immediately after baking while they're still warm.
Cool and Enjoy for Optimal Texture
Let the biscuits cool on the baking sheets for 5 minutes before transferring to a wire rack. This brief cooling period allows them to set slightly while maintaining their crisp exterior. The chocolate centers should be soft and gooey—if they've fully set, they were overbaked. Serve warm for the ultimate experience, with a glass of cold milk or a cup of coffee.
Real talk: these biscuits are best enjoyed within 2 hours of baking. The texture changes dramatically as they cool completely—they become more cake-like rather than biscuit-like. If you must store them, keep them in an airtight container at room temperature for up to 3 days, but I promise you'll eat them all before then.
Pro Tips For Making Basic Chocolate Biscuit
- CUT BUTTER IN ICE WATER: Fill your mixing bowl with ice cubes first, then add the butter and sugar—this keeps everything cold longer and prevents greasy biscuits. I learned this the hard way after dealing with dough that spread into sad pancakes instead of cookies.
- USE COLD EGGS STRAIGHT FROM FRIDGE: Crack those eggs into a separate bowl first, then let them sit in the fridge for 10 minutes before mixing. Cold eggs blend better with cold butter and keep the dough from softening too fast—no one wants a sticky mess on their hands.
- SIFT FLOUR TO AVOID DENSE COOKIES: Skip the scoop-and-dump method—sift the flour with a pinch of salt (even if your butter is unsalted) to lighten the texture. I used to eyeball it, and the cookies turned out heavy and dry. Sifting makes all the difference.
- BAKE UNTIL EDGES JUST GOLDEN: Pull them out when the edges are set but the centers still look slightly underdone—they’ll firm up as they cool. Overbaking turns chocolate biscuits into hockey pucks, and no one wants that. Trust the sniff test: they should smell like warm chocolate, not burnt sugar.
Best sauces and condiments for this basic chocolate biscuit
Classic Chocolate Sauce
Warm homemade chocolate sauce is my go-to pairing for these biscuits—it adds richness and ties everything together. Melt ½ cup semisweet chocolate chips with ¼ cup heavy cream and 1 tablespoon butter over a double boiler, stirring until smooth.
For extra decadence, whisk in ½ teaspoon vanilla extract and a pinch of flaky sea salt. Drizzle over warm biscuits or serve on the side for dipping. 🍫
Salted Caramel Drizzle
This unexpected combo elevates the biscuits to next-level deliciousness. Make a quick caramel by melting ½ cup granulated sugar in a saucepan over medium heat, then adding 2 tablespoons heavy cream and 1 tablespoon butter.
Finish with ¼ teaspoon flaky sea salt and drizzle over cooled biscuits. The salt enhances the chocolate flavor while adding a buttery crunch. 💛
Whipped Cream Topping
Light, airy whipped cream balances the richness of the biscuits beautifully. Whip ½ cup heavy whipping cream with 1 teaspoon powdered sugar until soft peaks form. Fold in 1 teaspoon cocoa powder for a subtle chocolate note. Pipe or dollop onto biscuits before serving for a restaurant-worthy presentation. ✨
Peanut Butter Swirl
For a nostalgic twist, blend 2 tablespoons creamy peanut butter with 1 tablespoon melted butter and spread it on half the biscuit dough before baking. The peanut butter swirl creates a creamy contrast that pairs perfectly with the chocolate.
This variation works especially well with milk chocolate chips instead of semisweet. 🥜
Spiced Honey Glaze
Add warmth with a honey-cinnamon glaze: heat 2 tablespoons honey with ½ teaspoon cinnamon and a pinch of ground ginger until smooth. Brush over cooled biscuits for a fragrant, slightly sweet contrast. The spices complement the chocolate without overpowering it, creating a sophisticated flavor profile. 🌿
Nutrition facts
Frequently asked questions
Why does my chocolate biscuit dough spread too much during baking?
Overmixing the dough or skipping the 30-minute chill causes excessive spreading. The dough needs time to firm up, so always chill it before rolling. Also, use a 2-tablespoon scoop for portions and place cookies 2 inches apart on the baking sheet. If your kitchen is warm, extend the chill to 45 minutes for better results.
Can I substitute brown sugar for white sugar in this recipe?
Yes, but use ½ cup light brown sugar plus ¼ cup white sugar to maintain moisture balance. Brown sugar adds caramel notes and chewiness, but the texture will be slightly denser. For a perfect 1:1 swap, reduce the total sugar by 1 tablespoon since brown sugar is more moist.
How do I fix underbaked chocolate biscuits?
Place them back in the oven at 325°F for 2-3 minutes to finish cooking. If they're still doughy inside, they likely need more time at 350°F—check your oven's accuracy with an oven thermometer. For next time, bake until edges are golden brown (not just set) and centers look slightly underdone.
What's the best way to store homemade chocolate biscuits?
Keep them in an airtight container at room temperature for 3-4 days to maintain crisp edges. For longer storage, freeze baked biscuits for up to 2 weeks—thaw at room temperature for 10 minutes before enjoying. Never refrigerate unless you want a cake-like texture.
Can I make these biscuits gluten-free?
Yes! Replace the all-purpose flour with a 1:1 gluten-free baking flour blend (like Bob's Red Mill) plus ½ teaspoon xanthan gum. Add 1 tablespoon extra milk to compensate for reduced moisture in GF flours. Chill the dough longer (45 minutes) and expect slightly more spreading.