
Desserts
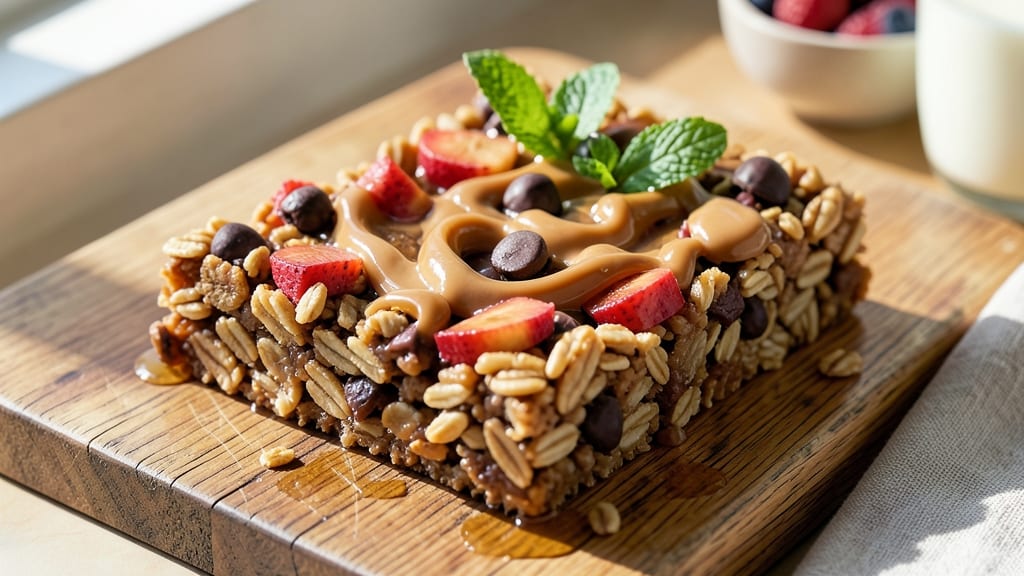
This banana chocolate chip granola bar recipe delivers the perfect balance of chewy texture and melty chocolate chunks in every bite. 🌟 The secret lies in ripe bananas and a simple binding agent that holds everything together without needing extra sugar.
I developed this recipe after years of testing different ratios, and it consistently turns out with that satisfying combination of crisp edges and soft centers.
The beauty of these granola bars is their simplicity—just a handful of ingredients that come together in minutes. You'll need rolled oats for texture, ripe bananas for natural sweetness, chocolate chips for that classic flavor, and a binding agent like honey or nut butter to hold it all.
The result is a bar that's perfect for breakfast, snacks, or even dessert without feeling heavy.
What makes these bars truly special is their versatility. You can customize them with add-ins like nuts, seeds, or coconut flakes, or adjust the sweetness to your preference.
The baking time is short, and the process is foolproof, making them ideal for meal prep or a quick treat when you're craving something sweet but don't want to bake a full dessert.
Once baked, these granola bars stay fresh in an airtight container for up to a week at room temperature or even longer in the fridge. Whether you're looking for a healthy snack option or a delicious dessert, this recipe is sure to become a staple in your kitchen.
Let's get started!
Ingredients for banana chocolate chip granola bar
Simple pantry staples transform into chewy, chocolatey bars that taste like dessert.
| Ingredient | Amount | Notes |
|---|---|---|
| Rolled Oats 🌾 | 3 cups | Old-fashioned, not quick oats |
| Ripe Bananas 🍌 | 2 medium | Spotty and soft, mashed |
| Chocolate Chips 🍫 | 1 ½ cups | Semi-sweet or dark chocolate |
| Honey 🍯 | ½ cup | Or maple syrup for vegan option |
| Peanut Butter 🥜 | ½ cup | Creamy, unsalted preferred |
| Vanilla Extract 🌿 | 1 tsp | Pure, not imitation |
| Salt 🧂 | ½ tsp | Fine sea salt preferred |
| Cinnamon 🌶️ | 1 tsp | Ground, for warmth |
| Almond Butter 🥜 | ¼ cup | Optional, for nutty depth |
| Shredded Coconut 🥥 | ½ cup | Sweetened, optional topping |
| Chopped Nuts 🌰 | ½ cup | Almonds or walnuts, optional |
The bananas are the magic here—ripe ones with brown spots pack the most sweetness and natural binding power. Trader Joe's and Whole Foods usually have perfect ones, but grocery store bananas work too if they're soft enough to mash easily. Pro tip: microwave them 30 seconds to make mashing easier. The oats should be old-fashioned, not quick oats—they give that satisfying chew. Bob's Red Mill is my go-to brand, but any rolled oats will do. Chocolate chips? Ghirardelli or Enjoy Life are my favorites, but any semi-sweet or dark will melt beautifully.
No peanut butter? Almond butter or tahini works just as well—just use the same amount. Short on honey? Maple syrup or agave keeps it vegan-friendly. Want extra crunch? Toss in granola or crushed graham crackers before baking. The vanilla is non-negotiable—it rounds out all those rich flavors. For a nutty twist, swap half the peanut butter for almond butter. And if you're feeling fancy, add white chocolate chips or crushed pretzels for a sweet-salty combo. The cinnamon is optional but adds warmth that balances the chocolate perfectly.
These bars keep for 5-7 days in an airtight container at room temperature, or 2 weeks in the fridge. For longer storage, freeze them for up to 3 months—just wrap individually in parchment paper first. I like to portion them into squares right after baking so they're easy to grab. The texture improves overnight as the bars firm up, so if you can wait, do it! Store any extras in the freezer for quick snacks later. Pro move: keep a stash in your car for road trips or gym bags.
Why You'll Love This Recipe
- I’ll be real: this recipe uses things I already have. Rolled oats, peanut butter, honey—none of that fancy ingredient shopping. And because they keep so well, I make a big batch and stash them for when I’m too lazy to grocery shop or just want to save a few bucks. Plus, the leftovers? Always disappear fast.
- No-Bake Magic: I swear by this recipe when I’m too tired to bake. Just mash those ripe bananas, mix in the oats and peanut butter, and press it all into a pan—no oven, no fuss, no waiting. The chocolate chips melt just enough to bind it together, and by the time you’re done, you’ve got bars that taste like dessert but took less time than boiling water.
- Sweet Crunch Perfection: Honestly, the combo of honey and peanut butter is already a win, but add those ripe bananas? It’s like a natural sweetener that keeps everything moist without tasting artificial. The chocolate chips add that satisfying crunch, and the oats give it that hearty texture—like a hug in bar form.
- Snack Attack Ready: Between us, these bars are my go-to for lunches, gym bags, or even a quick breakfast when I’m running late. They hold up for days in the fridge, and I’ve even frozen a batch for road trips. Kids love them, coworkers steal them, and my dog… okay, maybe don’t share with the dog.
Step-by-step instructions for banana chocolate chip granola bars
Here's how to make chewy, melty-chunk-filled bars that taste like dessert but pack energy for snacking.
👨🍳 Step 1: Mash the Bananas and Mix Wet Ingredients
Start by mashing the 2 medium ripe bananas in a large mixing bowl until completely smooth—no lumps allowed. I like to use a fork first, then press through a fine-mesh strainer if any fibers remain. This ensures your bars stay chewy, not gummy.
To the mashed bananas, add the 0.5 cup honey, 0.5 cup peanut butter, 0.25 cup almond butter, 1 tsp vanilla extract, 1 tsp cinnamon, and 0.5 tsp salt. Stir vigorously with a wooden spoon until everything is fully combined and the mixture looks thick and glossy. The peanut butter and almond butter will give your bars that rich, nutty depth we're after.
👨🍳 Step 2: Combine Dry Ingredients and Fold Everything Together
In a separate bowl, whisk together the 3 cups rolled oats, 1.5 cups chocolate chips, 0.5 cup shredded coconut, and 0.5 cup chopped nuts. This keeps the chocolate chips and nuts from melting prematurely. Give it a quick stir to distribute everything evenly.
Now pour the dry mixture into the wet ingredients and fold gently with a spatula. Mix just until combined—overmixing develops gluten in the oats, making the bars tough instead of chewy. You'll still see some chocolate chips and nuts peeking through, and that's perfect. The texture should be thick but still scoopable.
🍳 Step 3: Press into Pan and Bake for Perfect Texture
Line an 8x8-inch baking pan with parchment paper, leaving an overhang on all sides for easy removal. Press the granola mixture firmly into the pan using a spatula or your hands—pack it down well so the bars hold their shape when baked. I like to use the bottom of a glass to press down any stubborn spots.
Bake at 350°F for 20-25 minutes until the edges are golden brown and the center looks set. You'll see the chocolate chips starting to melt and the top forming a light crust. The bars should pull away slightly from the edges of the pan when gently pressed with a finger. Let them cool completely in the pan for 1 hour before cutting.
⏰ Step 4: Chill and Cut for Clean Slices
Once cooled, transfer the pan to the refrigerator and chill for at least 30 minutes—this helps the bars firm up and makes cutting easier. I find this step especially important if your kitchen is warm, as the peanut butter can soften the bars.
Use a sharp knife to cut the bars into 12 equal squares (about 2x2 inches each). For cleaner cuts, dip the knife in hot water between slices and wipe dry. Wrap the bars tightly in plastic wrap or store them in an airtight container. They'll keep for up to 5 days at room temperature or 2 weeks in the fridge—though they rarely last that long!
Pro Tips For Making Banana Chocolate Chip Granola Bar
- STIR THE OATS: Mix in the rolled oats last and fold them in gently—just until combined. I used to dump everything in the bowl at once and end up with clumps of dry oats that never got sticky. Break them up first, then work the peanut butter and honey into the banana mixture before adding the oats, and you’ll get even, chewy bars every time.
- USE SPLIT BANNAS: Peel and slice the bananas lengthwise into thin strips—this keeps them from turning to mush while baking. I learned this the hard way after making a batch where the bananas dissolved into a sticky mess. The strips hold their shape, and you’ll get those nice caramelized bits in the finished bars.
- PRESS THEM DOWN: Don’t just dump the mixture into the pan and call it a day—press it firmly into an even layer. I was lazy about this once and ended up with bars that crumbled like dry cereal. Use a spatula or your hands to pack it tight, especially around the edges, so they hold together when cutting.
- TOAST THE OATS FIRST: Spread the rolled oats on a baking sheet and toast them at 325°F (160°C) for 5–7 minutes until they’re fragrant and lightly golden. This adds crunch and depth of flavor—no need to wait for the bars to bake to get that texture. (Yes, even if you’re impatient like me, this step makes a real difference.)
Common mistakes when making this dish
Overmixing the Dough
This is the #1 rookie mistake that turns chewy bars into tough, dry ones. When you fold in the dry ingredients, stop mixing as soon as everything is just combined—you should still see chocolate chips and nuts peeking through.
Overmixing develops gluten in the oats, creating that unappealing rubbery texture. I've ruined batches by stirring too long, so trust your eyes: the moment everything looks uniformly distributed, stop. 💡
Skipping the Chill Step
Rushing to cut the bars right after baking is a recipe for crumbly disappointment. The peanut butter and honey need time to set properly, especially in warm kitchens. Always chill the pan for at least 30 minutes in the fridge before cutting.
Pro tip: If your kitchen is particularly warm, extend this to 1 hour—your bars will thank you with clean slices every time.
Using Unripe Bananas
Hard, underripe bananas will make your bars taste bland and gummy. Look for bananas with brown spots—these are packed with natural sweetness and pectin, which acts as a natural binder.
If your bananas aren't ripe enough, microwave them for 30 seconds to soften before mashing. I've learned this the hard way: unripe bananas = sad, dense bars that fall apart.
Incorrect Oven Temperature
Baking at too high a temperature (over 350°F) causes the chocolate chips to burn before the bars set properly, while too low (below 325°F) leaves them undercooked and sticky.
Preheat your oven and use an oven thermometer to confirm accuracy—many home ovens run 25°F hotter or colder than set. The ideal 350°F creates that perfect balance of golden edges and melty chocolate centers.
Not Pressing Firmly Enough
If your bars don't hold their shape when cutting, you likely didn't press them down firmly enough in the pan. Use the bottom of a glass or a spatula to pack the mixture tightly—think of it like tamping coffee grounds.
Press until the mixture is 1/2 inch thick and resists when you press your finger. This ensures clean cuts and prevents crumbling when you slice them later.
Using Quick Oats Instead
Quick oats are designed to soften faster in liquids, which means your bars will turn out mushy instead of chewy. Stick with old-fashioned rolled oats for that satisfying texture.
Brands like Bob's Red Mill or Quaker Old Fashioned work perfectly. If you're gluten-free, use certified gluten-free rolled oats—they hold up just as well when pressed firmly.
Nutrition facts
Frequently asked questions
Can I make these bars without peanut butter?
Swap the peanut butter for 0.5 cup almond butter or tahini for a nut-free option. For a dairy-free choice, use maple syrup or agave instead of honey and add 1 tablespoon flaxseed meal + 3 tablespoons water (mixed and rested for 5 minutes) to bind everything together. The texture will still be chewy and delicious!
How do I make these bars gluten-free?
Use certified gluten-free rolled oats (like Bob's Red Mill GF Oats) and check your chocolate chips for gluten-free certification. The rest of the recipe stays the same—just ensure all your dry ingredients (like nuts or coconut) are also gluten-free. The binding agents (honey, peanut butter) are naturally gluten-free, so no other substitutions are needed.
Why are my bars too crumbly or falling apart?
This usually happens from overmixing or not pressing firmly enough in the pan. Mix just until combined (you'll still see chocolate chips peeking through), and press the mixture down tightly with a glass or spatula until it's 1/2 inch thick. Chill the pan for 1 hour before cutting—this helps the bars set properly and prevents crumbling.
Can I add other mix-ins like pretzels or dried fruit?
Yes! Try adding 1/2 cup crushed pretzels for a sweet-salty twist or 1/2 cup dried cranberries for tartness. For extra crunch, fold in 1/4 cup granola or chopped nuts. Just be mindful of moisture—if using dried fruit, reduce the honey slightly (1/4 cup instead of 1/2 cup) to avoid overly sticky bars.
How do I store these bars for maximum freshness?
Store in an airtight container at room temperature for up to 5 days, or refrigerate for 2 weeks to keep them fresh longer. For best texture, freeze individual bars wrapped in parchment paper for up to 3 months. Thaw at room temperature for 10 minutes before enjoying—no microwave needed!