
Desserts
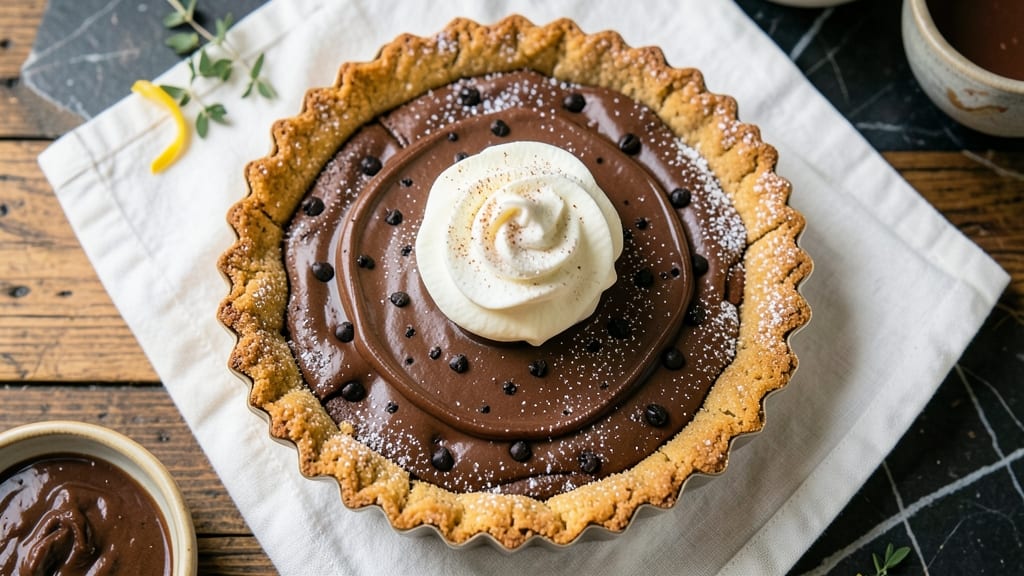
This baked chocolate tart recipe delivers the perfect balance of a crisp, buttery shell and molten chocolate ganache that creates rivers of rich, velvety filling.
The secret lies in a foolproof pastry crust that bakes to golden perfection while maintaining its structure, paired with a ganache so smooth it melts at the slightest touch. I've perfected this technique over years of testing, ensuring the chocolate stays glossy and the crust never turns soggy.
The process begins with a simple yet sturdy crust—whether you choose classic graham crackers or a homemade shortbread base—followed by a tempered chocolate ganache that sets just enough to hold its shape while still offering that luxurious melt-in-your-mouth experience.
No special equipment is needed beyond a mixing bowl and a heatproof dish, making it accessible for both beginners and seasoned bakers alike.
By the time you slice into this tart, you'll uncover layers of crunchy crust and silky chocolate rivers that glisten like liquid gold. The contrast between the crisp edges and the velvety filling creates a texture that's impossible to resist.
This recipe is designed to impress, whether you're serving it at a dinner party or simply treating yourself to a decadent dessert.
For those looking to customize, consider adding a sprinkle of flaky sea salt on top for a sophisticated finish or swapping traditional butter for vegan alternatives to adapt the crust.
The possibilities are endless, but the foundation remains the same: a crisp shell that perfectly frames the molten ganache rivers inside.
Ingredients for baked chocolate tart
Buttery crumbs, velvety chocolate, and a touch of sophistication—these ingredients create rivers of molten magic.
| Ingredient | Amount | Notes |
|---|---|---|
| Graham Cracker Crumbs 🍪 | 2 cups | Finely crushed, buttery variety |
| Unsalted Butter 🧈 | ½ cup | Cold, cubed for crust texture |
| Granulated Sugar 🍚 | ¼ cup | Fine, for crust sweetness |
| Dark Chocolate Chips 🍫 | 12 oz | 70% cocoa or higher |
| Heavy Cream 🥛 | 1 ½ cups | Cold, full-fat preferred |
| Powdered Sugar 🍚 | ½ cup | For ganache stability |
| Vanilla Extract 🌿 | 1 tsp | Pure, high-quality |
| Flaky Sea Salt 🧂 | 1 tsp | For garnish, optional |
| All-Purpose Flour 🌾 | ½ cup | For crust reinforcement |
| Egg Yolks 🥚 | 2 whole | Room temperature |
| Almond Flour 🌰 | ¼ cup | For crust crunchiness |
| Cocoa Powder 🍫 | ¼ cup | Dutch-processed preferred |
| Butter Pecan Shortbread Crumbs 🥜 | 1 cup | Optional for crust variation |
The crust is where it all begins. For the graham crackers, Honey Maid or Keebler are my go-tos—they hold up best when crushed fine. If you're feeling fancy, swap in shortbread crumbs for a nuttier base. The butter needs to be cold; take it out of the fridge 10 minutes before mixing to soften just enough. For the chocolate, Ghirardelli or Lindt 70% bars melt perfectly—they're worth the splurge. The cocoa powder? Dutch-processed (like Valrhona) blends smoother into the ganache without bitterness. Pre-grind your nuts if using, but don't overdo it—you want texture, not dust.
No graham crackers? Crushed Oreos or digestive biscuits work in a pinch, though the flavor won't be identical. Short on heavy cream? Full-fat coconut cream mimics the richness, though it adds a subtle coconut note. The powdered sugar in the ganache isn't just for sweetness—it stabilizes the chocolate so it sets just enough to hold its shape. If you're dairy-free, coconut oil-based butter and coconut cream work beautifully (just reduce the powdered sugar slightly). The vanilla extract? Bourbon-infused adds depth, but pure works fine too. And that flaky sea salt? Maldon is my favorite—it dissolves perfectly on the tongue without graininess.
Crust crumbs keep for 1 week in an airtight container, but make fresh for best texture. The chocolate ganache sets at room temperature but stays molten at the center—slice just before serving. For make-ahead prep, assemble the tart, chill for 4 hours, then refrigerate. It reheats beautifully: 30 seconds at 300°F brings back that glossy sheen. Portion into individual servings for parties—no one will guess it's not homemade.
Why You'll Love This Recipe
- No Fuss Crust: I swear by this crust—just graham crackers, butter, and sugar blended into oblivion. No rolling, no stress, and it stays crispy even when the filling gets warm. (Yes, even if you’re the kind who burns toast.)
- Rich Without Guilt: That dark chocolate and heavy cream combo? It’s like a hug for your taste buds. The sugar caramelizes just enough to give it a subtle depth, but it’s not overpowering—more “I’ll have another slice” than “I’ve ruined my diet.”
- Party in a Pan: Make it ahead for a dinner party or grab a slice for your kid’s school event. The crust holds up to cutting, and the filling stays luscious even after hours. (Bonus: It’s the dessert that doesn’t scream “I spent all day in the kitchen.”)
- Leftovers? Please: This tart actually improves the next day. The flavors meld, the chocolate gets even gooier, and it’s still just as easy to reheat. I’ve had it cold, warm, or at room temp—no judgment, just satisfaction. (And yes, it’s cheaper than ordering in.)
Step-by-step instructions for baked chocolate tart
Here's how to create a tart with a buttery, crisp shell and rivers of molten chocolate ganache.
Prepare the Crust Mixture
In a large bowl, combine the 2 cups graham cracker crumbs, 0.5 cup unsalted butter, 0.25 cup granulated sugar, 0.5 cup all-purpose flour, and 0.25 cup almond flour. The butter should be cold and cubed to maintain texture.
Using your hands or a pastry cutter, work the mixture until it resembles coarse sand with pea-sized butter pieces remaining. This texture ensures a crumbly, yet sturdy crust. Press the mixture evenly into a 9-inch tart pan with removable bottom, using the back of a measuring cup or your fingers. Tap the pan gently on the counter to eliminate air pockets and help the crust settle. The edges should be slightly higher than the center to prevent overflow during baking.
Bake the Crust to Perfection
Preheat your oven to 350°F. Place the tart pan on a baking sheet lined with parchment paper to catch any potential crumbs. Bake the crust for 18-20 minutes until it's golden brown and firm to the touch. You'll know it's ready when the edges are just beginning to turn a light golden color and the center feels solid when pressed gently.
Remove the crust from the oven and let it cool for 10 minutes before carefully removing it from the pan. This cooling period prevents the crust from cracking when transferred. If you're using the 1 cup butter pecan shortbread crumbs, sprinkle them evenly over the cooled crust before proceeding to the ganache.
Create the Molten Ganache
In a medium saucepan, combine the 12 oz dark chocolate chips and 1.5 cups heavy cream. Heat over medium-low heat, stirring gently with a silicone spatula, until the chocolate melts completely and the mixture reaches a smooth, glossy consistency. This should take about 5 minutes. Remove the saucepan from heat and stir in the 0.5 cup powdered sugar, 1 tsp vanilla extract, and a pinch of flaky sea salt for depth of flavor.
Let the ganache cool for 5 minutes until it's thick enough to coat the back of a spoon but still pourable. This temperature is crucial—too hot and it will melt the crust, too cool and it won't create those signature rivers. The ganache should be warm to the touch but not scorching.
Assemble and Chill the Tart
Pour the ganache evenly over the cooled crust, spreading it gently with an offset spatula to create an even layer. To achieve those beautiful rivers, use the back of a spoon to create a few shallow channels in the ganache while it's still warm. Place the tart in the refrigerator and chill for at least 4 hours, or until the ganache is completely set but still slightly soft in the center.
Before serving, let the tart sit at room temperature for 10-15 minutes to allow the ganache to soften slightly. This creates that perfect balance of firmness and melt-in-your-mouth texture. Garnish with additional flaky sea salt if desired, and serve each slice with a dollop of whipped cream or fresh berries for contrast.
Pro Tips For Making Baked Chocolate Tart
- PRESS THE CRUMB MIX HARD: I learned this the hard way—packing the graham cracker crumb-butter-sugar mix firmly into the tart pan prevents a crumbly bottom. Use a measuring cup or glass to press it down in layers, then chill the pan for 20 minutes before filling. Skimp here, and your tart will taste like a sad, sandy puddle.
- MELT CHOCOLATE LOW AND SLOW: Dark chocolate seizes when it hits steam or hot spots. Microwave in 30-second bursts at 50% power, stirring between each, until just smooth. If using chocolate chips, toss them in the heavy cream first—this melts them evenly without burning. (Yes, even if you're impatient like me.)
- CHILL THE CREAM FILLING: Whip the heavy cream to stiff peaks, then fold in melted chocolate immediately and pop the mixture in the fridge for 15 minutes. This stops the filling from sliding out of the tart when you cut it. I used to skip this, and half my slices would flop onto the plate like sad pancakes.
- USE A LITTLE LESS SUGAR: The graham cracker crumbs already have sugar, and dark chocolate is bitter enough on its own. Cut the granulated sugar by 1-2 tablespoons unless you're going for a caramelized crust. Trust me, the chocolate flavor will sing louder—and your tart won’t taste like a dessert from the 1950s.
Storing and reheating this dish
Refrigerator Storage
Store your baked tart in an airtight container lined with parchment paper to prevent sticking. Keep it refrigerated for up to 3 days—the ganache will firm up but still maintain its glossy sheen.
I like using glass containers because they don’t absorb odors like plastic. Let it sit at room temperature for 10-15 minutes before slicing to restore that perfect molten texture. 🌟
Freezer Storage
For longer storage, wrap the tart tightly in plastic wrap followed by aluminum foil to prevent freezer burn. It keeps beautifully for up to 2 months in the freezer. When ready to serve, thaw in the refrigerator overnight, then let it sit at room temperature for 20 minutes before slicing.
The crust stays crisp, and the ganache softens just enough to create those dreamy rivers again. ❄️
Reheating for Serving
If your tart has been refrigerated, reheating it briefly brings back that restaurant-quality shine. Place individual slices on a baking sheet and warm at 300°F for 2-3 minutes—just enough to soften the ganache slightly without melting it completely.
For a quicker fix, microwave for 10-15 seconds on low power, then let it rest for 30 seconds to redistribute the heat evenly. 🔥
Portioning for Parties
For gatherings, slice the tart into 8 equal wedges and arrange them on a platter. To keep the ganache from melting too quickly, serve it at room temperature but place the platter in a cooling rack on top of a bed of ice.
This trick keeps the tart stable while allowing guests to enjoy that perfect balance of firm and molten. Garnish with flaky sea salt or fresh raspberries just before serving for extra flair. 💫
Reviving Stale Ganache
If the ganache loses its gloss or becomes too firm, don’t toss it! Place the tart in a 200°F oven for 5-7 minutes—this gently reheats the ganache without overcooking the crust.
For a more dramatic fix, microwave a single slice for 5 seconds, then let it rest for 1 minute to reset the texture. The result? A tart that tastes like it was just made. 💡
Make-Ahead Tips
Assemble the tart 24 hours ahead and refrigerate—this gives the ganache time to set perfectly. If you’re prepping for a party, slice it into individual portions and wrap each piece in parchment paper.
Store in the fridge until ready to serve; this keeps the ganache from spreading and maintains clean slices. For a head start, bake the crust a day in advance and store it in an airtight container at room temperature. 📅
Nutrition facts
Frequently asked questions
Can I use a different type of chocolate for the ganache?
While 70% dark chocolate creates the best balance of richness and smoothness, you can experiment with 60% for a sweeter profile or even milk chocolate for a creamier texture. For a bold flavor, try 85% dark chocolate, but reduce the powdered sugar slightly since it's less sweet. Always use high-quality chocolate—it makes a noticeable difference in the final result.
Why did my crust turn out soggy?
Soggy crusts usually happen when the ganache is too warm or the crust wasn't fully baked. Let the crust cool completely before adding the ganache, and ensure it's golden and firm to the touch. If the ganache is too hot, chill it for 5-10 minutes before pouring. Another trick: blind-bake the crust for 5 extra minutes to remove any moisture.
How do I make this recipe vegan?
Swap the butter for vegan butter or coconut oil, use coconut cream instead of heavy cream, and replace egg yolks with flaxseed meal mixed with water (1 tbsp flax + 3 tbsp water = 1 egg). For the crust, try almond flour or oat flour instead of all-purpose flour. The ganache will still set beautifully, though it may have a slight coconut note.
Can I prepare the crust ahead of time?
Yes! Bake the crust up to 3 days in advance and store it in an airtight container at room temperature. For longer storage, freeze it for up to 1 month. Thaw completely before adding the ganache—this prevents condensation from making the crust soggy. Pre-baking saves time and ensures a perfectly crisp base.
What’s the best way to create those signature chocolate rivers?
After pouring the ganache, use the back of a spoon to create shallow grooves while the chocolate is still warm but starting to set. Let it chill for 3-4 hours to firm up slightly, then return to room temperature for 10 minutes before serving. The rivers should be firm enough to hold their shape but still soft enough to melt with the first bite.