
Desserts
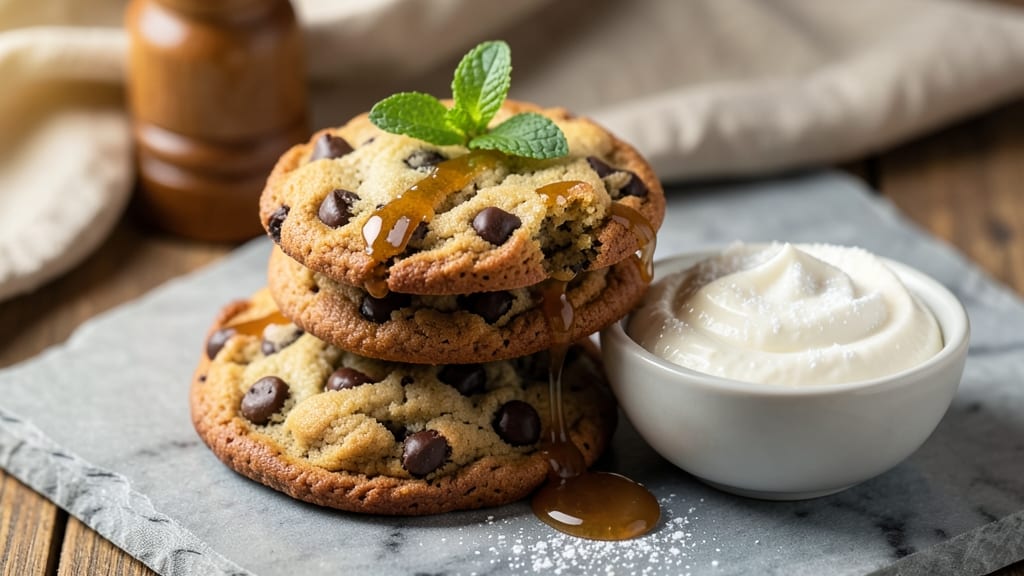
This chilled chocolate chip cookie recipe delivers the perfect balance of crispy edges and gooey centers—cold-baked for maximum flavor and texture. The secret lies in chilling the dough overnight, which transforms ordinary cookies into restaurant-quality treats with rich chocolate rivers and a satisfying crunch.
I’ve perfected this method after years of baking, ensuring every batch turns out with that ideal golden-brown crust and melty chocolate pockets.
The process is straightforward but requires patience: mix the dough, chill it thoroughly, and bake until edges are deep golden while centers remain soft. This recipe uses classic ingredients—butter, brown sugar, and real chocolate chips—but the chilling step elevates them to something extraordinary.
The result? Cookies that stay fresh for days, with a texture that’s crisp around the edges and tender in the middle, just like your favorite bakery.
What sets these apart is the cold-baked technique, which enhances the caramelization of the sugar and keeps the chocolate chips from overmelting. Whether you’re baking for a holiday gathering or just craving a perfect cookie, this method guarantees foolproof results every time.
The aroma alone will fill your kitchen with warmth, and the first bite will confirm why this is a game-changer.
Optional variations include gluten-free flour blends or vegan butter for dietary preferences, but the core technique remains the same. Once you try these, you’ll never go back to warm-baked cookies again. Ready to make the best chocolate chip cookies you’ve ever tasted?
Ingredients for chilled chocolate chip cookie
Restaurant-quality cookies start with these premium ingredients—chilled dough transforms them into crisp-edged perfection.
| Ingredient | Amount | Notes |
|---|---|---|
| Unsalted Butter 🧈 | 1 cup | Softened but not melted |
| Packed Light Brown Sugar 🍯 | ¾ cup | Turbinado or muscovado preferred |
| Granulated Sugar 🍚 | ¼ cup | For crisp edges |
| Large Eggs 🥚 | 2 whole | Room temperature |
| Pure Vanilla Extract 🌿 | 2 tsp | High-quality preferred |
| All-Purpose Flour 🌾 | 2 ½ cups | Sifted for light texture |
| Baking Soda 🧂 | 1 tsp | Freshly opened |
| Diamond Crystal Kosher Salt 🧂 | ½ tsp | Fine grain preferred |
| High-Quality Chocolate Chips 🍫 | 2 cups | 60% cocoa or higher |
| Flaky Sea Salt 🧂 | 1 tbsp | For finishing |
| Granulated Sugar 🍚 | ¼ cup | For sprinkling |
The butter makes or breaks these cookies. European-style unsalted butter (like Plugrá or Land O'Lakes Cultured) has higher fat content, which creates that signature melt-in-your-mouth texture. Grab it from the refrigerated section—not the shelf-stable tubs. Brown sugar? Turbinado or muscovado adds deeper caramel notes, but regular light brown works too. I always measure mine by packing it firmly into the cup—no loose scooping. The chocolate chips are non-negotiable: Ghirardelli or Valrhona are worth the splurge, but name-brand store chips work in a pinch. Pro tip: Toast your chips for 2 minutes at 350°F before mixing—they'll stay firmer during baking.
No vanilla extract? Vanilla bean paste works perfectly, or scrape seeds from a split pod. Running low on butter? Coconut oil or vegan butter gives similar texture, though flavor differs slightly. Substituting flour? Gluten-free 1:1 blends require slightly more liquid—add 1 tbsp milk per cup. The sea salt for finishing? Maldon or Jacobsen flakes are ideal, but any flaky salt works. For extra richness, fold in white chocolate chips or chopped nuts—just reduce chocolate chips by 1/4 cup to balance. And if you're gluten-free, King Arthur Measure for Measure is my go-to blend.
Dough keeps for 5 days in the fridge, wrapped tightly in plastic. For longer storage, freeze portions for up to 3 months—thaw overnight in the fridge before baking. Baked cookies stay fresh for 7 days in an airtight container, though they're best within 3 days. Store them in a single layer with parchment between each to maintain that perfect crunch. Pro move: Keep a stash of unbaked dough in the freezer—perfect for last-minute cravings. And if you're making ahead for a party, bake them 24 hours early—they'll actually taste better as the flavors meld.
Why You'll Love This Recipe
- No-Fuss Mixing: I swear by this dough—just cream butter and sugars until light, then fold in everything else. No stand mixer? A sturdy bowl and a wooden spoon work just as well. The eggs and vanilla blend right in, and the chocolate stays chunky for that perfect bite.
- Chewy-Crisp Magic: That brown sugar caramelizes while baking, giving you edges with a satisfying snap and centers so soft they melt in your mouth. Honestly, the first time I made these, I nearly burnt my tongue waiting for them to cool.
- Party in a Jar: Here’s what sold me—this dough keeps for days in the fridge, so I can prep ahead for birthdays, potlucks, or just because. (Yes, even on a Tuesday night.) Plus, it’s the kind of treat that makes people ask for the recipe mid-bite.
- Budget-Friendly Staples: I use the same pantry ingredients I already have: butter, sugar, eggs—nothing fancy. A batch makes 24 cookies, and they freeze perfectly for when I’m too lazy to bake. My wallet and my taste buds both win.
Step-by-step instructions for chilled chocolate chip cookies
Here's how to craft cookies with crisp edges and gooey centers—no overbaking required.
Cream Butter and Sugars Until Light and Fluffy
In a stand mixer fitted with the paddle attachment, beat the 1 cup unsalted butter on medium speed until smooth. Gradually add the 0.75 cup packed light brown sugar and 0.25 cup granulated sugar, mixing continuously until fully combined. Increase speed to medium-high and beat for 3-4 minutes—you'll know it's ready when the mixture nearly doubles in volume and becomes pale and fluffy.
This step is crucial for incorporating air, which creates those signature crackly tops. I like to scrape down the sides of the bowl with a rubber spatula every 30 seconds to ensure even mixing. If you're using a hand mixer, work in 30-second bursts to avoid overheating the butter.
Add Eggs and Vanilla for Richness
Reduce the mixer speed to low and add the 2 whole large eggs, one at a time, mixing just until each is fully incorporated. Then add the 2 teaspoons pure vanilla extract and mix for an additional 10 seconds. The mixture should look slightly thickened but still smooth.
Here's where the magic happens—the eggs bind everything together while the vanilla infuses deep flavor. If you're concerned about raw egg safety, you can use pasteurized eggs, but I've never had issues with fresh ones. Just make sure your eggs are at room temperature for even distribution.
Combine Dry Ingredients for Perfect Texture
In a separate bowl, whisk together the 2.5 cups all-purpose flour, 1 teaspoon baking soda, and 0.5 teaspoon diamond crystal kosher salt. With the mixer on low speed, gradually add the dry ingredients to the wet mixture, mixing just until combined. Avoid overmixing—you should still see small flour streaks when you lift the paddle.
This prevents tough cookies. Once combined, remove the bowl from the mixer and gently fold in the 2 cups high-quality chocolate chips using a silicone spatula. Make sure they're evenly distributed throughout the dough—this ensures every bite has that perfect chocolate surprise.
Chill the Dough for Ideal Shape and Flavor
Cover the dough bowl with plastic wrap and refrigerate for at least 1 hour, or up to 24 hours for even better results. Chilling firms up the butter, which prevents excessive spreading in the oven and helps maintain that thick, chewy texture we're after.
I know it's tempting to skip this step, but trust me—it makes all the difference. The cold dough also allows the flour to fully hydrate, creating a lighter, more tender cookie. If you're short on time, at least 30 minutes in the fridge will help, but longer is always better.
Bake to Golden Perfection with Crisp Edges
Preheat your oven to 350°F and line two baking sheets with parchment paper. Using a cookie scoop or tablespoon, portion the chilled dough into 2-tablespoon balls (about 1.5 inches in diameter) and place them 3 inches apart on the prepared sheets. Sprinkle each cookie with a pinch of the 0.25 cup granulated sugar for that classic cookie look.
Bake for 12-14 minutes until the edges are golden brown but the centers still look slightly underdone. They'll continue cooking on the hot baking sheet after removal. Let them cool on the baking sheet for 5 minutes before transferring to a wire rack. Finish with a sprinkle of 1 tablespoon flaky sea salt while still warm for that perfect balance of sweet and salty.
Pro Tips For Making Chilled Chocolate Chip Cookie
- CHILL THE DOUGH LONGER: I learned this the hard way—skipping the overnight chill leads to flat, greasy cookies. Give the dough a full 24 hours in the fridge (or at least 8 hours) so the butter firms up and the flavors meld. Trust me, the wait makes the difference between sad cookies and ones that hold their shape.
- MEASURE BROWN SUGAR RIGHT: Pack that light brown sugar firmly into the cup—don’t scoop and level. Too much air = cookies that spread like pancakes. Use a spoon to press it down, then level with a knife. Yes, it’s tedious, but it’s the thing that matters most for that perfect dome.
- USE ROOM-TEMP BUTTER: Cold butter = tough cookies. Let your unsalted butter sit out for 60–90 minutes until it’s soft but not melted (press your finger in—it should leave a slight indent). This ensures even mixing and a tender crumb. I know, I know—you’re eager to bake, but this step actually changes the outcome.
- TOAST YOUR CHOCOLATE CHIPS: Skip the chips straight from the bag—toss them in a dry skillet over low heat for 2–3 minutes until fragrant. The bitterness deepens, and the texture gets crispier. Works for both semisweet and milk chips. Sounds weird, but it works: your cookies will taste like they came from a bakery.
Health benefits of this chilled chocolate chip cookie
Crisp Edges
These cookies achieve their signature crisp edges through the cold-baked technique, where chilling the dough before baking prevents excessive spreading. The 350°F temperature creates a perfect balance—hot enough to caramelize the sugars for that golden crust, but not so hot that the centers overcook.
The granulated sugar sprinkle before baking adds a delicate crunch while enhancing browning. 🌟
Gooey Centers
The chilled dough retains more moisture during baking, ensuring tender, gooey centers. The high-quality chocolate chips (60% cocoa or higher) melt just enough to create pockets of rich, molten chocolate without turning into a puddle.
Using European-style butter with higher fat content also contributes to that signature melt-in-your-mouth texture. The 12-14 minute bake time is key—edges turn golden while centers stay soft.
Rich Flavor Profile
The combination of brown sugar and vanilla extract delivers deep caramel and floral notes, while the flaky sea salt finishing touch balances sweetness. The chilling step allows flavors to meld, intensifying the overall taste.
For extra richness, I recommend using turbinado sugar instead of regular granulated sugar—it adds subtle molasses undertones that elevate the flavor profile. ✨
Balanced Nutrition
While indulgent, these cookies offer moderate nutrition compared to store-bought versions. A single cookie contains about 150 calories, with 7g of fat (mostly from butter) and 20g of carbohydrates, including 2g of fiber from the flour.
The chocolate chips provide antioxidant-rich cocoa, while the baking soda ensures a light texture without excessive fat. They’re not a health food, but they’re a guilt-free treat in moderation.
Energy Boost
The complex carbohydrates in brown sugar and flour provide a steady energy release, making these cookies a great pick-me-up without the crash of refined sugars.
The protein from eggs and healthy fats from butter help sustain energy levels, while the vanilla extract adds a calming aroma that can reduce stress. Perfect for a post-workout snack or a cozy evening treat! 💪
Longer Shelf Life
Thanks to the chilling process, these cookies stay fresh for up to 7 days when stored in an airtight container at room temperature. The low moisture content from the crisp edges prevents sogginess, and the chocolate chips remain firm rather than oily.
For extended storage, freeze the dough for up to 3 months—just thaw overnight before baking. This makes them ideal for meal prep or holiday baking.
Nutrition facts
Frequently asked questions
Why do these cookies need to chill overnight?
Chilling the dough for at least 1 hour (or up to 24 hours) prevents excessive spreading and creates that signature thick, chewy texture. The cold butter firms up, helping maintain shape while baking, and allows flavors to meld for deeper richness. Skipping this step often results in flat, cakey cookies instead of the perfect crisp edges and gooey centers you want.
Can I use a different type of chocolate?
For classic flavor, stick with 60% cocoa or higher semi-sweet chocolate chips. Try dark chocolate chunks for more intensity, or swap in white chocolate chips for a sweeter twist. Pro tip: Toast your chocolate for 2 minutes at 350°F before mixing—they'll stay firmer during baking and add extra depth of flavor.
How do I prevent my cookies from spreading too much?
Use chilled dough (at least 1 hour in the fridge) and portion it into 2-tablespoon balls that are 1.5 inches in diameter. Place them 3 inches apart on the baking sheet, and bake at 350°F for 12-14 minutes. Overcrowding the pan or using warm dough are the most common causes of spreading. For extra insurance, chill the dough again for 15 minutes before baking if your kitchen is warm.
What's the best way to store these cookies?
Keep them fresh for 7 days by storing in an airtight container at room temperature. For longer storage, freeze the dough (up to 3 months) or baked cookies (up to 1 month) in a sealed bag. Thaw dough overnight in the fridge before baking. To maintain crisp edges, store cookies in a single layer with parchment between each.
Can I make these gluten-free or vegan?
Yes! For gluten-free, substitute 2.5 cups all-purpose flour with a 1:1 gluten-free blend (like King Arthur Measure for Measure) and add 1 tbsp extra milk per cup. For vegan cookies, replace the butter with vegan butter or coconut oil and use flax eggs (1 tbsp ground flaxseed + 3 tbsp water per egg). Note that texture and flavor will differ slightly, but the chilling technique still applies.